Welcome to the new Attica e-banking. From now on, you can use the Master User role to manage the capabilities and limits of other Users, the accounts, the daily limits and the authentication scheme of the Corporate Customer in a safe, quick and directly manner.
Introduction
From now on, you can use the Master User role to manage the capabilities and limits of other Users, the accounts, the daily limits and the authentication scheme of a corporate customer in a safe, quick and directly way.
At the top of the homepage, as at the top of every other page through your navigation you can view a toolbar that contains the following icons:
- Attica Bank’s Logo. By clicking it (mouse click), you are transferred to Attica Bank’s homepage.
- “Branches”. By clicking it, you are re-directed to the corresponding page of the Attica Bank’s site where all branches & ATMs are listed.
- Attica Bank’s contact number.
- “Language” selection option (Greek/ English).

Attica e-banking Logo is also visible at the top left corner of the homepage, as in any other navigation page through the application, and it gives you the option, by clicking it, to be re-directed to the dashboard of Attica e-banking . The same re-direction can also be achieved by pressing the icon  , at the top of the right corner of any page.
- By selecting the messages icon
 , you can view the secure messages sent by Attica Bank to you through the e-banking application. You can reply to these secure messages or create a new message if you have an inquiry to a specific subject.
- If you need any assistance, at any point throughout your navigation, you can press the question icon
 , which is located at the top right toolbar of any navigation page, and you will be re-directed to a menu which contains details to the e-banking use as well as answers to the most Frequently Asked Questions (FAQ).
- In order to log out from Attica e-banking, you click the ON/OFF icon
 , located at the top right toolbar.
The application informs you about your last login details to Attica e-banking.
The 'Master User' role
In Attica e-banking, Corporate Users can have multiple Users with different assigned roles. The Master User to whom you are logged in, has the role to manage all the other Users of the Company.
The Master User is able to execute the following available transactions:
Transactions for Master User
- Change Username
- Change Password
- Enroll to One–Time-Password (OTP) SMS
- Activate One–Time-Password (OTP) SMS
- Activate One–Time-Password Hardware Token
Transactions for the Company
- Manage Daily Limits for all available monetary transactions
- User Management (create and modify all other Users’ roles characteristics: Maker, Authorizer, Maker & Authorizer)
- Account Management (assign corporate accounts to other Users and determine their access level)
- Fund Transfer Management (assign fund transfers to Users and determine their daily transfer limits)
- Authentication Scheme Settings (regarding Corporate Users who have a two - level authentication schema)
- Authentication Schema Management
- Notifications Alerts Settings
- Users’ Online Transaction History
The Master User himself does not have the right to execute monetary transactions, i.e. he is not able to make or to authorize a monetary payment.
Transactions for Master User
Change Username
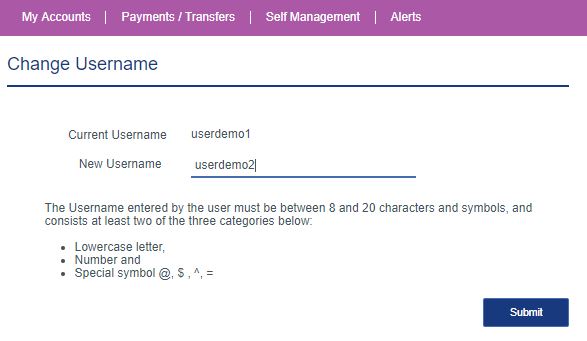
In this section, you are given the option to change your Username. As it is shown above, the Username entered must be between 8 to 20 characters and symbols, and contain at least 2 of the following:
- Lowercase letter
- Number and
- Special Symbol such as @, $, ^, =
In addition, your Username must not contain any space characters and has to be completely different from the old one and unique.
Fill in the empty field “New Username” with your new Username and press “Submit”. Subsequently, you will be requested to “Confirm” any changes made.
You will be notified via email and SMS that your Username has been changed.
Change Password
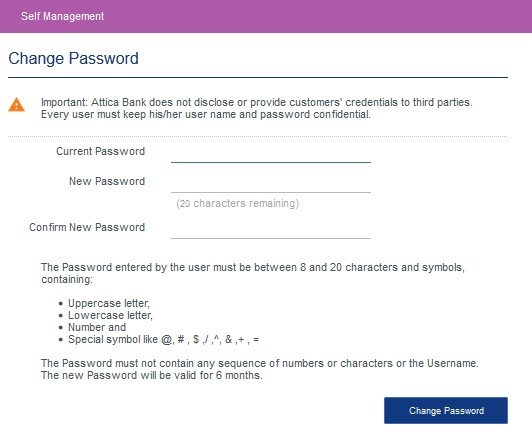 In this section, you can change your Password. As shown on the above screen, the Password entered must be between 8 and 20 characters, containing:
- Uppercase letter
- Lowercase letter
- Number
- Special symbol such as @,#,$,/,+,=
In addition, it must not contain any sequence of numbers or part of the Username, or space characters. The new password must be different from the old one.
In order to change your Password, fill in the text fields referencing to your Current Password, the New Password, and the confirmation of the New Password. Then, press “Change Password”.
Successively, you will be requested to “Confirm” the Password change.
You will be notified via email and SMS that your Password has been successfully changed.
The new Password will be actively valid for 6 months.
Register for SMS OTP
One-Time-Password (OTP) via SMS (SMS Token) is sent to the mobile phone number that you have declared to the Attica Bank. In case that your mobile number is not registered to Attica Bank’s core system, you have to get in touch with the closest Attica Bank branch in order to update your mobile phone details and your current email address as for the Bank to be able to contact you.
If you have already registered for SMS OTP, by selecting the tab “Register for OTP”, the following message will appear on your screen:

On the other hand, if you have not been registered for SMS OTP yet, your registration can be achieved using the following 2 ways:
- contact Attica Bank’s Help Desk on the phone numbers: (+30) 210 3669000 or 801-11-50090 (from Greek home phone number, with an urban unit charge), in order to be registered
- Through Attica e-banking:
- Under “Self-Management” menu, select “Register for SMS OTP”.
Then, the following screen will appear, which contains the User’s mobile phone and the “Submit” button as shown below:
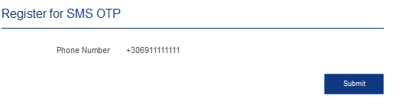
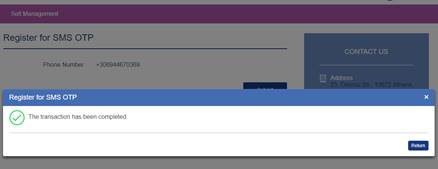
- In order for the User to be registered for SMS OTP, he/she has to press “Submit” and then to enter the 8-digit OTP generated by his Hardware Token as shown in the screenshot below. Successively, the User has to press “Confirm”.
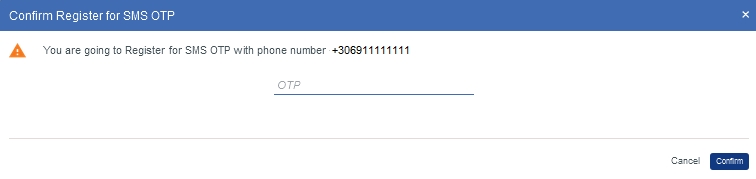
When the transaction is completed, the User is notified respectively. Subsequently, he/she will be having to activate the SMS OTP.
Activate/Verify SMS OTP
In order to activate / verify SMS OTP, after having registered to the corresponding service, the following steps are followed:
Under “Self Management” menu, select “Activate / Verify SMS OTP” in order to activate the service.
In case you have not registered to the SMS OTP yet, you will get notified with a corresponding message that clarifies that you have to register first.
If the SMS OTP is not yet activated, the following screen will appear that contain your mobile number and the “Submit” button:

In order for SMS OTP to be activated, the User must press “Submit” and then select “Sent OTP via SMS” from the following screen that will appear:

Using “Sent OTP via SMS”, an OTP is sent to the User’s mobile number via SMS. The OTP has to be entered on the corresponding field as shown in the screenshot above. Then, Press “Confirm”.
As a last point, the User gets informed that the transaction is completed and from now on, he/she will be able to use an SMS OTP for the completion of his/her financial transactions
Note:
- The 8-digit SMS OTP has a maximum valid duration of two (2) minutes.
- The 8-digit SMS OTP can be only used once and for only one transaction.
- The SMS OTP is blocked / de-activated temporarily after 3 wrong attempts to insert the SMS Token. In such a case the user has to contact Attica Bank’s Help Desk Contact Numbers: (+30) 2103669000 or 801-11-50090 (from Greek home phone number, with an urban unit charge) in order to be activated again.
Enable Hardware Token
In case you have neither activate Hardware Token nor the SMS OTP, then you have to get in touch with the Help Desk of Attica Bank or an Attica Bank’s branch, in order to activate the Hardware Token. In that case, if you select “Enable Hardware Token”, the following message will appear on the screen:

If the SMS OTP is already activated, then the following screen will appear:
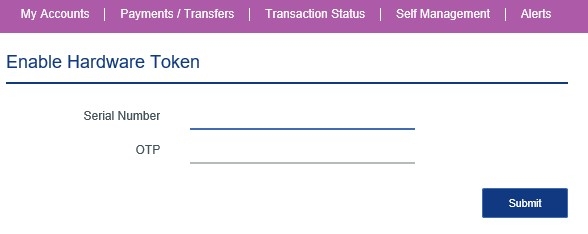
You will have to enter the serial number of your Hardware Token device which can be found at the back of the device and successively a One-Time-Password (OTP) generated from this device.

By pressing “Submit” you will get notified with a confirmation message. Your Hardware Token device has been successfully activated and from now on you can use it to your financial transactions.
Transactions for the Company
Daily Limits Management
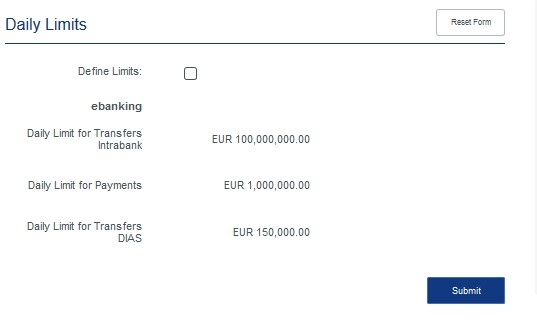
Daily Limits Management is a feature that enables the Master User to define a daily limit for the Company’s monetary transactions.
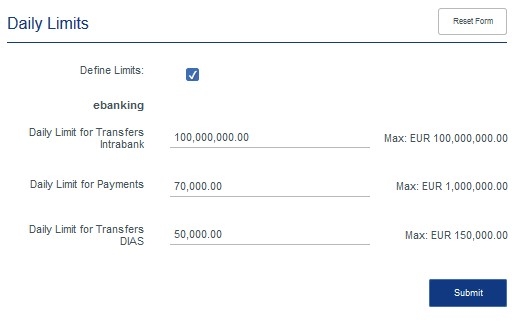
Under this option, as a Master User, you can define the maximum daily limits to the Company’s monetary transaction regarding:
- Intrabank Transfers (transfers between your Company’s own accounts, transfers to another Attica bank account of a third party, third party Attica Credit Card Payment, Load Prepaid Card)
- Payments (Pay a bill to a Utility Company)
- DIAS Transfers (Transfers to another domestic or foreign Bank Institution, another bank’s Credit Card Payment)
The total amounts of transfer funds per category that are executed from all the assigned Users in a day, cannot exceed the corresponding limits. In addition, the daily limits that will be defined cannot be higher from the daily limits that have been determined by the Bank to these transaction categories: intrabank transfers, payments and DIAS transfers.
By selecting “Daily Limits Management”, the following screen appears, which contains the maximum daily limits that have been determined by the Bank:
By selecting “Define Limits”, you can define the daily limits for the Company:
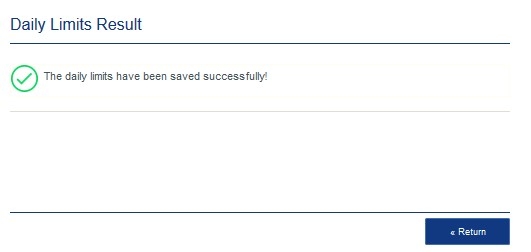
By selecting “Submit”, the confirmation of the daily limits page appears:

By selecting “Confirm”, a confirmation message appears on the screen:
By selecting “Return”, you are re-directed to the Daily limits first page.
User Management
Under this option, as a Master User you can create new Users andmodify the details of the already existing Users of the Company.

Form Information:
|
+ New User |
Create New User |
|
Username |
Username assigned to each User |
|
Type |
The User’s role. The possible roles are:
|
|
Status |
Active or Inactive |
|
Full Name |
User’s full name |
|
Information Icon |
View Further information |
|
Modify icon |
User’s modification |
In case that there are no other Users created, only the Master User appears on the above shown list.
3.7.1 New User
By selecting +New User, a form appears on the screen where you can create a new User to Attica e-banking: .
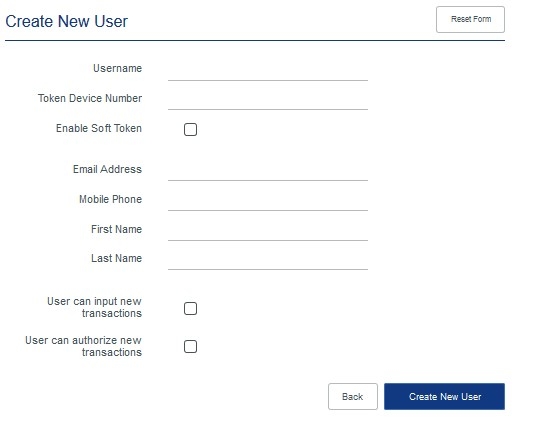
Form Information:
|
Username |
New User’s Username is recorded. The Username entered must be between 8 to 20 characters and symbols, and contain at least 2 of the following:
|
|
Token Device Number |
It is filled in only if a Hardware Token has been assigned to the User. The serial number is found at the back of the Hardware Token device. The aforementioned device must have been assigned to the Corporate User from the corresponding Bank’s branch . |
|
Enable Soft Token (SMS) |
By ckeckboxing this Form, the Master User enables the new User to SMS OTP. In order for this feature to be activated, the new User will have to activate it via his Attica e-banking account. |
|
Email Address |
User’s email address. It is used for Attica e-banking messages and notifications alerts. |
|
Mobile Phone |
User’s mobile phone. The mobile phone must start with + (Country code) and then the phone number. E.g. +3069xxxxxxxx |
|
First Name |
User’s First Name |
|
Last Name |
User’s Surname |
|
User can input new transactions |
The new User is able to enter data for a new monetary transaction. This role is defined as “Maker” on Attica e-banking. See note. |
|
User can authorize new transactions |
The new User is able to authorize a new monetary transaction. By checking this box, new fields on transaction limits are displayed.. This role is defined as “Authorizer” on Attica e-banking. See note. |
Note: A user can simultaneously be a Maker and an Authorizer. This means that he/she would be able to enter the details of a new transaction, and authorize it himself/herself.
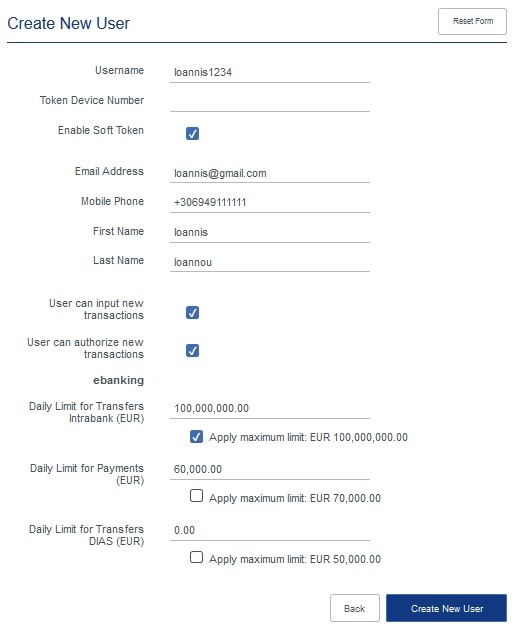
In case you have selected a User to be defined as “Authorizer”, then on the creation page of a new user , by selecting the checkbox “User can authorize new transactions”, will open new fields where the daily transaction limits per transaction category have to be defined:
|
Daily Limit for Intrabank Transfers (EUR) |
The total amount that the User can authorize in Intrabank Transfers (transfers between your Company’s own accounts, transfers to another Attica bank account of a third party, third party Attica Credit Card Payment, Load Prepaid Card). There is the option to define a different, smaller than the maximum daily limit that has been determined from the Master User for the Company through “Daily Limit Management”. |
|
Daily Limit for Payments (EUR) |
The total amount that the User can authorize in Payments (pay a bill to a Utility Company). There is the option to define a different, smaller than the maximum daily limit that has been determined from the Master User for Company through “Daily Limit Management”. |
|
Daily Limit for Transfers DIAS (EUR) |
The total amount that the User can authorize in DIAS Transfers (Transfers to another domestic or foreign Bank Institution, another bank’s Credit Card Payment). There is the option to define a different, smaller than the maximum daily limit that has been determined from the Master User for the Company through“Daily Limit Management”. |
Here is an example of the aforementioned form:
By selecting “Create New User”, the confirmation pop-up window appears on the screen, containing all the filled in data of the aforementioned form.

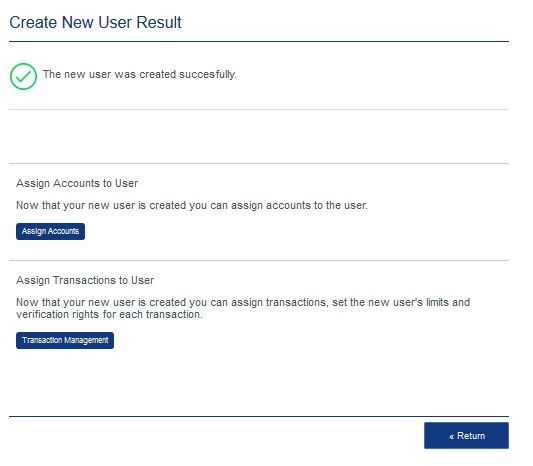
By selecting “Confirm”, the New User’s details are entered into the system. A successful transaction message with options either to assign accounts or manage transactions appears on the screen.
By selecting “Return”, you are re-directed to the page that contains the list of the Company’s Attica e-banking Users.
By selecting “Assign Accounts”, the corresponding screen appears where as Master User you can define the access level of the new User (no restriction, display only, and no display) to each particular account .
By selecting “Transaction Management”, the corresponding screen appears where as Master User you can define which transactions and up to which limit the particular User is assigned to manage or authorize.
3.7.2 Users List
In Users list, by selecting the information icon, the following screen appears containing relevant information of the User.

By selecting “Back”, you are re-directed to the Users List.
3.7.3 Modify User
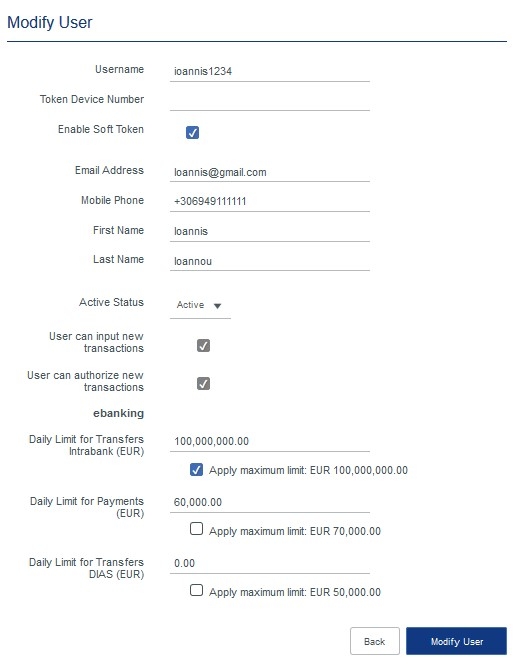
By selecting the modify icon on the Users List, the following screen appears where as Master User you can modify any User’s data.
By selecting “Modify User”, the respective screen appears when you can compare a User’s old details to the new ones.
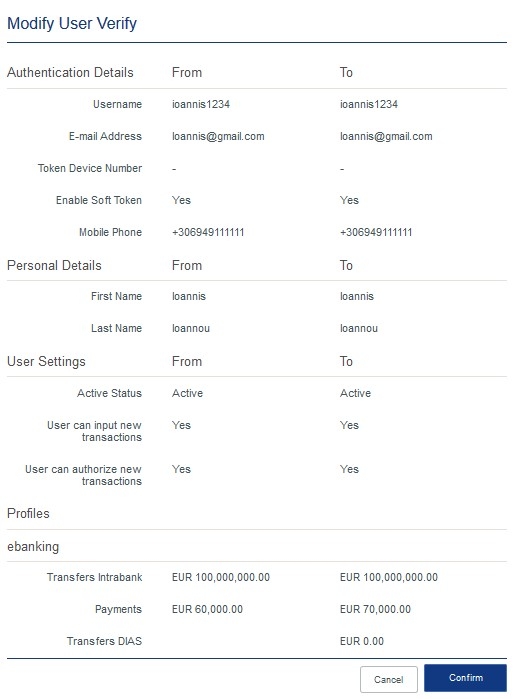
By selecting “Confirm”, a successful message of the modification changes appears on the screen and the aforementioned changes are saved to the Bank’s system.

By selecting “Return”, you are re-directed to the Company’s Attica e-banking Users List.
Account Management
In “Account Management“ you can manage the access level of each particular User to a Company’s account , i.e.you can assign which accounts Users will view, no view or execute transactions through .
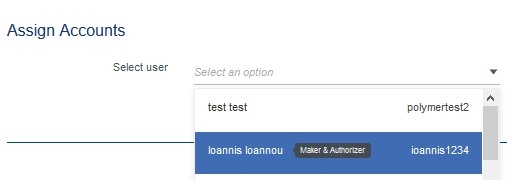
On the following screen, select the User of interest to whom particular access levels will be assigned.
By selecting a User, a screen containing all the Company’s accounts in Attica Bank appears, ordered by account type:
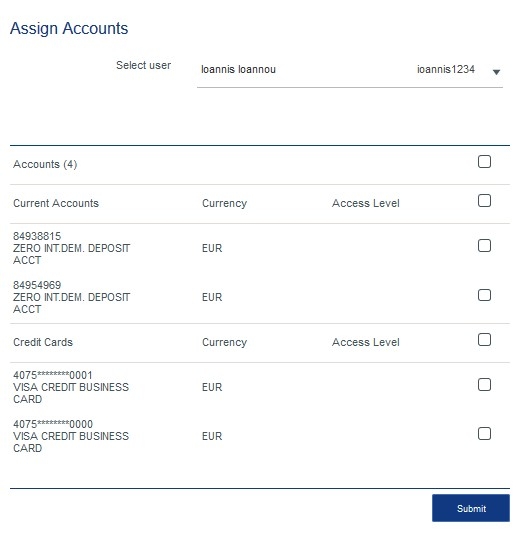
For each particular account (or for each particular account category – by selecting the corresponding- check box), you may select:
|
Access level |
Action |
|
No display |
Check box is deactivated |
|
Display Only, without the ability to realize transactions |
Check box activated, with option Display only from the list |
|
No restriction |
Check box activated, with option No restriction from the list |
Example:
By selecting “Submit”, the confirmation page of Accounts Management and the Access level of the User to each account appears on the screen.
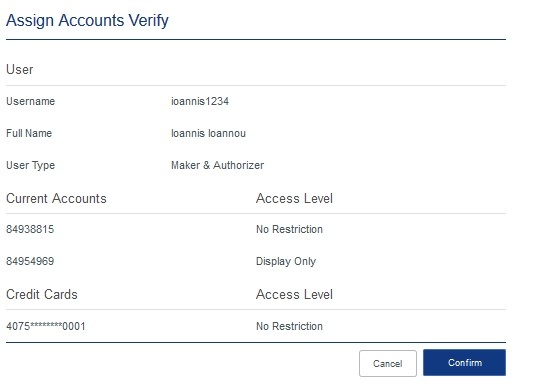
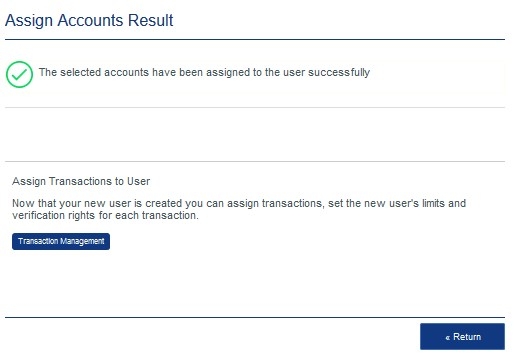
By selecting “Confirm”, a successful confirmation message appears on the screen and the changes are successfully saved to Attica e-banking.
By selecting “Return”, the Account Management page appears.
In case that there are no transactions assigned to a New User, the option “Transaction Management” is given.
Transaction Management
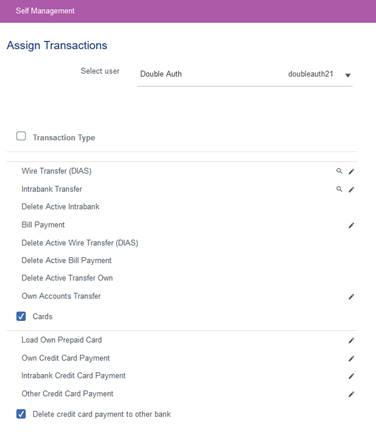
In this section, as a Master User you can assign transactions to the Users, i.e. to give the possibility to particular Users to make, or/and authorize particular transactions.
On the page that follows, you select the User of interest from the Users List to whom you wish to assign transactions.
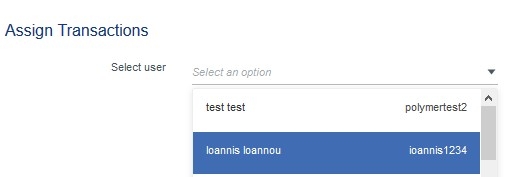
By selecting a User, the respective (for a maker or an authorizer) screen reffering to the transactions that this particular User can execute through Attica e-banking appears.
3.9.1 Maker
In case of a “Maker”, the User’s full name and Username, as defined upon creation of the user, as well as a list of all possible transactions are shown on the screen:
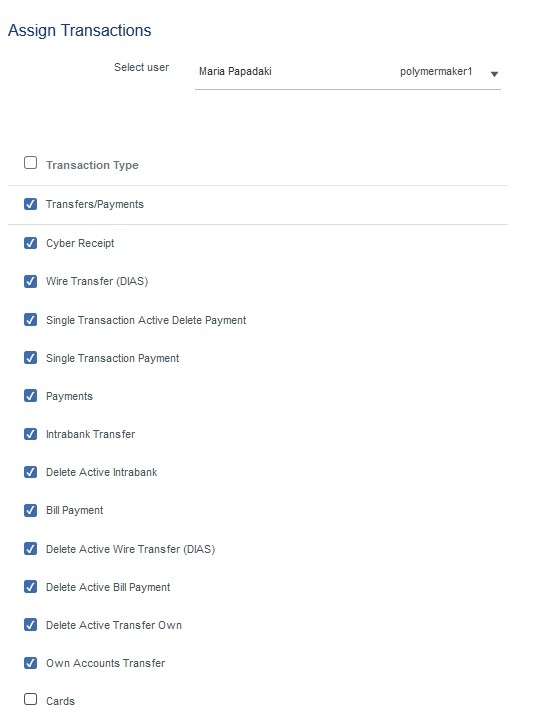
From the above list, the Master User can select the transactions to be assigned to a Maker. The transactions can be monetary, managerial or informational. The Master User can select:
- The transactions one-by–one
- A specific category, where all the transactions included are automatically selected
- The “Transaction Type”, where all the transactions from the corresponding type are automatically selected.
3.9.2 Authorizer
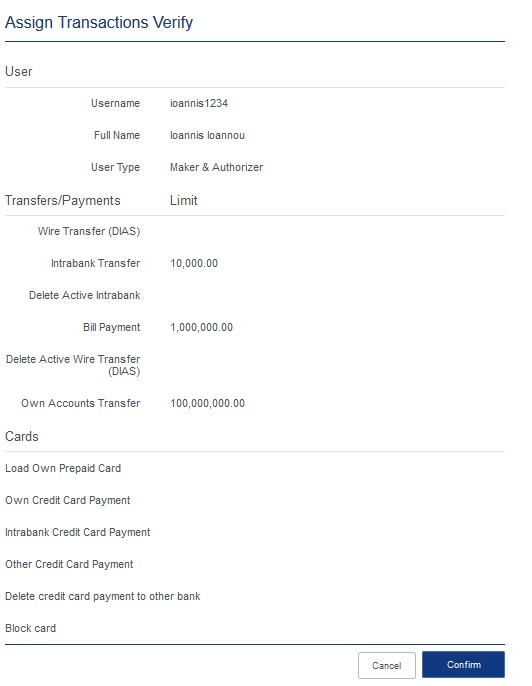
In case of an “Authorizer”, the User’s full name and Username, as defined when created, as well as a list of all possible transactions, and in case that these transactions are monetary, the limit thereof, are shown on the screen:
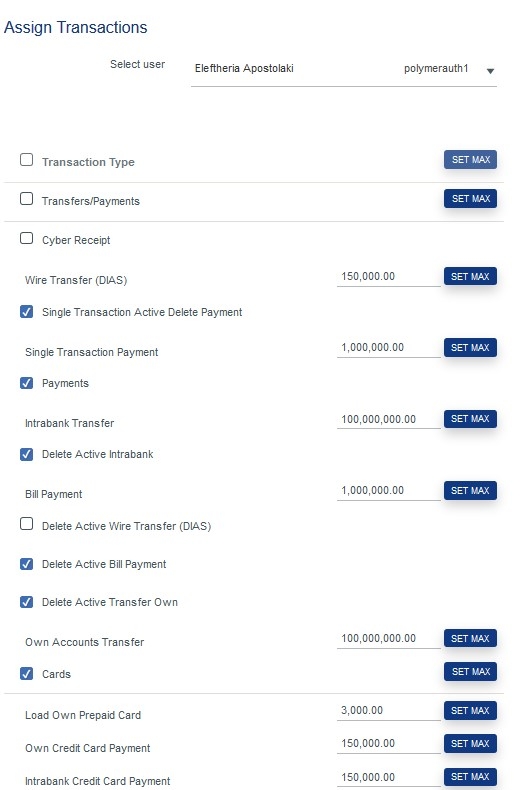
From the above list, the Master User can:
- Select which monetary transactions can be authorized by the Authorizer. In order to do so, Master User has to define a limit to the relevant field next to each transaction. There is the option either to define a specific limit , or to select the maximum allowed limit per transaction, or per category transaction, or the total maximum allowed limit. If a limit has been defined for a particular transaction, the transaction is assigned to the Authorizer up to this specific amount limit.
- Select (check box) which non-monetary transactions (managerial, informational) the Authorizer can make.
- Select the total transactions of a particular category or of particular transaction type. In that case, the transactions that are included in that category or transaction type are automatically selected. The Master User can also select the maximum allowed limit to the transactions as a total, per category or per transaction
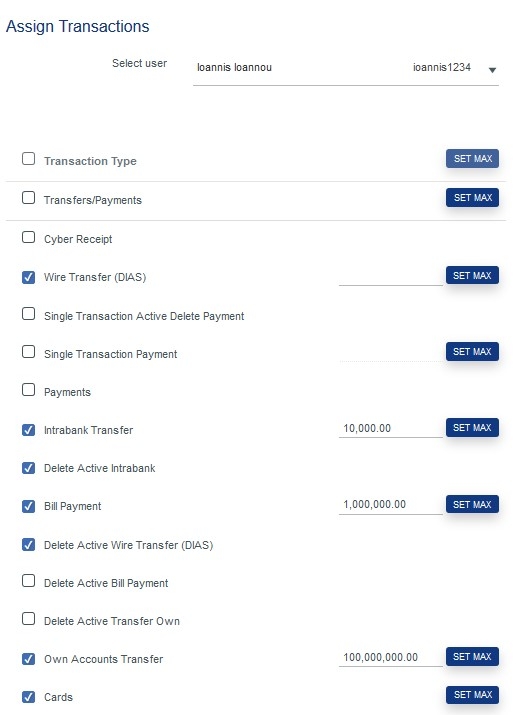
3.9.3 Maker & Authorizer
In case of a “Maker & Authorizer”, the User’s full name and Username, as defined when created, as well as a list of all possible transactions and in case that these transactions are monetary, the limit thereof, are shown on the screen:
- By selecting (check box) a transaction, without determining an amount limit, the User is able to “make” that particular transaction, however without having the right to authorize it (see DIAS Transfers).
- By selecting a particular transaction and entering a defined amount limit to it, the User has the right not only to “make” but also to authorize this transaction, as long as the transaction amount is smaller or equal to the defined amount limit. In case that the transaction amount is higher, the transaction has to be authorized from another User who has the appropriate amount limit for the particular transaction (see Intrabank Transfers)
- By entering an amount limit for a particular transaction without selecting (checkbox) the transaction, the User has only the right to authorize it, as long as the transaction amount is smaller or equal to the defined amount limit, without being capable of “make” that transaction (see Bill Payments).
- By activating a transaction and selecting the maximum amount limit as the defined limit for that transaction, the User has the right to “make” it and also to authorize it up to the maximum amount limit that has been defined by the Bank or by the Company for this particular transaction (see Own Accounts Transfer).
By selecting “Submit”, the confirmation page appears on the screen, containing a list with all the assigned transactions for that particular User:
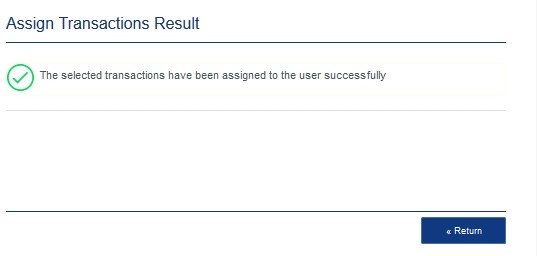
By selecting “Confirm”, a transaction success message appears on the screen and the relevant data are successfully saved in Attica e- banking.
By selecting “Return”, the Transaction Management homepage appears on the screen.
B) Two-Level Authentication Schema
In case of a two–level authentication schema, there is a differentiation to Authorizers where the amount limits as well as the type of signatures are entered:
Authorizer
Maker & Authorizer

If there is an already defined authorization schema for a particular transaction, there is a view icon next to that transaction. By selecting it you can view the authorization schema (e.g. DIAS Transfers).

In case you need to modify anything related to the transaction, you can modify the amount limit and the signature type by selecting on the modify icon:
By selecting the modify icon, you are re-directed to “Modify Signature Matrices”, where you can modify the details that are already recorded to the authorization schema of that particular transaction.
By selecting the delete icon, the authorization schema for the transaction is deleted.
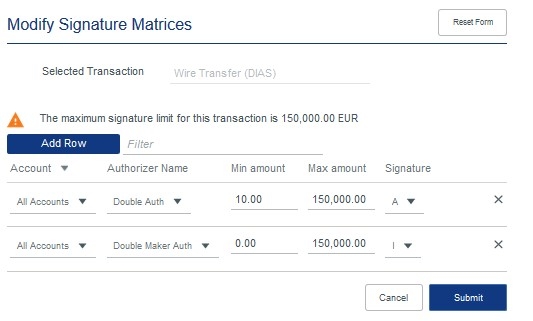
By selecting “Submit”, all the modified changed are saved.
In case of an authorization for a transaction does not exist (e.g. Bill payments), then you can only modify the transaction, and by selecting it you will be re-directed to “Modify Signature Matrices”.
By selecting to create a signature matrix, you are re–directed to the following screen, where you can create the authorization schema for that particular transaction. You will have to select if this authorization will be apply to all the accounts of the Corporate User or only for some of them and to define the authorization schema for one particular User or for all the Users (Authorizer or Maker & Authorizer)

By selecting “Submit”, the authorization schema has been set for the User.
On the other hand, the amount limits and the signature types can be defined through “Manage Signature Matrices” (see Section Signature Matrices).
Define Authorization Schema
Under this section, you can change the authorization schemas by the Company’s Users.
Through Attica e-banking Master User is able to manage the signatures needed for the execution of the transactions by the Company’s Users.
In Attica e-banking, the following roles exist:
- Maker
- Authorizer
- Maker & Authorizer
As Master User, you must determine the authorization schemas for your Company’s organizational structure .
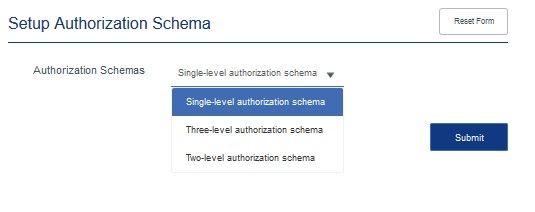
The available authorization schemas are:
Single - Level Authorization Schema: A single authorizer is sufficient to authorize a pending transaction. In a single – level authorization scheme, a single maker and a single Authorizer or a single Maker & Authorizer can execute a transaction.
Two – Level Authorization Schema: In order for a transaction to be executed, there has to be up to 2 signatures.
By selecting “Setup Authorization Schemas”, the following page appears on the screen, containing the authorization schema e.g. Single–level authorization schema where you can select the authorization scheme of interest.
*The initial authorization schema has been set by the Attica Bank’s employee at the time of the Corporate User registration to the Attica e-banking.
If the Two – level authorization schema is selected, the predefined signature combinations set by the Bank appear on the screen:
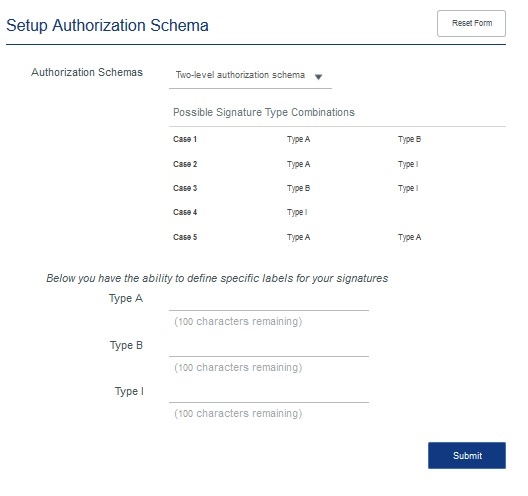
In addition, there are Form where a description for each signature can be added e.g. A =Supervisor, B=Director, I=CEO.
By selecting “Submit”, a confirmation page appears on the screen, with a precaution that the previously defined authorization schema will be deleted.
By selecting “Confirm”, a transaction success message appears on the screen and the new authorization schema isapplied.
By selecting “Return”, the Define Authorization schema homepage appears on the screen.
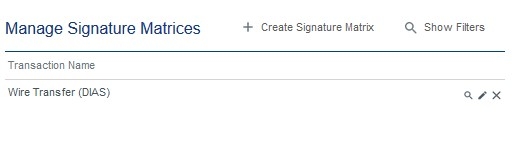
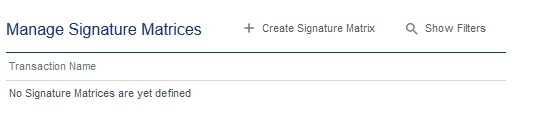
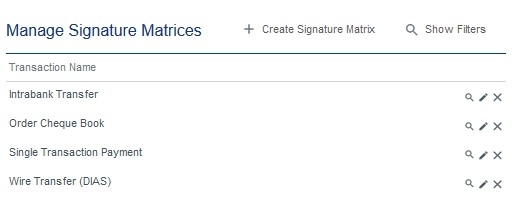
Manage Signature Matrices
Under this section, the Master User can determine the authorization schema, i.e. the signature types and the amount limits that are required in order for the execution of a transaction, depending on the amount of the and in accordance with the policy of the Company.
A prerequisite requirement in order to do so is the Accounts & Transactions assignment to the User through the User Management.

By selecting “Manage Signature Matrices”, the following authorization schema page appears on the screen:
Create Signature Matrix
By selecting “Create Signature Matrix”, the screen for the creation of a new authorization schema appears, where the transaction for which the new schema is going to be created is selected.
It is noted that there has to be created an authorization schema for one by one transaction.
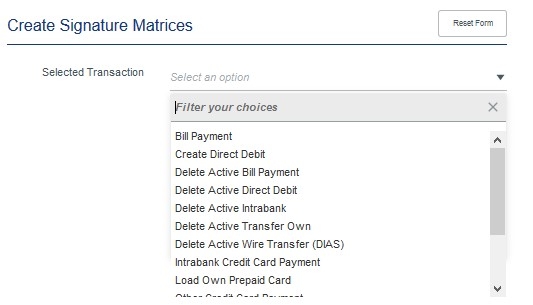
By selecting a transaction, the creation of an authorization schema page for that transaction appears on the screen.
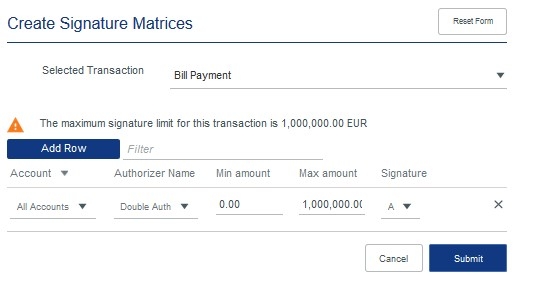
Form Information:
|
Add Row |
A new authorization schema row is created |
|
Account |
The account for which the authorization schema will apply is selected. There is the option the authorization schema to be valid for all the accounts. |
|
Authorizer Name |
The User’s name is selected from the list for whom the authorization schema is created |
|
Minimum Amount |
The minimum amount for which the authorization will be apply |
|
Maximum Amount |
The maximum amount for which the authorization will be apply |
|
Signature |
The signature types are Α, Β or Ι. It is suggested to use A for First Signature, use B for Second Signature and I for authorization that require only a single signature. |
By selecting “Submit”, the confirmation screen appears:
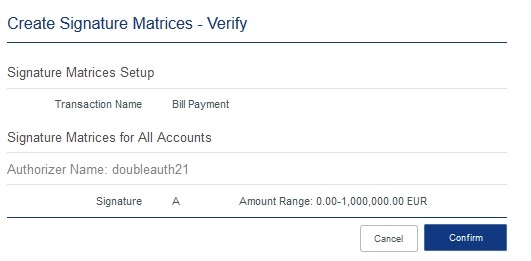
By selecting “Confirm”, the transaction success message appears on the screen.
Two – Level Authentication Schema Example
Under “User Management”, Users are recorded with the following assigned roles:

- The Master User does not have the right to execute monetary transactions
- Niki S can only “make” transactions (Maker).
- Magda P and Grigoris S can ”make” and also authorize transactions (Maker & Authorizer).
- Nikos Pap and Marinos X can only authorize transactions (Authorizer).
The Commercial User has adopted the two – level authorization schema, for which the following scenarios are applied:

In order for a transaction to be authorized, one of the following 4 scenarios must be valid:
- Authorization from a User with signature type A and from a User with signature type B, regardless of the signature order (A+B or B+A)
- Authorization from two Users with signature type A (A+A)
- Authorization from a User with signature type A and from a User with signature type I (A+I)
- Authorization from a User with signature type B and from a User with signature type I (B+I)
- Authorization from a User with singature type I
E.g. for a Bill payment the following authorization schema is formulated:
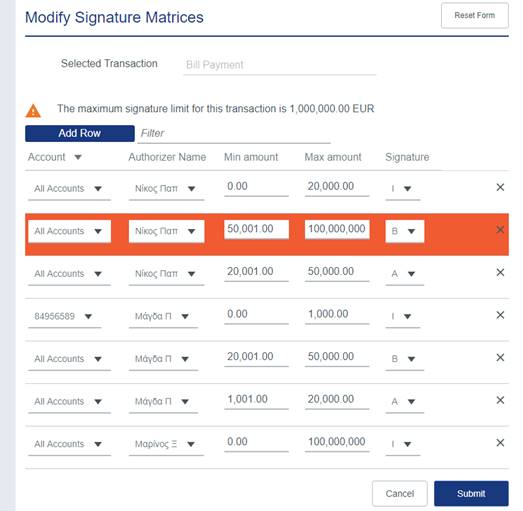
- The transaction (of any amount) can be recorded by Niki S, Magda P, and Grigoris S
- A Bill payment up to 1.000€ can be authorized with a single signature by Magda P or Nikos Pap Or Marinos X.
- A Bill payment up to 20.000€ can be authorized with a single signature by Nikos Pap or Marinos X.
- A Bill payment from 20.001up to 50.000€ can be authorized by Magda P ( signature type A) and Nikos Pap (Signature type B) or by Magda P (signature type A) and Marinos X (signature type I) or by only Marinos X (signature type I)
- A bill payment from 50.000€ can be authorized by Nikos Pap (signature type B) and Marinos X (signature type I) or solely by Marinos X (signature type I).
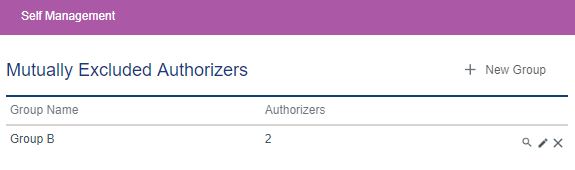
In the case where some of the authorizers have the same signature rights but you don’t want them to be able to authorize monetary transactions simultaneously, you can exclude this potential via Mutually Excluded Authorizers transaction (which is located under “Self Management” menu). Through this transaction, you can create groups which will include those authorizers who mutually exclude each other.

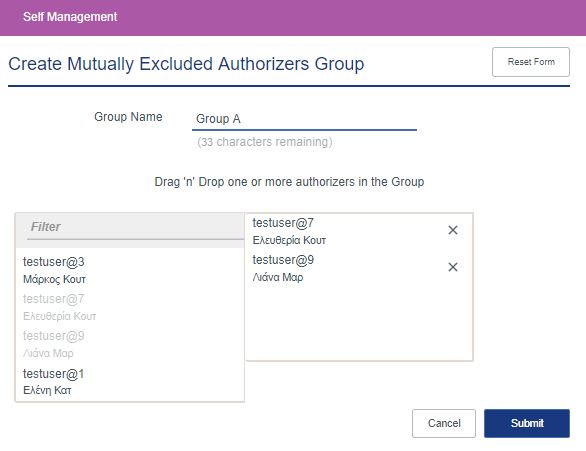
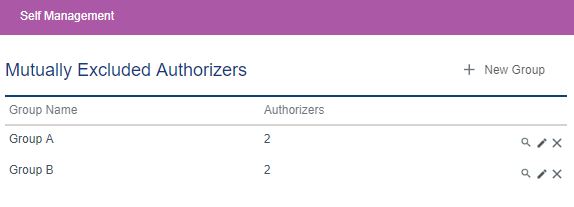
From Self Management, by selecting Mutually Excluded Authorizers, you are directed to the screen below. From that point, you can create a group which will include the mutually excluded authorizers by selecting +New Group.
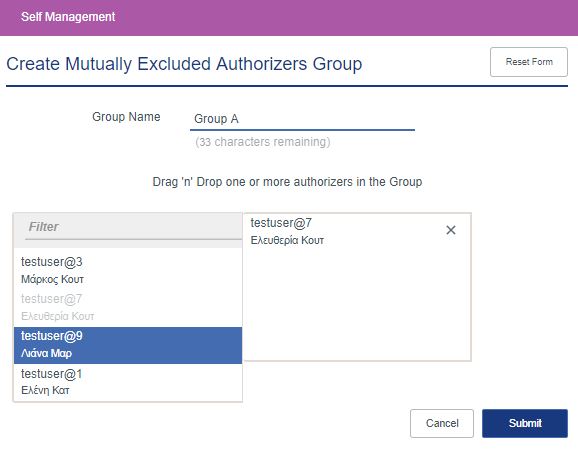
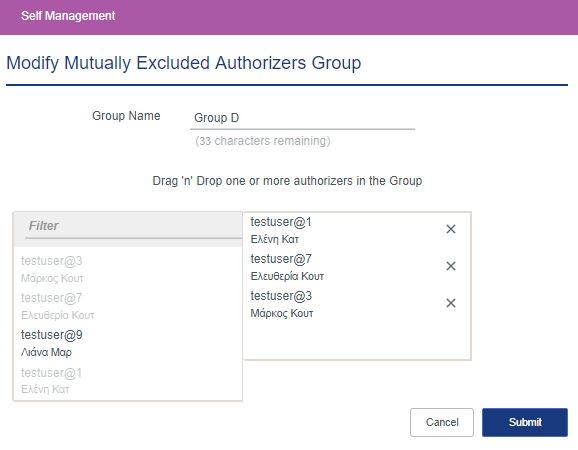
By Drag ‘n’ Drop, you can move from the left to the right column the authorizers you wish to be mutually excluded.
The authorizers that will be moved to the right column will not be able to simulteanously authorize a monetary transaction. If one authorizes the transaction, then no one else from the same group, though being able to view the transaction, will be able to authorize it.
By pressing Submit, you will be directed to the Verification Screen.
As shown below, you will create a group with the name you inserted and the authorizers you added in the right column of the table as in the screen above. In that specific example, the group’s name will be ‘Group A’ and the mutually excluded authorizers will be testuser@7 and testuser@9.
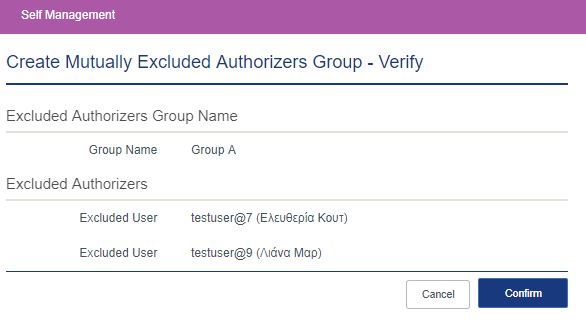
By selecting Confirm, you will be directed to the screen below which contains the relevant message that the transaction has been completed.

When you ‘ve already created a group, you can modify , whenever you want, its elements (group name) or the authorizers it consists of (add or removal of authorizers) by selecting the pen symbol  which is located on the right of the group record.
You will be directed to the screen below:
By selecting Submit, you will be directed to the Verification Screen where all the modifications that took place are stored:
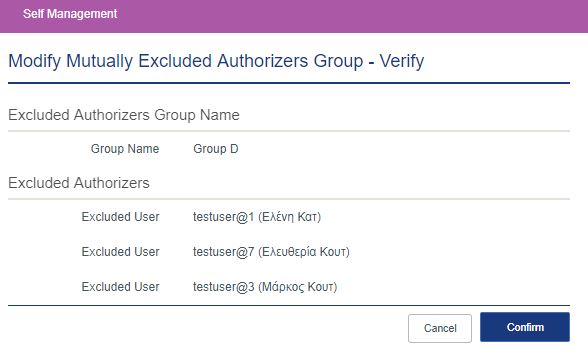
Select Confirm so as to confirm the group modification. You will get the message that your transaction has been completed.
Online Activity
All the transactions that have been realized by the Company’s Users in Attica e-banking are recorded on the Online Activity.
By selecting “Show Filters”, the filtering options will appear on the screen, which are used in order to narrow down a particular search:
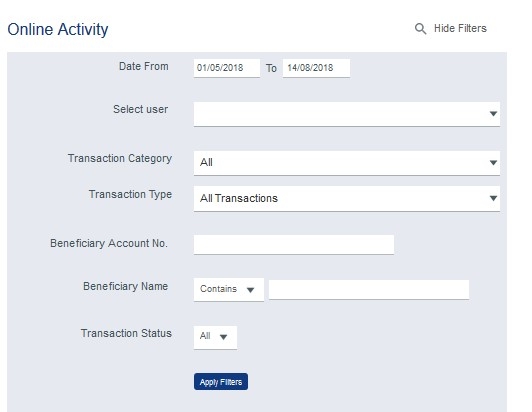
Form Information:
|
From - To |
Selected from the calendar,or entered by the Master User the period during which the transactions are realized. |
|
Select User |
The User is selected from the list. In case that the Form remains empty, all the Users will be shown. |
|
Transaction Category |
The transaction category can be optionally selected |
|
Transaction Type |
A particular transaction from any transaction type is optionally selected |
|
Beneficiary Account No. |
The Beneficiary’s account number is optionally entered |
|
Beneficiary Name |
Specific letters contained in the Beneficiary’s surname or the initial letters of the Beneficiary’s surname or the Beneficiary’s full surname are optionally entered |
|
Transaction Status |
Optionally selected: All, Sent to the Bank, Failed, Pending, Timeout, Completed, Being Processed, and Signed. |
After selecting the respective filters , a list in accordance with the selected criteria appears on the screen.
User Alerts Delivery Settings
Under this option, as a Master User you can activate the Alert delivery service from Attica Bank to the mobile phone or email of the Users.
The activation is done separately for each User.
Note that even if the aforementioned setting remains deactivated, the Bank, on behalf of its Clients safety and protection, sends alert notifications with respect to security, maluses etc.
By selecting “User Alerts Delivery Settings”, the following page appears on the screen:
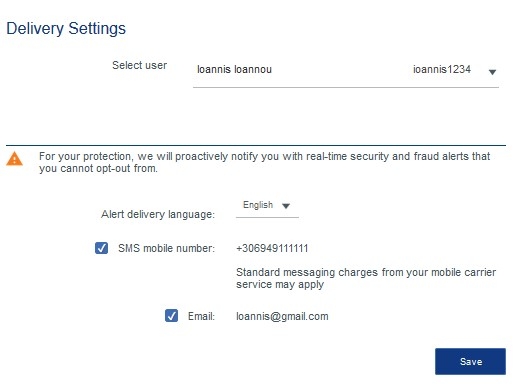
|
Select user
|
The Master User selects the user to whom he/she wants to set the alert delivery. |
|
Alert delivery language |
The selection of the language is selected. |
|
SMS Mobile phone |
The registered (User Management) mobile phone is shown. The alerts are activated by slelecting the check box. |
|
|
The registered (User Management) email is shown. The alerts are activated by slelecting the check box. |
By selecting “Save”, a message to “Confirm” the modified changes appears on the screen. An OTP will be requested to be entered via a Hardware Token or SMS Token.
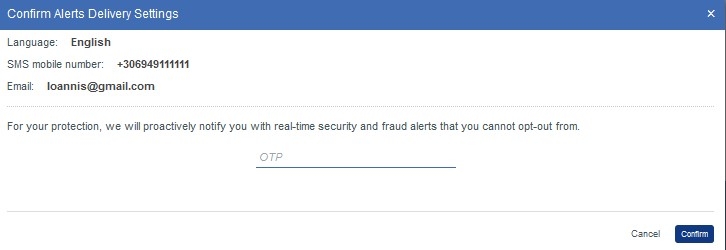
- In case that the User uses the Hardware Token, he/she enters the generated OTP to the “OTP” Form.
- In case that the User selects an “OTP via SMS”, the button “ Sent OTP via SMS” appears on the screen. By selecting it, the User receives an SMS to his mobile phone and enters the “OTP”.
By selecting “Confirm”, a transaction success message appears on the screen.
By selecting “Return”, the User is re-directed to the Alerts Delivery Settings homepage.