Please read this User Guide to learn how the user with the role "Authorizer' works in companies with complex authorization schemas.
Attica e-banking for Authorizer
Welcome to the new Attica e-banking! From now on, you can authorize or manage monetary transactions with safety and autonomy and carry out these transactions in a safe and quick manner through a variety of available options.
As an Authorizer and depending on your assigned transactions for authorization by the Master User, according to the organizational structure and the regulatory framework of the Commercial Customer, you can authorize the total or a portion of monetary transactions.
At the top of the first page of Attica bank’s e-banking, as well as on every other page through your navigation, you can view a tab containing the following icons:
- Attica Bank’s Logo. By clicking it (mouse click), you are being transferred to the initial homepage of Attica Bank’s e-banking.
- «Branches» icon. Under this option, you are redirected to the corresponding Attica Bank page where all of its Branches & ATMs network is recorded.
- Attica Bank’s Contact number.
- “Language” selection option (Greek, English).

Attica e-banking logo is also visible at the top left corner of the homepage, as in any other navigation page through the application, where it gives you the option, by clicking it, to redirect to the e-banking’s dashboard. The same redirection can also be achieved by pressing the icon ![]() , at the top of the right corner of any navigation page.
, at the top of the right corner of any navigation page.
- By selecting the messages icon
 , you can view the secure messages sent by Attica Bank to you through the e-banking application. You can reply to these secure messages or create a new message.
 - If you need any help, at any point throughout your navigation, you can press the question icon
 , which is located at the top right corner’s toolbar of any navigation page and you will be redirected to a menu which contains details about the e-banking use as well as answers to the most Frequently Asked Questions (FAQ).
 - To log out from Attica e-banking, you click the ON/OFF icon
 , located at the top right corner toolbar.
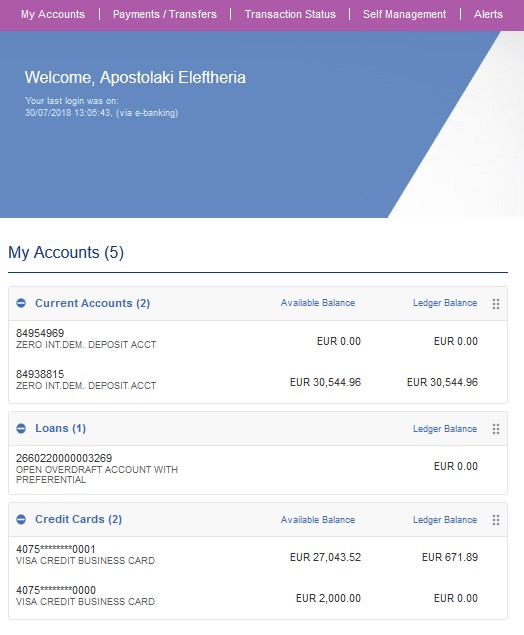
The application provides you with information regarding your last log in to the Attica e-banking.
An Authorizer has the responsibility to authorize the monetary transactions of a Corporate Customer. In addition, he can also execute specific managerial transactions regarding his assigned bank accounts or his / her credentials and the notifications he / she receives from the application. As a last point, he / she may have access to information that is related to the financial statements of his assigned Company’s bank accounts.
Portfolio
My Accounts
In “My Accounts” menu and by selecting “My Portfolio”, you can have an analytical view and per category for the total of the company’s bank accounts that are assigned to you. Next to each accounts category, there is a (+) or (-) symbol. By selecting it, detailed information regarding that particular category is shown or minimized as shown on the screen below.
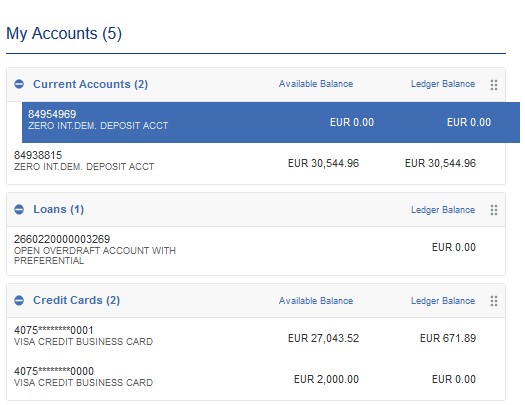
Furthermore, there is the option to move the categories as well as the individual accounts of each category according to the display order of your preference. Select the icon ![]() to the right of each category and then, by drag and drop you can reorder the way the particular categories will be displayed. In the same way, in order to move any particular account within its category, again by drag and drop, you can select the order of preference as shown below:
to the right of each category and then, by drag and drop you can reorder the way the particular categories will be displayed. In the same way, in order to move any particular account within its category, again by drag and drop, you can select the order of preference as shown below:
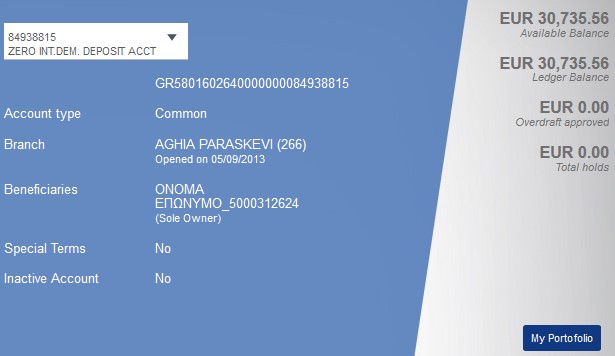
Finally, by double-clicking on any account, you are redirected to a page containing detailed information about the account of interest.
Current Accounts
In Current Accounts, the following information appears on the screen:
- the IBAN of the account
- the type of the account
- the branch
- the open date of the account
- the beneficiaries
- the special terms (if any)
- the inactive account flag
- the available balance
- the ledger balance
- the overdraft approved
- the total holds
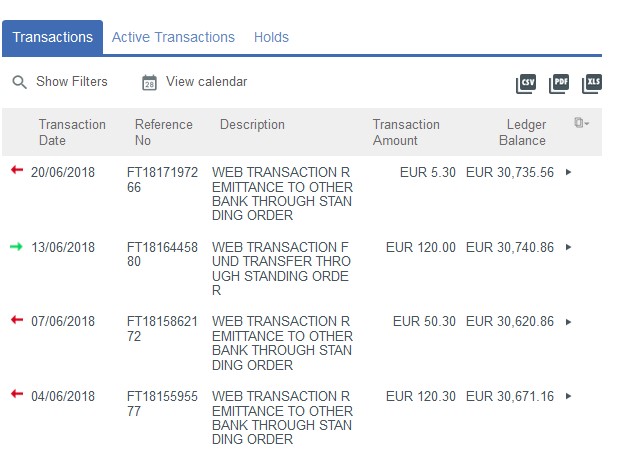
Except for the aforementioned basic details of the account, the following information is also provided at the bottom of the page:
- the Transaction History
In this Tab, you can see all the transactions that were realized with that account through any channel (e.g. e-banking, mobile, ATMs, Branches) during the last month. For each transaction, except for the transaction date and its reference number, the description and the amount that was debited or credited and the updated ledger balance are also shown. For each transaction, you can select the icon to the right ![]() and see additional information about it.
and see additional information about it.
If you wish to view account transactions for a smaller or a larger period, you can do it by changing the default date settings from the filters.
Furthermore, by clicking on “View calendar”, you can see in which days of the month you carried out the transactions of interest, in order to facilitate your search to a particular transaction.
- The Active Transactions
In this Tab, you are able to view your upcoming future or recurring (standing orders) transactions.
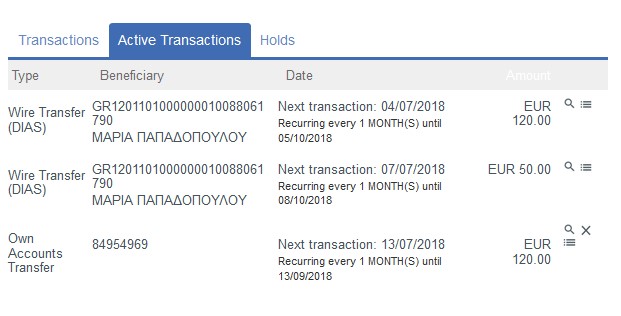
- The Holds
You can view details referencing to any holding amount for the account of your interest.
Loans
In Loans, except for the nickname, the reference number and the product type, the following information appears on the screen:
- the disbursement amount
- the loan expiry date
- the branch
- the loan service account
- the contract date
- the contract number
- the beneficiaries
- the outstanding balance
- the current interest rate
- the next payment amount
- the overdue amount
On the second half of the page, the loan’s Transaction History is also available.
In this Tab, you can see all the transactions that were carried out during the last month. If you wish to view a smaller or a larger number of the transactions, you can do it by changing the default date settings from the filters.
Furthermore, by clicking on “View calendar”, you can see in which days of the month you carried out the transactions, in order to limit your search to a particular transaction. For each transaction, except for the transaction date and its reference number, the description and the amount that was debited or credited are also shown.
For each transaction, you can select the icon to the right ![]() and hence see any additional information related to it.
and hence see any additional information related to it.
Finally, the transaction history can be downloaded as a csv, pdf or xls file.
Credit Cards
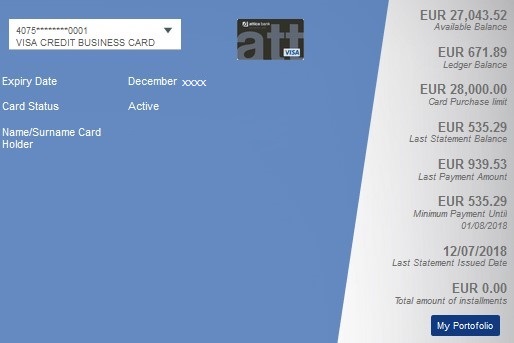
In the details of Credit Cards, the following information is available to the User:
- the nickname, the card number (masked) and the type of card (there is a dropdown list where you can view the same details of any other account of interest)
- the expiry date
- the card status
- the cardholder name
- the add-on card number (if any)
- the add-on cardholder name
- the available balance
- the ledger balance
- the card purchase limit
- the latest statement balance
- the last payment amount
- the minimum payment until the relevant date
- the latest statement’s issue date
- the total amount of installments (if any)
On the second half of the page, you can find the following information:
- The Transaction History
In this tab, all the transactions that were carried out after the last credit card statement issue are shown. For each transaction, you can select the icon to the right ![]() and hence view additional information
and hence view additional information
Finally, the transaction history can be downloaded to a csv, pdf or xls file.
- The Pre - Authorizations
In the Pre-Authorizations Tab, credit card charges that have not yet been cleared are shown. The amount is hold until the transaction is cleared.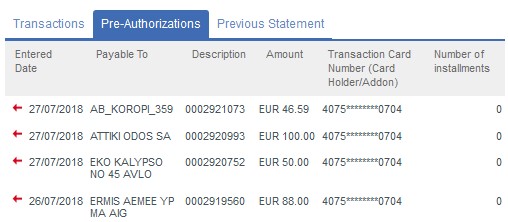
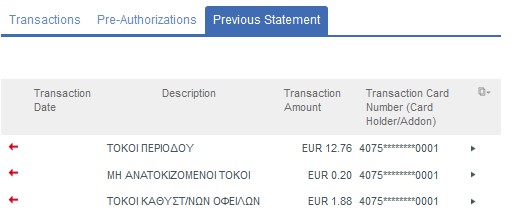
- The Previous Statement
You can view your last issued statement, in an electronic form.
Insurance Products
Vehicle Insurance
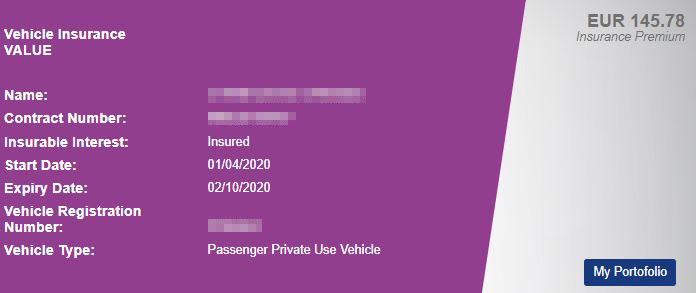
The information that is shown for Vehicle Insurance is written below:
- The Name and Surname of the contract owner
- The Contract Number
- The Insurable Interest which describes the relationship between the Customer and the contract and can get the following values: Contracting party, Insured or Insured / Contracting party.
- The Start Date of the Contract
- The Expiry Date of the Contract
- The Vehicle Registration Number
- The Vehicle Type
- The Insurance Premium
Payments / Transfers
List of Active Transfers
All of your monetary transactions that are to be carried out in the future are shown on the List of Active Transfers. For each of these transactions, you can select the “View” ![]() , “Delete”
, “Delete”![]() or “History”
or “History”![]() icon.
icon.
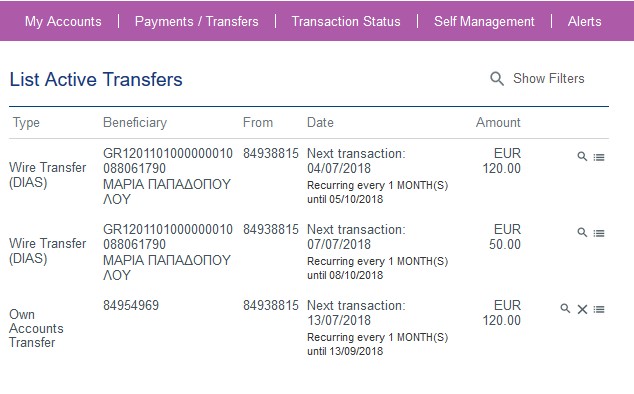
By selecting “Display” e.g. to an active Wire Transfer (DIAS), you are redirected to the “View Details of Active Wire Transfer (DIAS)” where you can have a view of the details of the selected transaction. By selecting “Back”, you are directed back to the initial “List of Active Transfers” page.
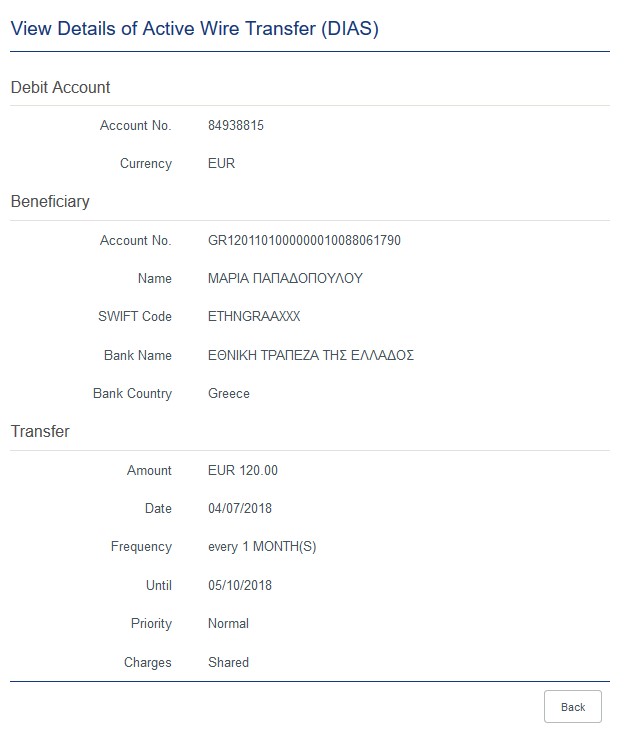
To delete an active transfer, you will be requested to enter a One-Time-Password (OTP) via SMS or Hardware Token. Select “Confirm” to delete the transfer.
The “Transactions History” has the following form and consists of all the transactions that have already been carried out and represent a portion of the recurring transaction.

Cheque Book
List of Applications
The list of Applications consists of the status of the applications made to the Bank e.g. Order Cheque Book.
As it is shown on the screen below, an application is characterized by the “Date”, the “Transaction” and the “Status”.

The “Status” list for an application e.g. Order Cheque Book consists of the following stages:
- Sent: The application is sent to Attica Bank.
- In Progress: The application is in progress by Attica Bank.
- Completed: The application has been approved and completed. You can pick up your ordered Cheque book from the pre-selected Attica branch.
- Cancelled: Your application has been cancelled.
- Rejected: The order Cheque book application has been denied by Attica Bank.
By clicking on “Show Filters” at the top right corner of the page, you are redirected to the corresponding page. Select the “Date From” and the “Transaction Type” filters and then press “Apply filters”.
By selecting “Hide Filters”, you are navigated back to the initial list of applications page.
Transaction Status
Display Pending
One – Level Authorization schema
Under this option, the pending transactions for authorization by an Authorizer are shown. On the screen below, an example of a pending Wire Transfer (DIAS) for authorization is shown.
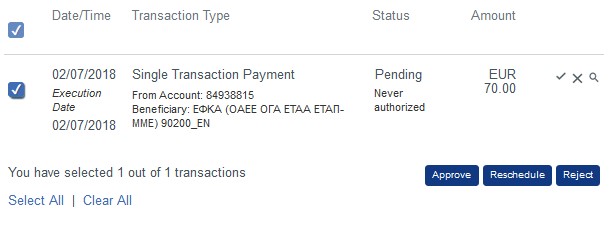
By selecting “Approve”, you are redirected to the following transaction confirmation screen where you will be requested to enter a One-Time-Password (OTP).
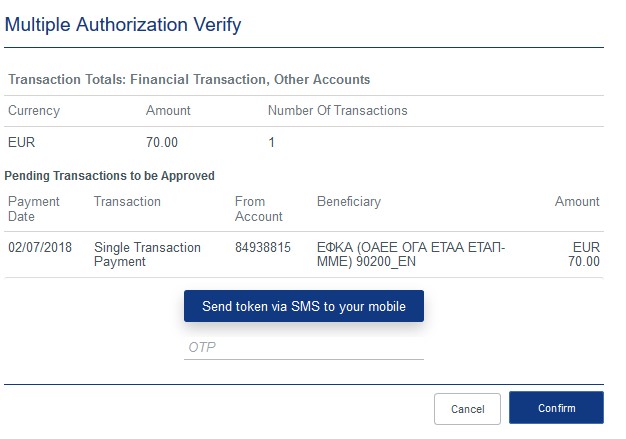
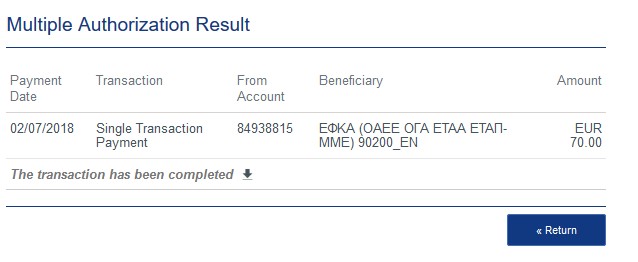
By entering the One-Time-Password (OTP) to the corresponding field, select “Confirm”. You will be navigated to the next screen where you get notified that the transaction has been successfully completed and beside from the details of the transaction, a cyber receipt is also available.
In case you select the “Download Cyber Receipt” ![]() , you are navigated to the following screen where you can select if you would like to download the receipt to your computer or to send it via an email.
, you are navigated to the following screen where you can select if you would like to download the receipt to your computer or to send it via an email.

By selecting “Reject”, you are redirected to the following screen where a One-Time-Password (OTP) is requested.
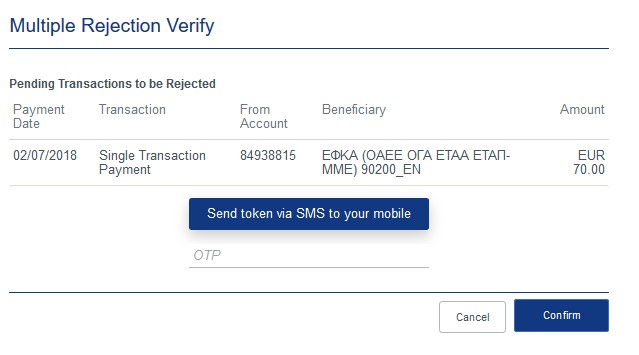
After entering the One-Time-Password (OTP), select “Confirm”. You will get notified that the transaction has been cancelled.
By selecting “Reschedule”, you have the option to reschedule a particular transaction that has been expired (the date of the transaction has gone by) and is pending authorization. You will be requested to enter a One-Time-Password (OTP).
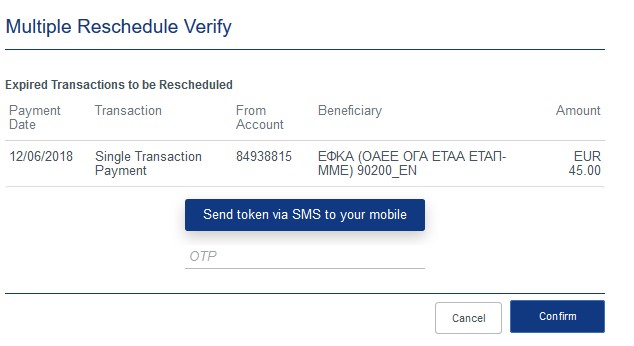
After entering the One-Time-Password (OTP), select “Confirm”. You will be redirected to the next screen where you will get notified that the transaction has been successfully completed.
Two – Level Authorization Schema
For a two - level authorization schema, the combination of authorization signatures needed for the completion of a specific transaction type has to be defined by the Master User.
For a Two – level authorization schema, the following combinations are in force:
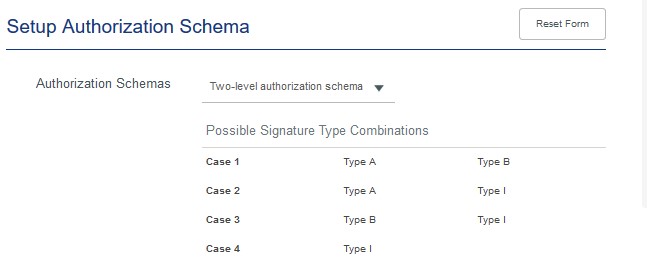
For a monetary transaction to be authorized, one of the following four (4) combinations of signatures must be in force:
- Authorization from a User with signature type A and Authorization from a User with signature type B regardless of the order of the signatures
- Authorization from a User with signature type A and then Authorization from a User with signature type I
- Authorization from a User with signature type B and then Authorization from a User with signature type I
- Authorization from a User with signature type I
E.g. a Wire Transfer (DIAS) for which the following are in force:
- Authorizer1 has a signature type A
- Authorizer2 has a signature type B
- Authorizer3 has a signature type I
regardless of the amount and limit. (In general, Users can be assigned with different signatures depending on the amounts of the transactions, the limits and the bank accounts).
Hence, in order for an e.g. wire transfer (DIAS) to be completed, the following must be executed:
- The transaction to be authorized by Authorizer1 (signature type A). The transaction automatically will not be shown to his pending transactions anymore, but it will be shown on the pending transactions of the Authorizer2 and Authorizer3. If the transaction is authorized by either Authorizer2 or Authorizer3, the transaction is carried out and is shown as completed under the transaction result screen where a transaction receipt will also be available (combination of signatures A+B or A+I).
- The transaction to be authorized by Authorizer2 (signature type B). The transaction automatically will not be shown to his pending transactions, but it will be shown on the pending transactions of the Authorizer1 and Authorizer3. If the transaction is authorized by either Authorizer1 or Authorizer3, the transaction is carried out and is shown as completed under the transaction result where a transaction receipt will also be available (combination of signatures B+A or B+I).
- The transaction to be authorized by Authorizer3 (signature type I). The transaction is carried out and is shown as completed under the transaction result which contains all the transactions and a transaction receipt is also available (combination of signatures I).
Under the list of “Display Pending” on the “Status” column, the following can be in force:
One - Level Authorization Schema:
- Pending, never authorized: The transaction has not been authorized yet by an Authorizer.
- Pending, rejected: the transaction has been rejected by an Authorizer.
- Expired, never authorized: the transaction has expired without being authorized.
- Sent to the bank: the transaction has been authorized and sent to the Bank (completed).
- Being processed: the transaction has been sent to the Bank and is being processed (e.g. Ordering Cheque book).
Two – Level Authorization Schema:
- Pending, never authorized: The transaction has not been authorized yet by an Authorizer(s).
- Pending, rejected: The transaction has been rejected by an Authorizer.
- Expired, never authorized: The transaction has expired without being authorized by any Authorizer.
- Expired, after rejected authorization: the transaction has expired and has been rejected by an Authorizer.
- Expired, Signed: the transaction has expired while it has been authorized by an Authorizer (second signature pending).
- Sent to the bank: the transaction has been authorized and sent to the Bank (completed).
- Being processed: The transaction has been sent to the Bank and is being processed (e.g. Ordering Cheque book).
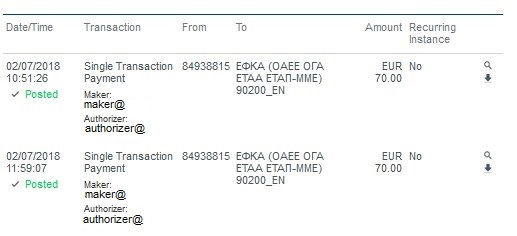
Transaction Result
In this option, the transactions results are shown after the authorization procedure is completed as shown below:
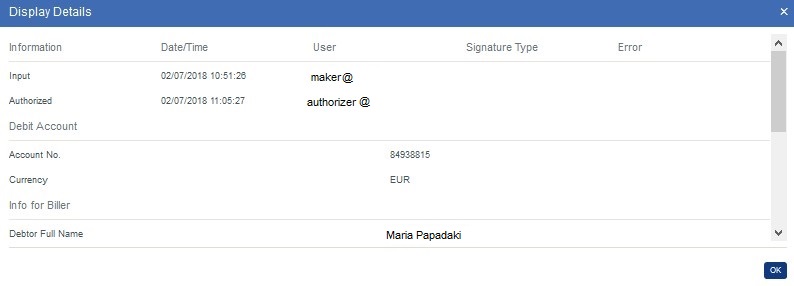
By selecting the “Display” ![]() icon
icon
on a particular transaction, you are redirected to the “Display Details” form, which contains the transaction’s full details.
Select “OK” to close the pop-up window.
By selecting the “Download Cyber Receipt” ![]() icon , you can download the transaction receipt or to send it via email as shown below:
icon , you can download the transaction receipt or to send it via email as shown below:

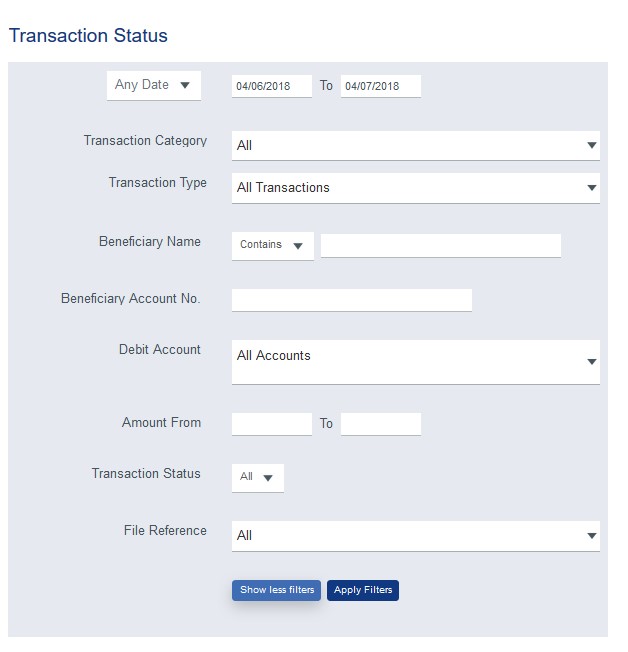
Furthermore, you can use filters in order to facilitate your search regarding either particular transaction or a bundle of transactions:
POS Transactions
POS Transactions refer to customers who own POS terminals. Via this transaction, the user can view and save the statement of the transactions authorized via all POS linked to the accounts.
This transaction is found in “Payments/Transfers” menu.
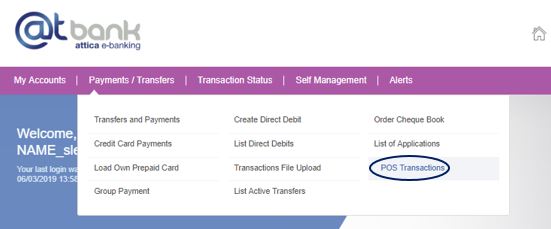
By selecting this functionality, the user is directed to the following screen:
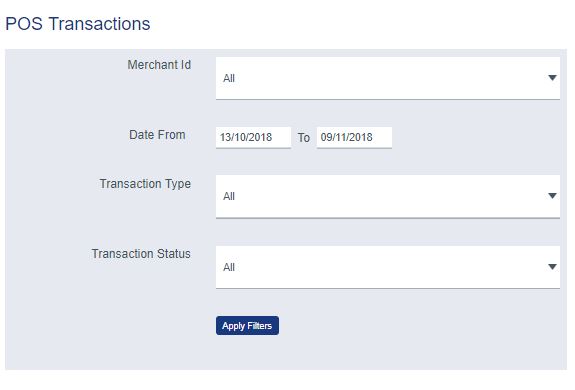
Filters contain:
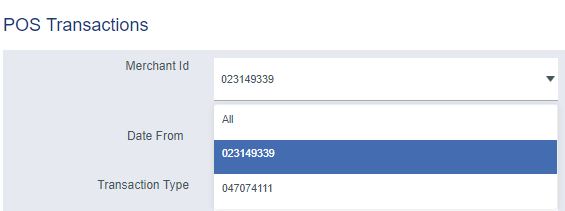
- The Merchant Id: The default value is “All” and refers to all “Merchant Ids” linked to the Customer. The user can change the selection by selecting one unique merchant id from the list.
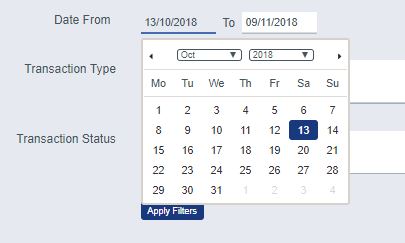
- The Time Period during the transactions have been authorized. The default selection relates to the time period of the last three days, however the user can select another time period
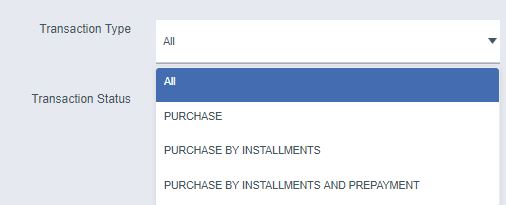
- The Transaction Type which is set by default as ‘All’. The User, though, can select if he wishes so to view the transactions which refer to “Purchase”, “Purchase by Installments” or “Purchase by Installments and Prepayment”.
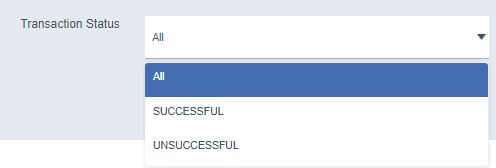
- The Transaction Status can be set as “Successful” or “Unsuccessful”.
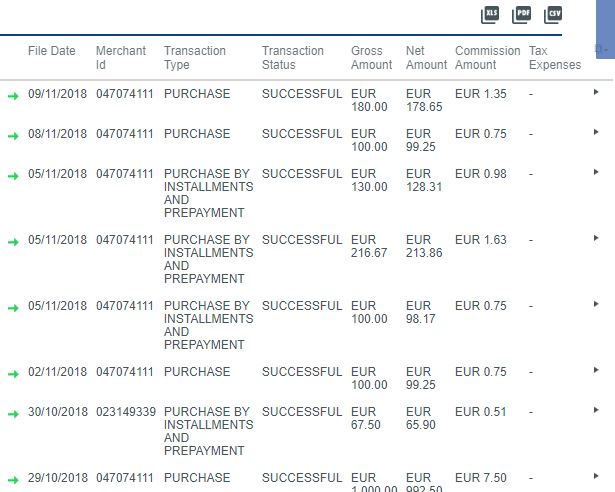
By selecting Apply Filters, the User can get the list with the Transaction History depending on the chosen filters:
In each transaction, by selecting the arrow located in the right of the row ![]() or in total, for all the transactions, by selecting the arrow in the title
or in total, for all the transactions, by selecting the arrow in the title ![]() , the User can view more details referring to these transactions.
, the User can view more details referring to these transactions.
The columns of the search results table are the following:
- File Date: Refers to the date of the file of transactions authorization.
- Merchant Id: Refers to the Merchant Code. A Customer can dispose more than one merchant codes.
- Transaction Type: The type of transaction.
- Transaction Status: The status of the transaction.
- Gross Amount: The gross amount of the transaction.
- Net Amount: The net amount of the transaction (without commission).
- Commission Amount: The commission amount for every transaction.
- Tax/Expenses: The tax/expenses of the transaction if there are any (ex. overnight stay tax).
- Batch Date: The date of the file closure from the merchant.
- Transaction Reference: The code reference of the transaction.
Moreover, the User can download the search results at xlsx, pdf or csv format, as it is shown in the upper right part of the search results. You should select the relevant icon so as to download the related file format. The maximum number of records that the file can contain is 3.000.

Self Management
Change Username
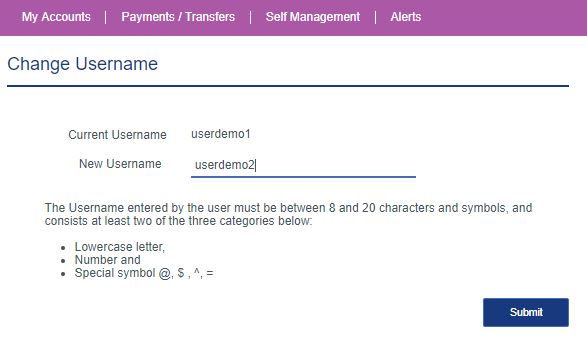
In this section, you are given the option to change your Username. As it is shown above, the Username entered must be between 8 to 20 characters and symbols, and contain at least 2 of the following:
- lowercase letter
- number
- special symbol such as @, $, ^, =
Fill in the “New Username” and then press “Submit”. Subsequently, you will be requested to “Confirm” any changes made.
Upon the successful completion of the change, you will be notified via email and SMS that your Username has been changed.
Change Password
Under this section, you can change your Password.
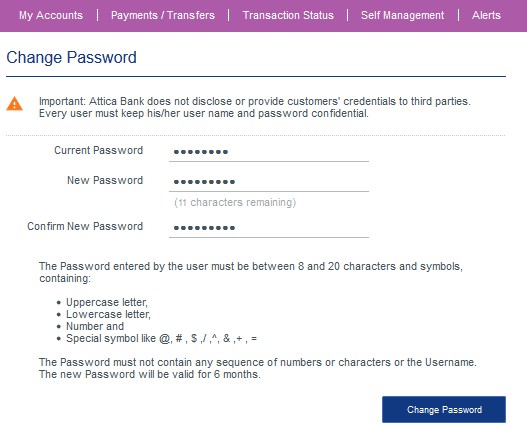
As it is shown above, the Password entered must be between 8 and 20 characters, containing:
- uppercase letter
- lowercase letter
- number
- special symbol such as @,#,$,/,+,=
In addition, it must not contain any sequence of numbers or part of the Username.
In order to change your Password, fill in the text fields referencing to your Current Password, the New Password, and the confirmation of the New Password. Then, press “Change Password”.
Successively, you will be requested to “Confirm” the Password change.
Upon the successful completion of the change, you will be notified via email and SMS that your Password has been changed.
The new Password will be actively valid for 6 months.
Manage Accounts
For your convenience, apart from using the account number, you can assign nicknames to your assigned bank accounts. In “Manage Accounts”, select the bank account of interest you would like to assign a nickname to. Enter the “Nickname”. The assigned account nickname is only visible by you. The maximum character limit for assigning a nickname is 15.
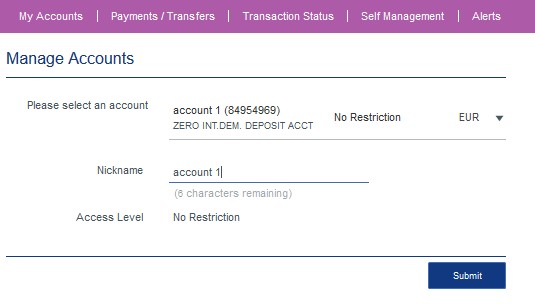
After assigning your nickname of preference, select “Submit”. Then, select “Confirm” on the “Confirm account changes” form.
Online Activity
In Online Activity, all the performed actions by the User through the e-banking are depicted. Hence, by using this option, you will be able to monitor your online activity via the application. Furthermore, you can reprint any cyber receipts of a transaction that has a print-receipt option by clicking on the corresponding icon ![]() .
.
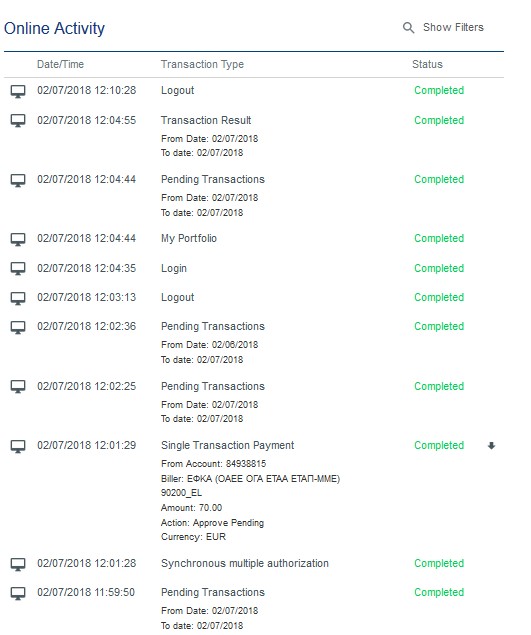
The above shown screen display consists of four (4) columns: the icon of the Channel from which the transaction took place, the Transaction Date, the Transaction Type and the completion Status of each transaction.
Show Filters
In this option, you are navigated to the filters that contain the following fields: “Date From/To”, “Transaction Category”, “Transaction Type”, ”Pre-Defined Beneficiaries”, ”Beneficiary Account No”, ”Beneficiary Name”, ”Transaction Status” and “Channel”.
Select or type the preferred data in each frame and then press “Apply Filters” so that your online activity based on the selected criteria is shown.
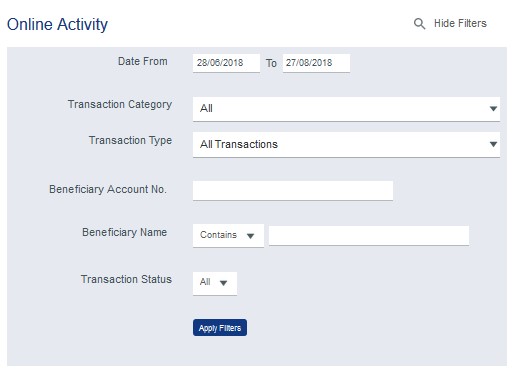
“Hide Filters” at the top right corner of this page will automatically redirect you to the Online Activity homepage.
SMS OTP Service
Register for SMS OTP Service
The registration to the SMS OTP service (SMS Token) can be achieved via 2 ways depending on if you possess a Hardware Token or not.
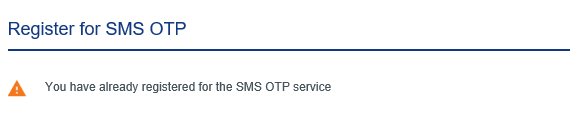
In the case you have already been registered to the service, the following message will appear on the screen:
Via Hardware Token
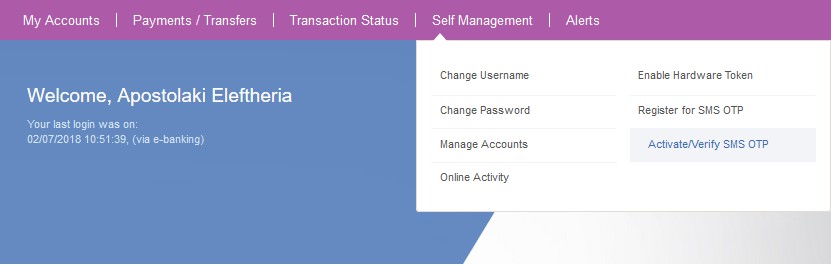
From the “Self Management” menu, select “Register to SMS OTP” to register to the service.
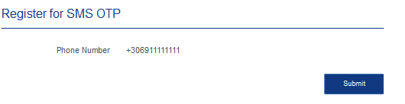
Then, the following screen will appear which contains your mobile phone and the “Submit” button:
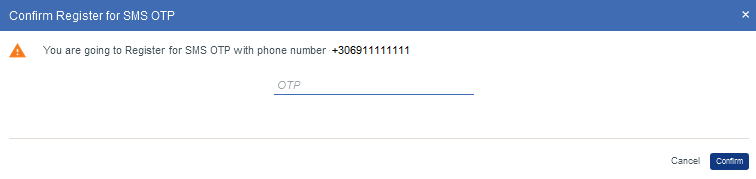
In order for the User to register to the service, he / she has to press “Submit” and then to enter the 8-digit One-Time-Password (OTP) generated by the Hardware Token as shown below. Then, he / she has to select “Confirm”.
When the transaction is completed, the User is also informed. Subsequently, you have to activate the SMS OTP.
Without a Hardware Token
Your registration to SMS OTP without a Hardware Token can solely be done by the Master User.
Activate / Verify SMS OTP
In order to activate the SMS OTP service, after having done the corresponding registration, the following steps are executed:
From “Self Management” menu, select “Activate / Verify SMS OTP” to activate the service.
In the case you have not been registered to the service yet, you will get notified with the corresponding message:

As long as the service is not already activated, the following screen appears containing the mobile phone of the User and the “Submit” button:

The user has to press “Submit” and then “Send token via SMS to your mobile” as shown below on the screen:

By selecting “Send token via SMS to your mobile”, an SMS is sent to your mobile phone containing the One-Time-Password (OTP) that you have to enter to the corresponding field. Select “Confirm”.
Finally, the User gets notified that the transaction has been successfully completed and from now on he / she will be able to carry out his / her monetary transactions via the use of an SMS OTP.
Note:
- The 8-digit SMS OTP has a maximum valid duration of two (2) minutes.
- The 8-digit SMS OTP can be only used once and for only one transaction.
- The SMS Token application is blocked/de-activated temporarily after 3 wrong attempts to insert the SMS Token. In such a case the user has to contact Attica Bank’s Help desk contact numbers: (+30) 2103669000 or 801-11-50090 (from Greek home phone number, with an urban unit charge) in order to be activated again.
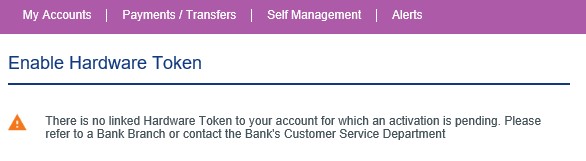
Enable Hardware Token
In the case that you have not activated the SMS OTP, then, you have to contact with the Attica Bank’s help desk or with an Attica branch in order to activate your Hardware Token. In that case, if you select “Enable Hardware Token” the following message will appear on the screen:
If the SMS OTP service is activated, then the following screen will appear:
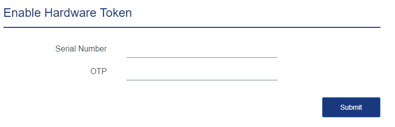
Enter the Hardware Token serial number which is located at the back of the device as well as a One-Time-Password (OTP) that will be generated from the Hardware Token device:

By selecting “Submit”, a confirmation message appears on the screen. Successively, you will be requested to enter an SMS OTP by pressing “Send token via SMS to your mobile”.
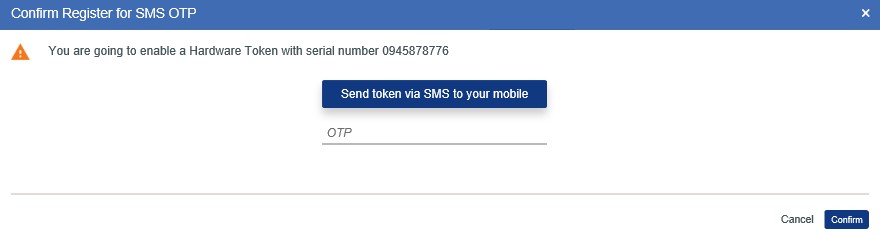
By pressing “Confirm”, a completion message will appear on the screen. The Hardware Token has been successfully activated and can be used in order to carry out your monetary transactions.
Alerts
Alerts Delivery Settings
In “Alert Delivery Settings”, you have to set the alerts’ delivery language as well as the way you would like to get notified, either by SMS and/or email. Click “Save”.

Insurance Products
Insure your vehicle or home, easily and securely, via Attica e-banking, by selecting the insurance program of INTERAMERICAN that best covers your needs.
Specifically, select “Insurance products”, from the basic menu of Attica e-banking and you will have the choice of applying for the available Insurance programs of vehicle or home insurance.
Vehicle Insurance
For the vehicle insurance, you will need the following:
- The details that are listed in your vehicle license.
- The date of birth of the owner.
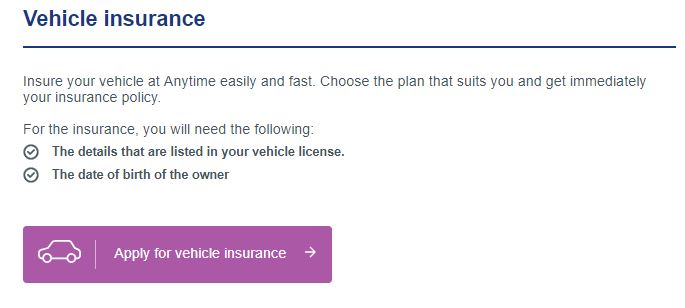
By clicking on the button “Apply for vehicle insurance”, you will be directed to the following form. In this form, you will get information regarding the General Information Leaflet of Mediator and the Pre-contractual Information of the product. After declaring you have read the mentioned documents, you will be able to be directed to Interamerican’s Anytime platform and choose the Vehicle Insurance program that covers your needs.
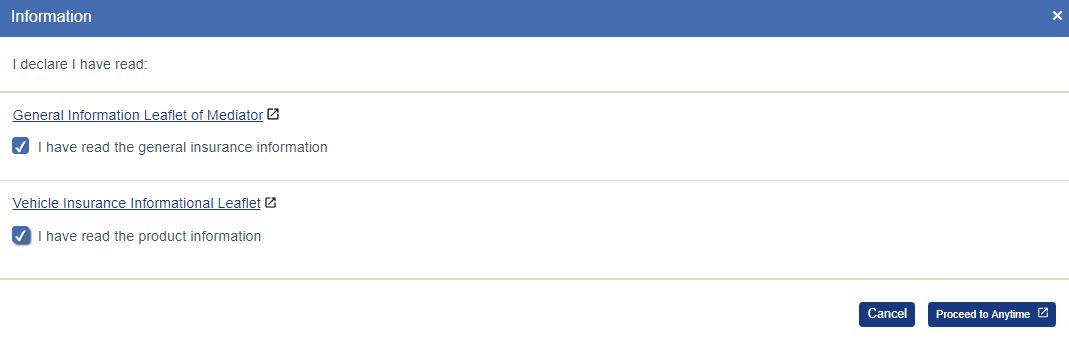
Specifically:
- You will take cognizance of the General Information Leaflet of Mediator (Mandatory from articles 28, 29 of N.4583/2018) and the Pre-contractual Information of the insurance product.
- Select “Proceed to Anytime”.
Under this selection, you will be directed to the relevant page regarding the vehicle insurance of Interamerican’s Anytime platform and you will be able to view the provided vehicle insurance programs, compare prices and choose the insurance program that covers your needs. Follow the steps required like filling in your Details, agreeing with the Terms and paying your program so as your insurance contract is produced.
In Anytime site, under “Frequently Asked Questions” (https://www.anytime.gr/info/faq), you can find information regarding the insurance programs as well as the related coverage that each program offers.