Welcome to the new Attica Bank mobile banking! From now on, you can carry out your banking transactions in an easy, quick and safe manner even if you’re on the go! Manage your accounts with safety and autonomy from your iOS or Android device through a variety of available options!
Introduction
Attica mobile’s main features are:
- Easy and quick to access
- Easy and quick to use
- Instant information about the details of your accounts
- Any payment, transaction and transfer made easily
Services and other settings
How to install Attica Mobile Application
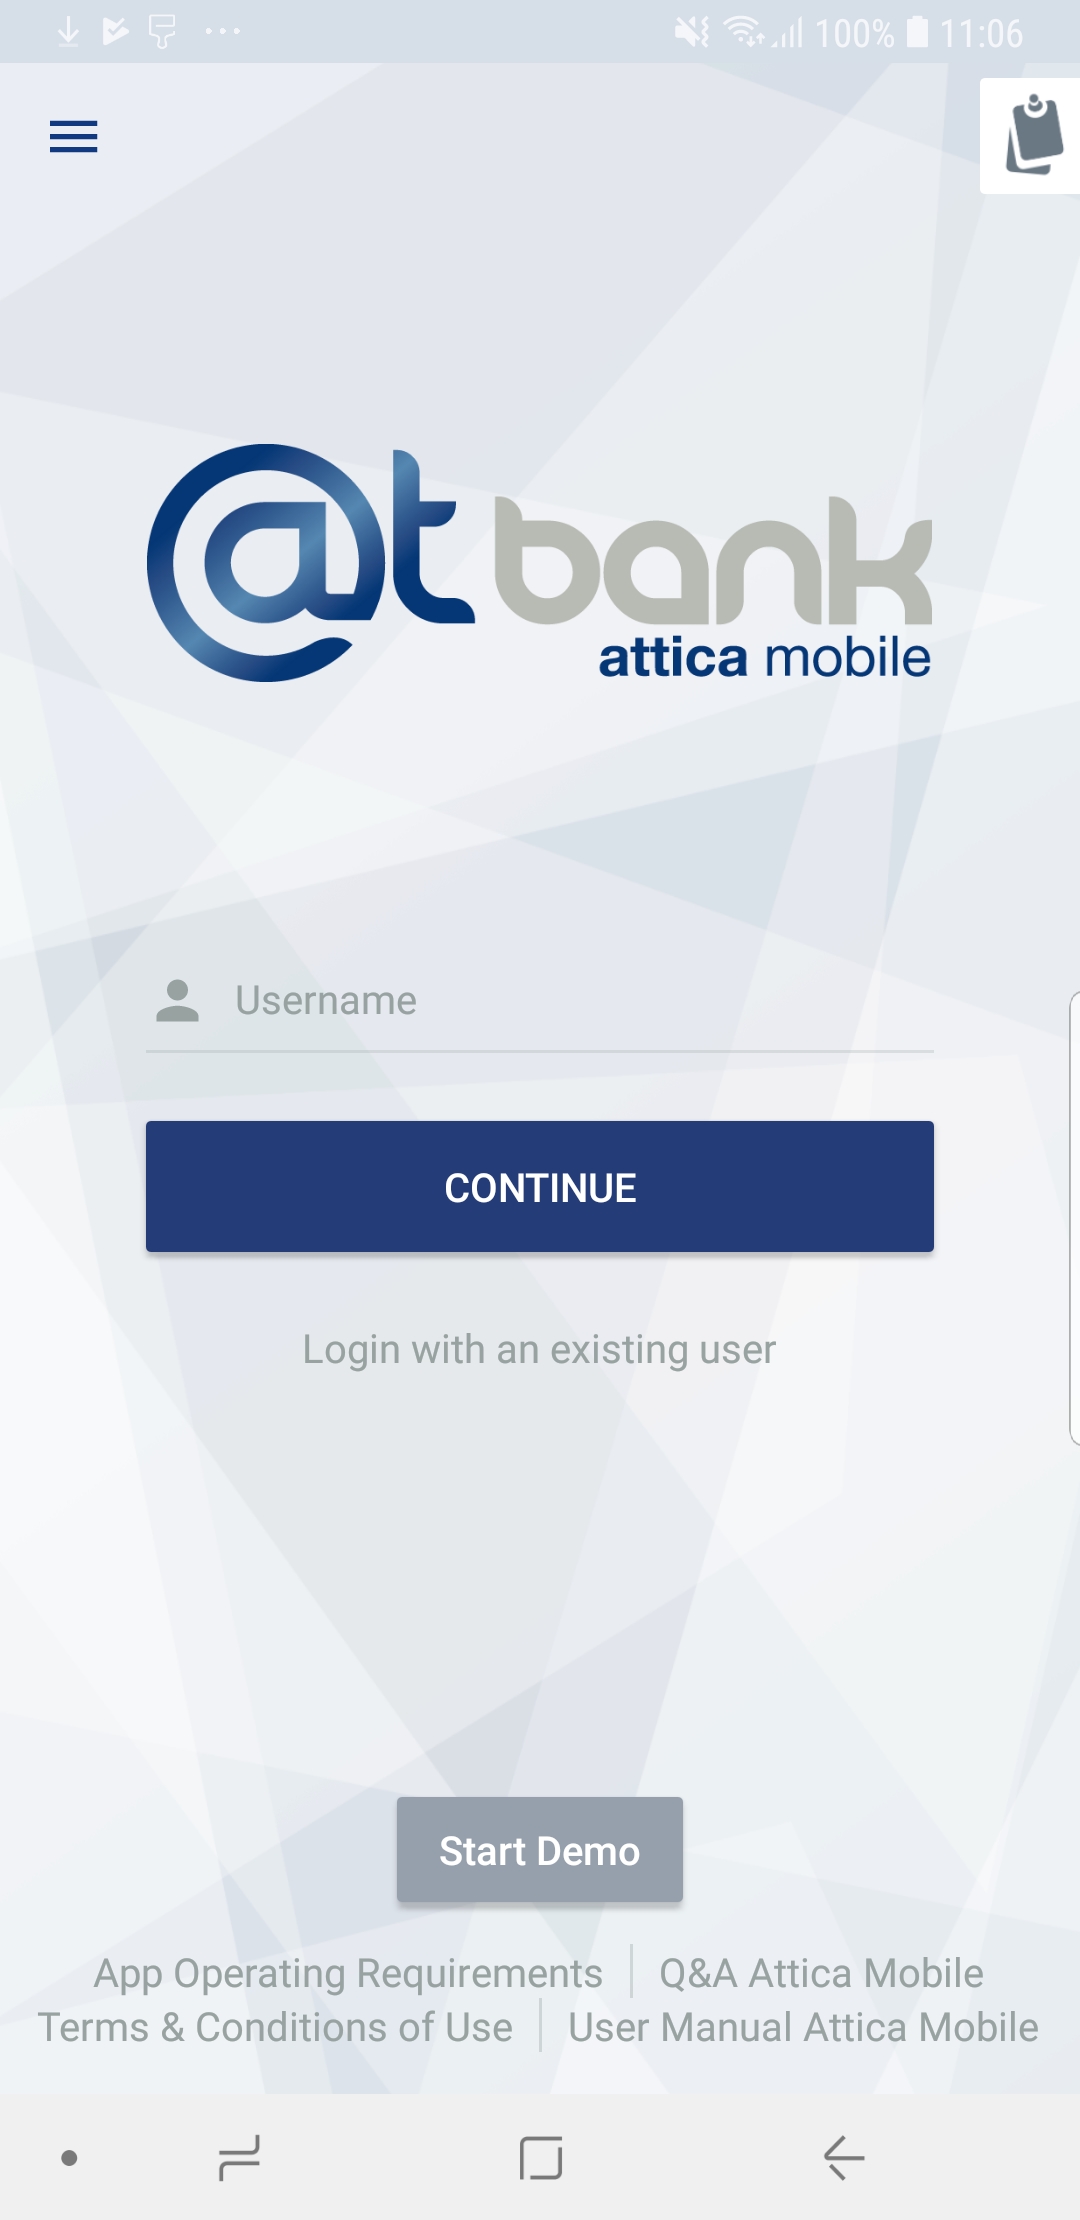
To install the application to your personal mobile device, you have to search for the Attica Bank application ![]() in the Play Store. Select and download it to your device. The downloading of the application is free of charge and is also available in iOS version.
in the Play Store. Select and download it to your device. The downloading of the application is free of charge and is also available in iOS version.
Application’s login page
On a tablet, at the bottom of the login screen, you can view the following four (4) icons:
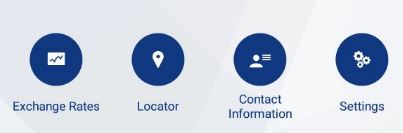
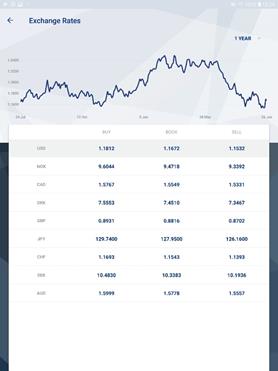
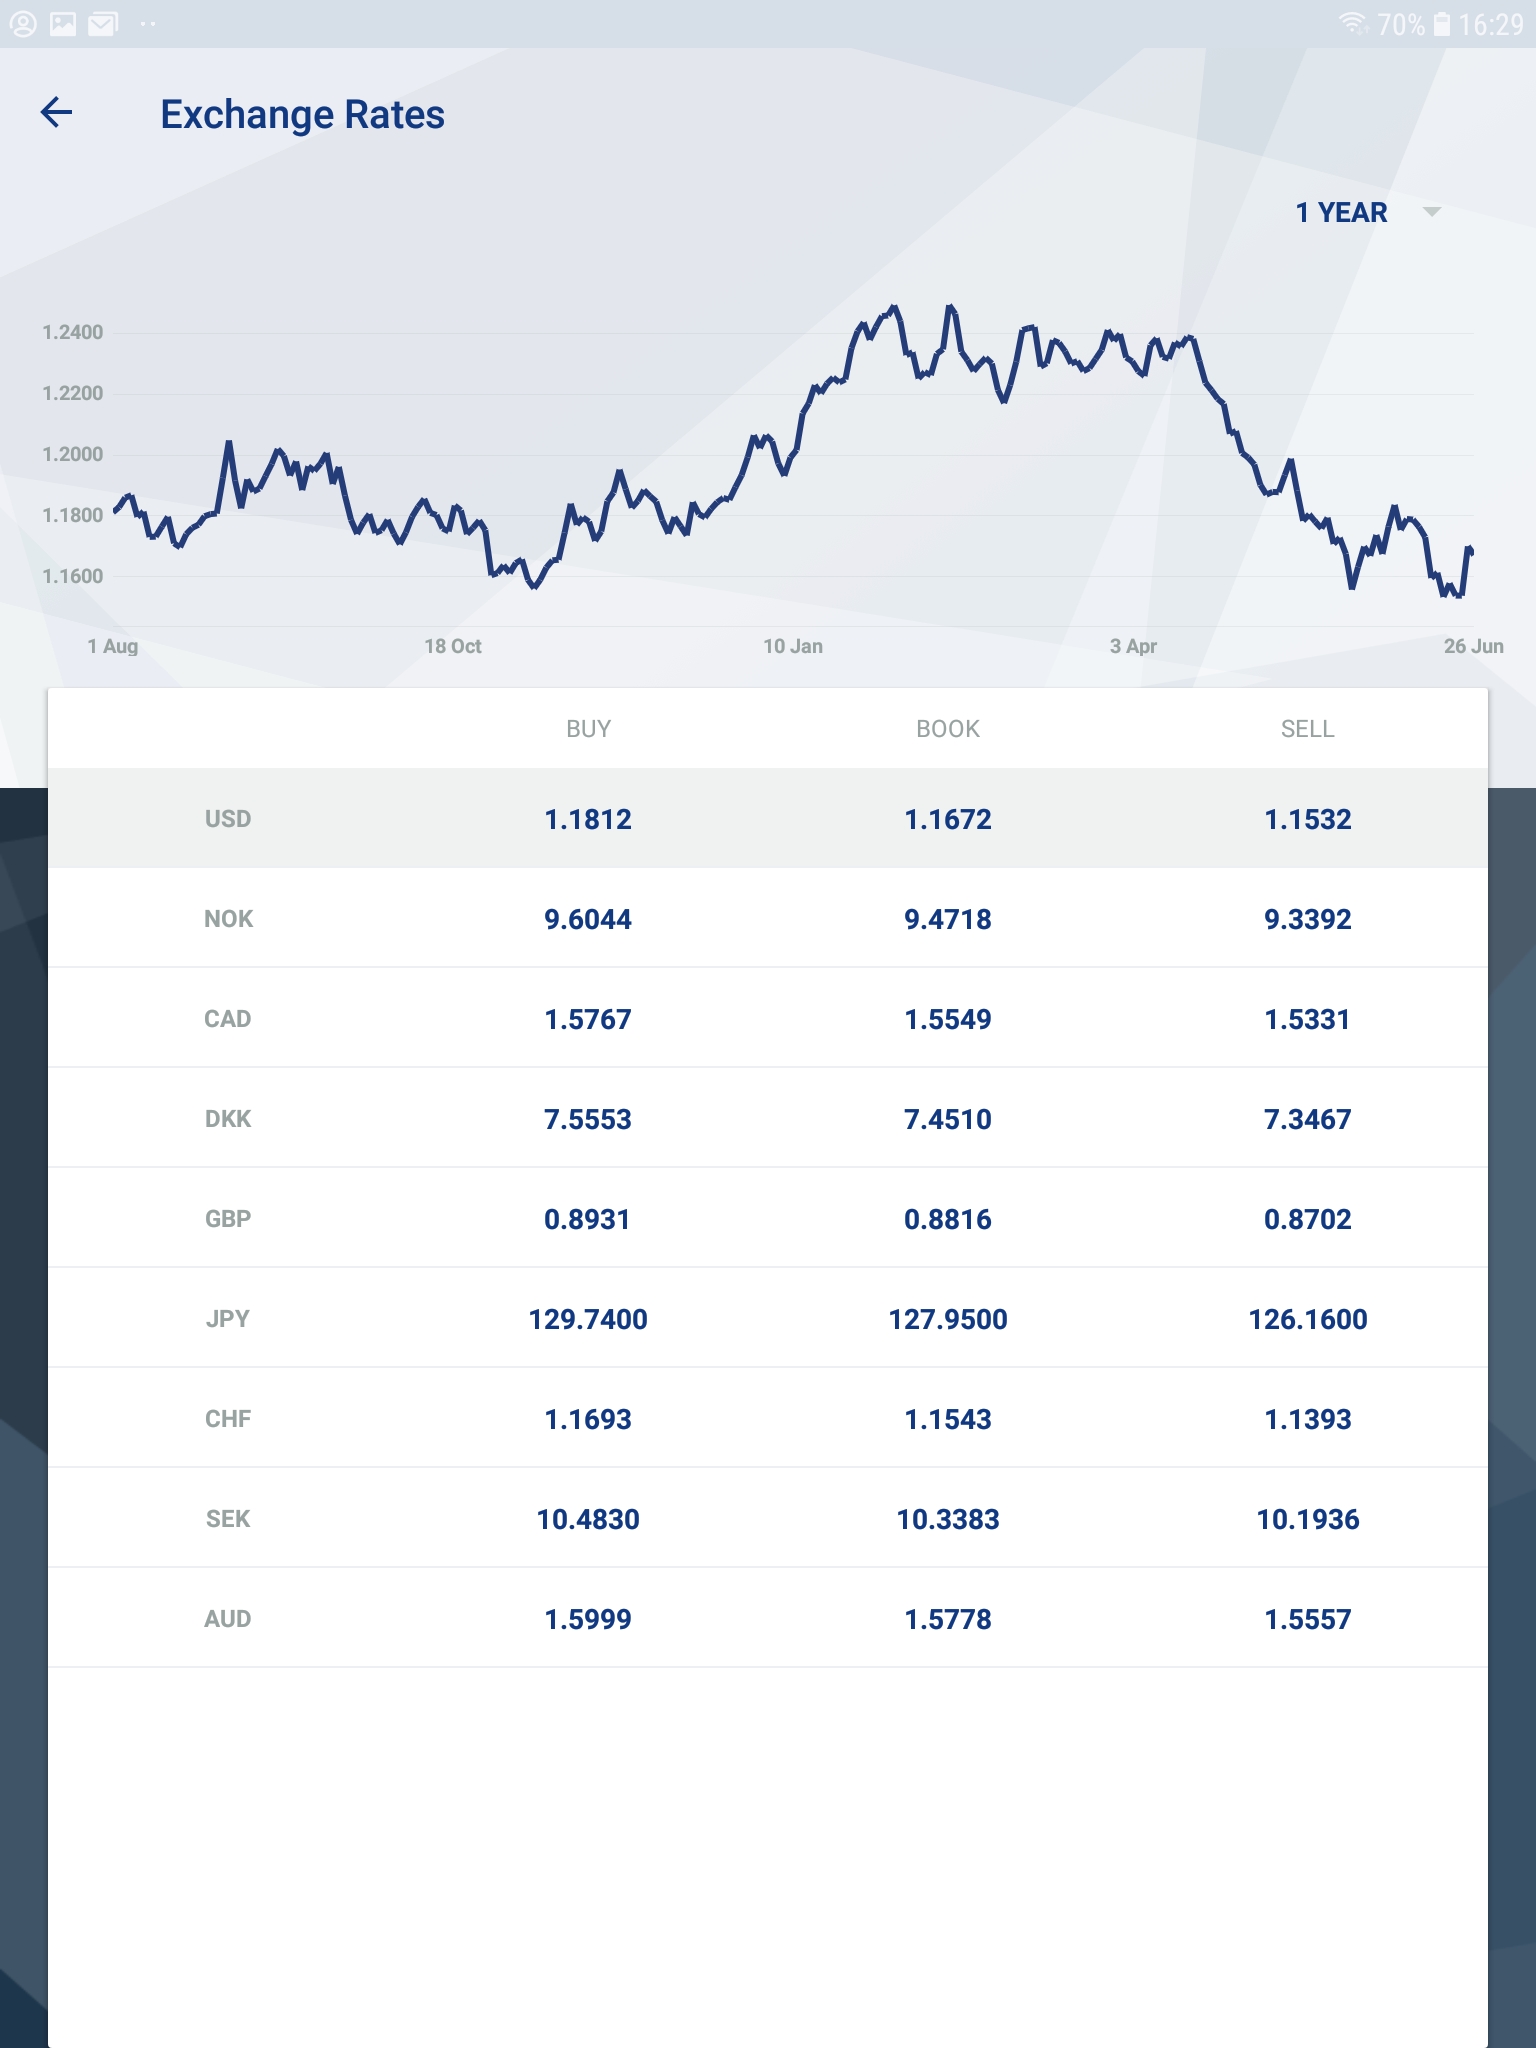
- The Exchange Rates relative to €. By selecting this icon
 , you are redirected to a new screen which contains the exchange rates of the most frequently used currencies. For each selected currency, you can see a diagram of the change of the currency’s price relative to Euro for a predefined period of time (last week, month and year).
- The Locator
 , where all of the Bank’s branches & ATM’s are shown on the map. By selecting a specific branch or ATM, the contact details thereof appear on the screen (address, contact phone number, operating hours).
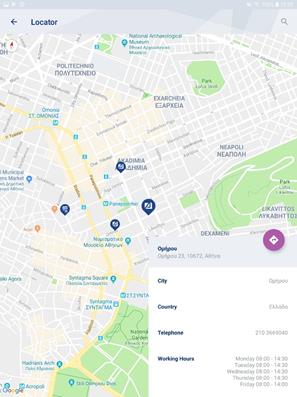

- The Contact Information
 , where the Bank’s contact details are shown (Address, Email and Phone number).
- The Settings where the application’s language is set. There are 2 available options: English or Greek.
On a mobile phone, by selecting “Services” on the login screen, you are redirected to a new screen containing the four aforementioned features respectively.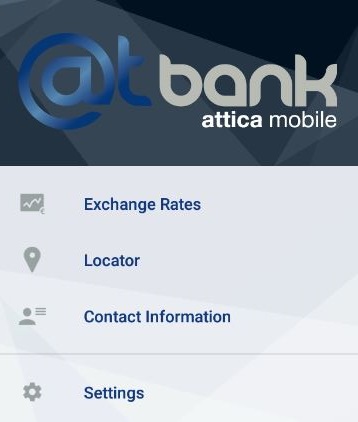
Log in
Log in Procedure
There are 3 available options for the user to log in to the application.
- Via Username and Password
Enter the Username and Password you use when logging in to Attica e-banking. It is the only way to log in to Attica Mobile for the first time from a particular device.

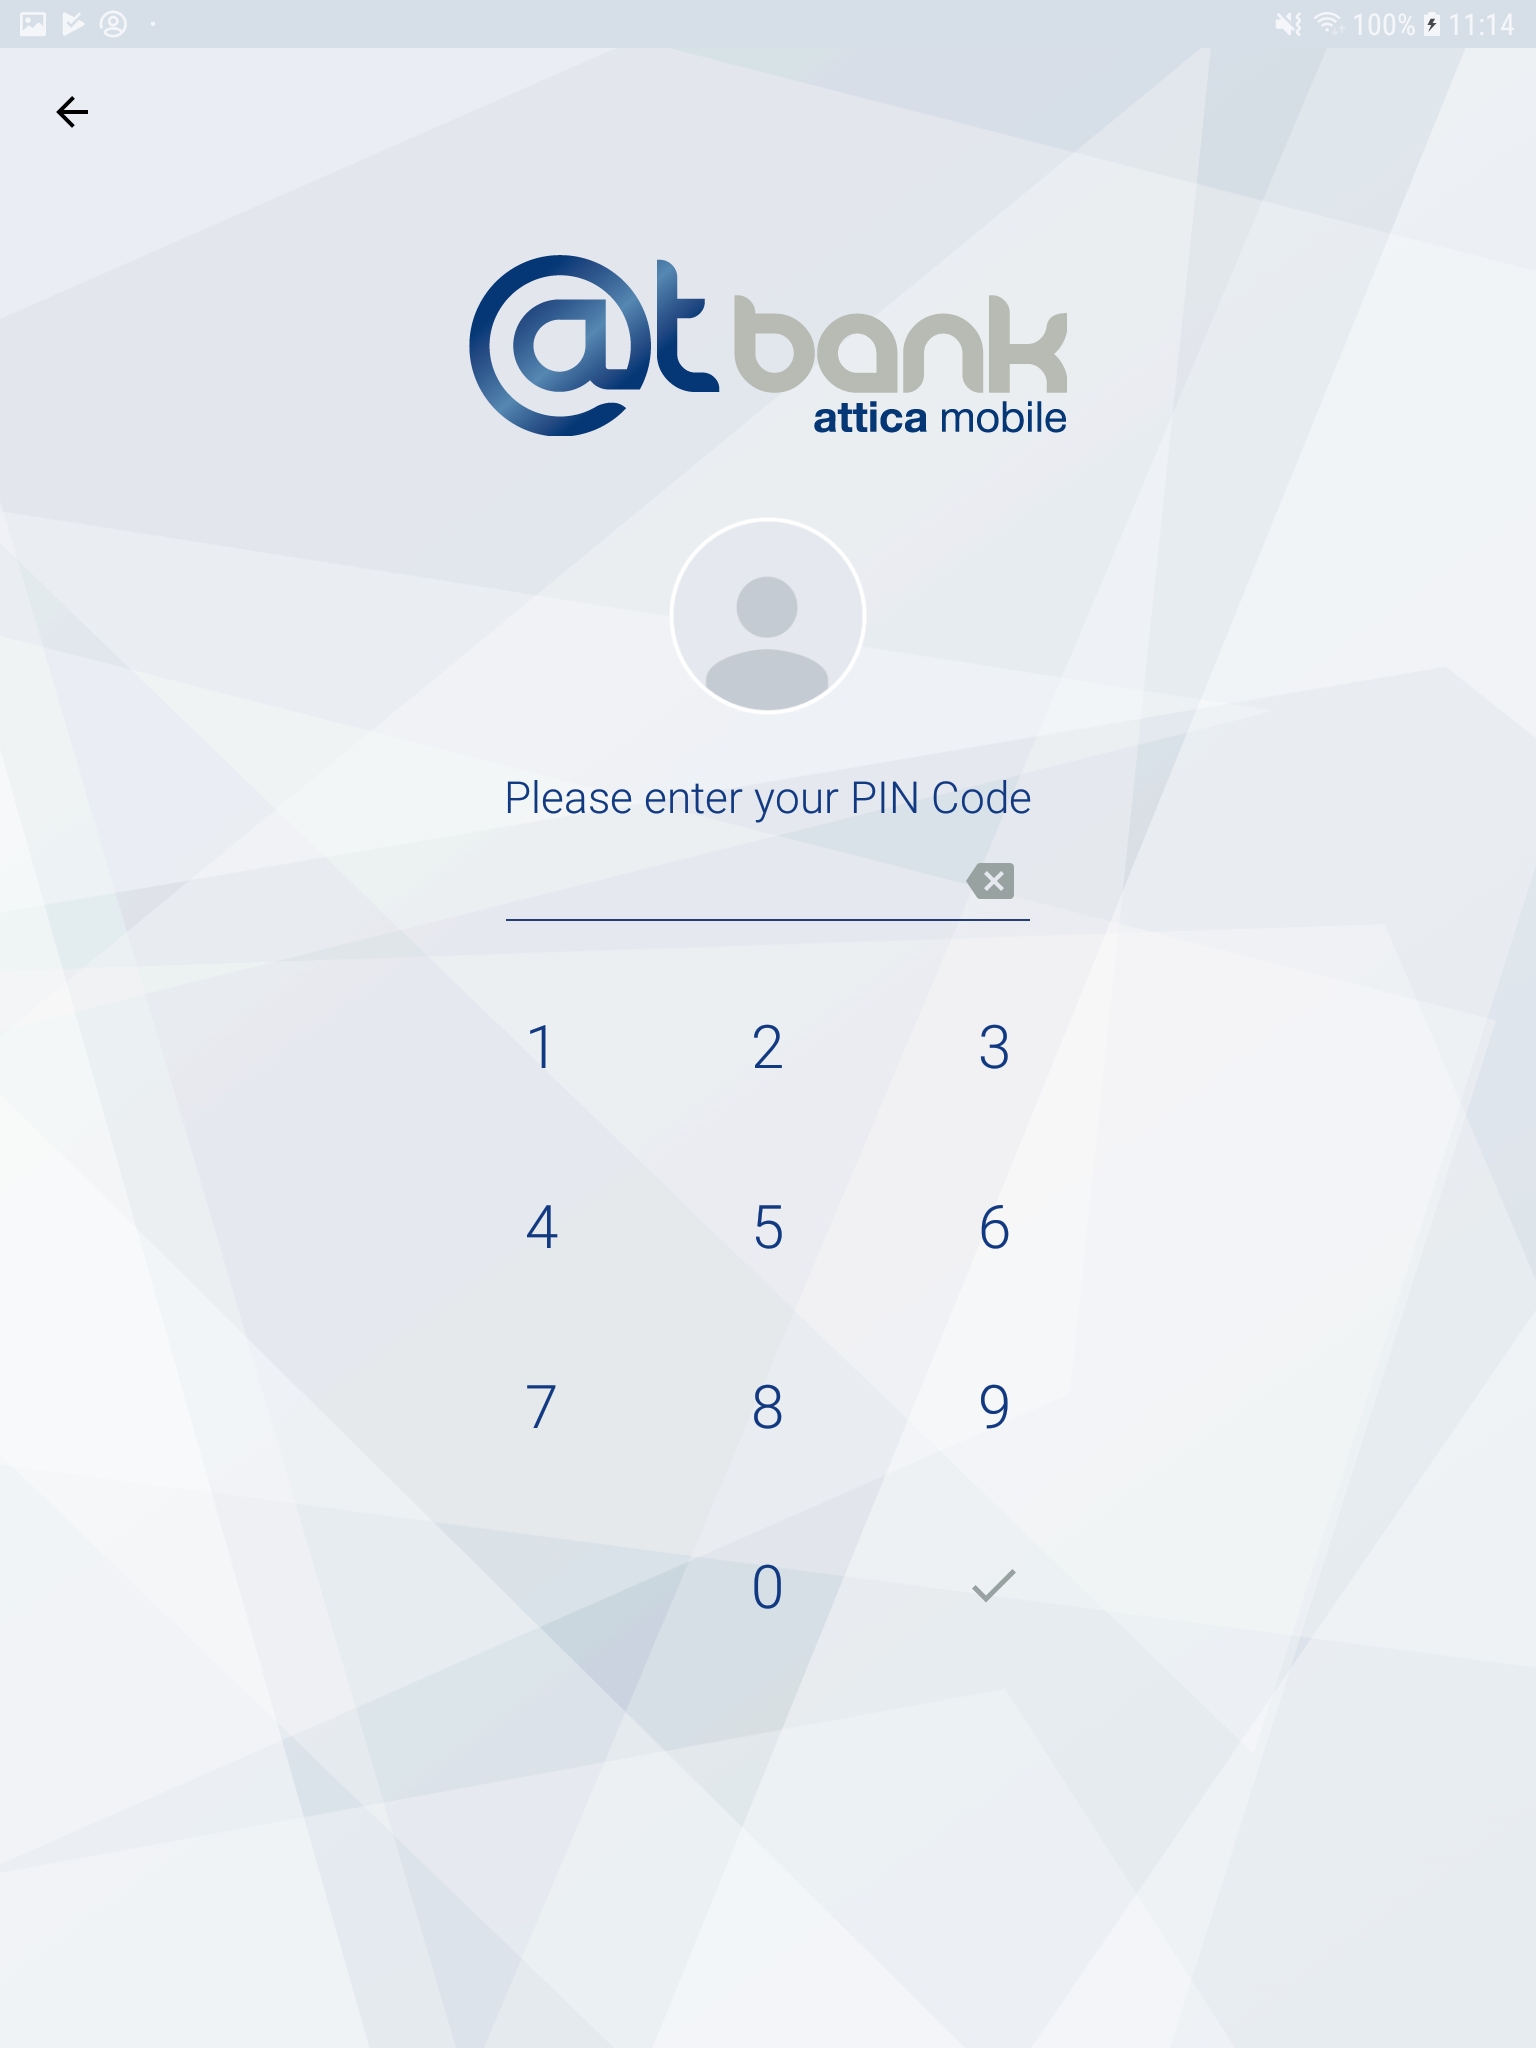
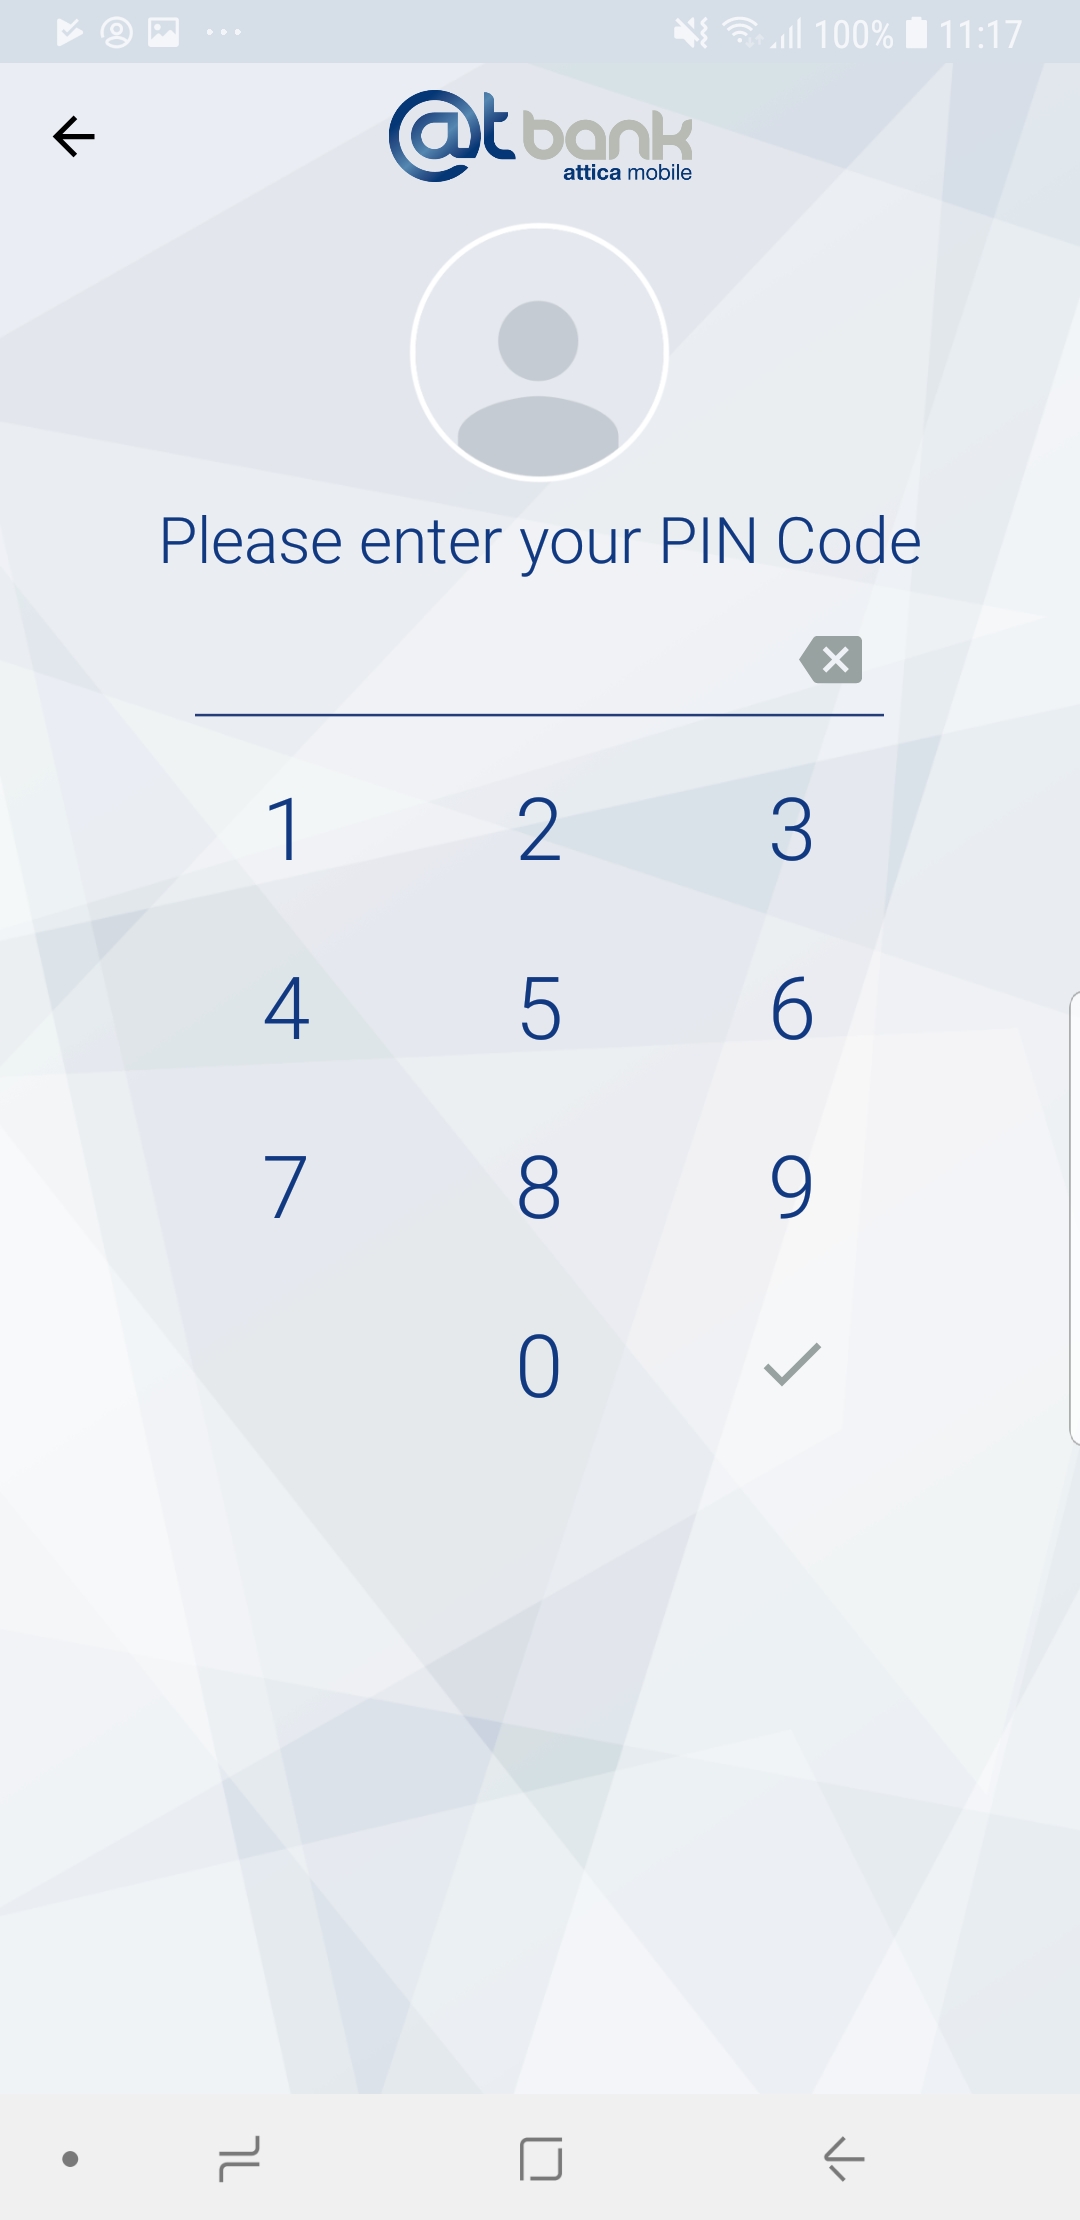
- Via PIN
Select the user avatar and if your device is registered to the application, you will be redirected to the corresponding screen where you have to enter the PIN you have set when you registered your device. (For more information, see "Manage devices").
- Via Fingerprint
Select the user avatar and if your device is registered to the application you will be redirected to the corresponding screen where you have to use your stored fingerprint. (For more information, see paragraph “Manage devices”).
By logging in to Attica Mobile, you are redirected to the application’s main screen (dashboard). To begin with, the dashboard is shown as such below:

At the top of the tablet’s dashboard you can view:
- The transfers’ icon
 , which redirects you to the Transfers menu. For more information, see chapter “Transfers”.
 - The avatar icon
 , which redirects you to the User menu. For more information, see chapter “User”.
 - Attica Bank’s Logo
 , which redirects you to the Services menu. The Services menu consists of the Exchange Rates and the Locator as already referenced.
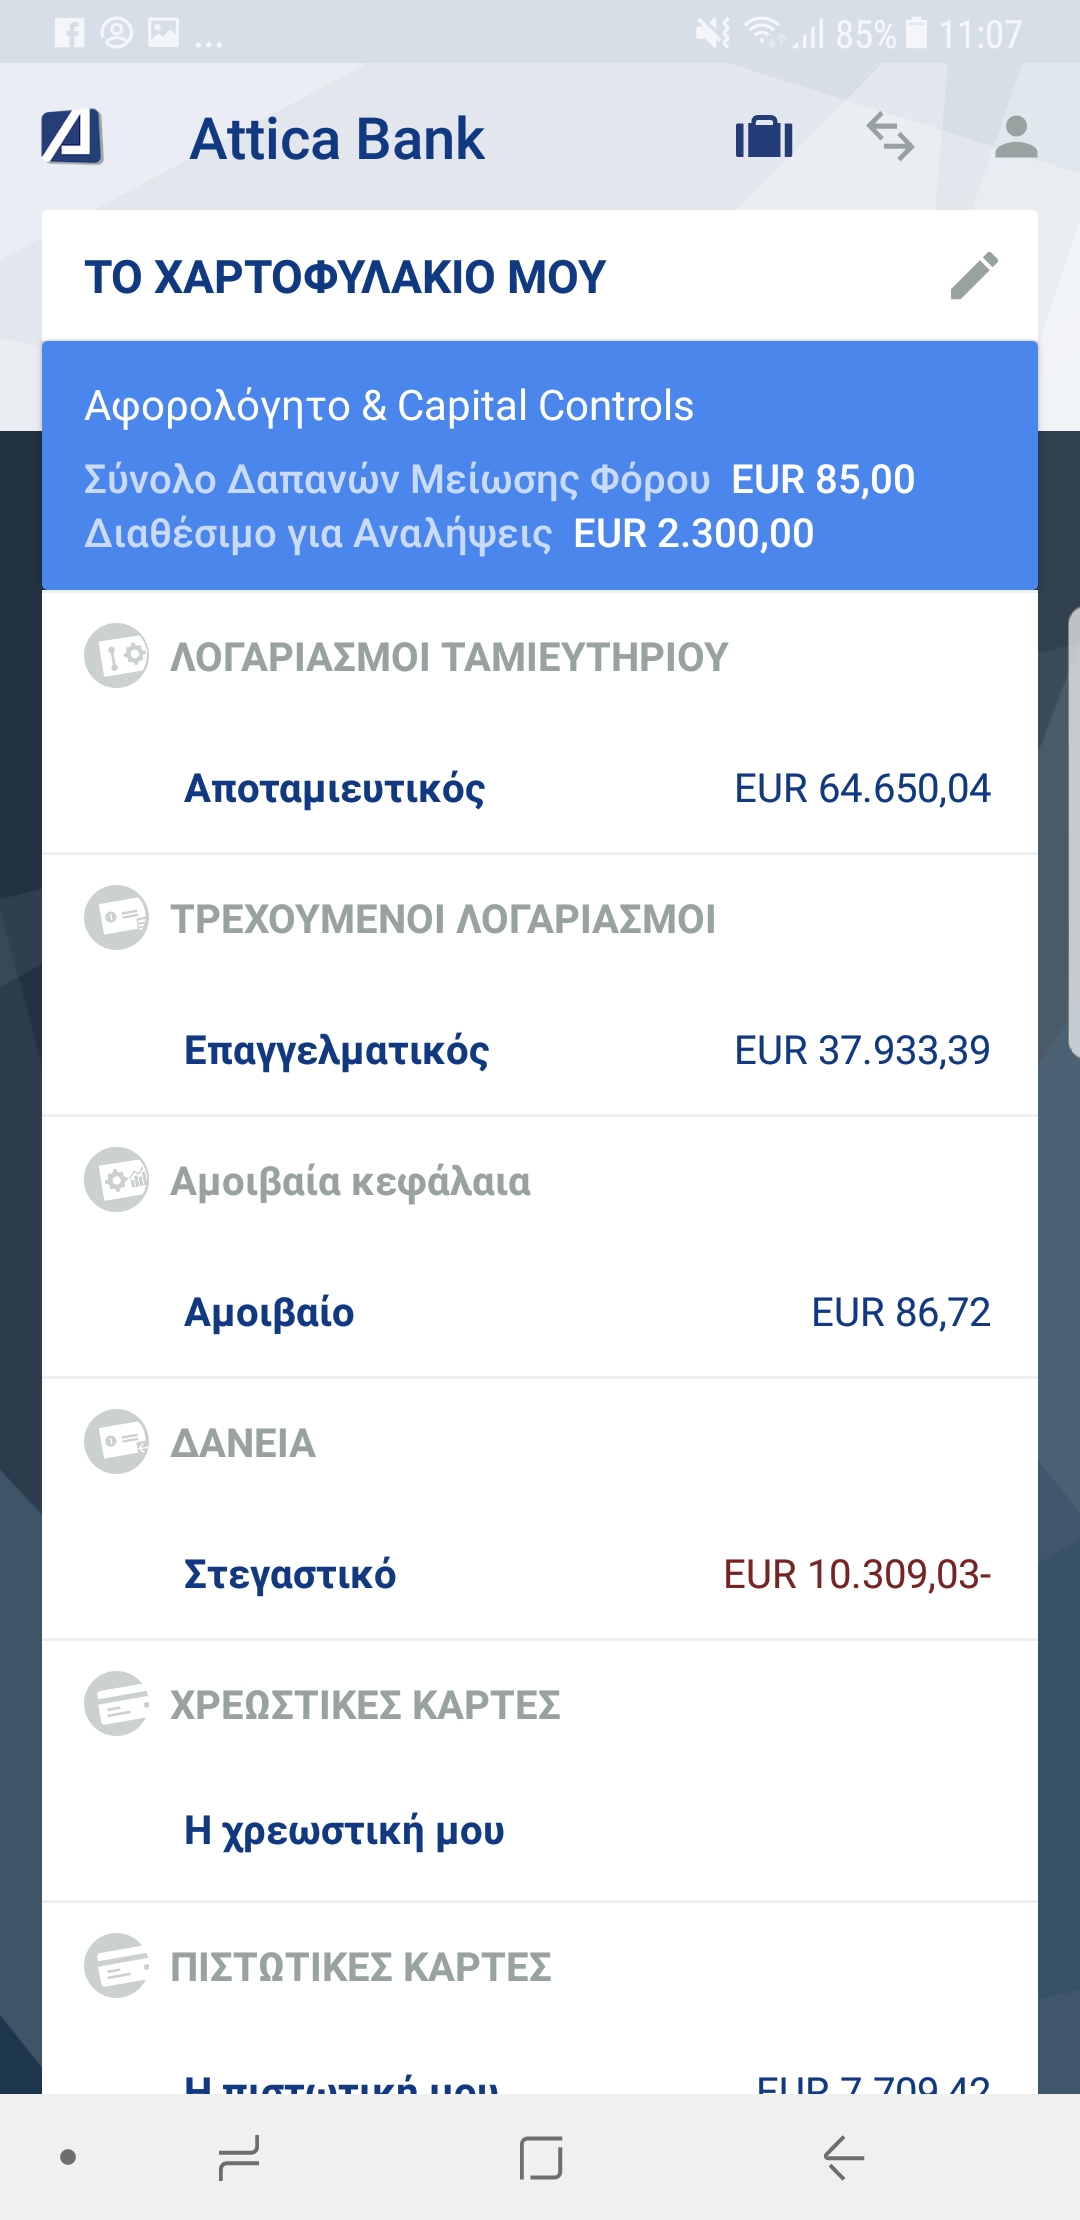
On the left side of the dashboard you can view:
- The whole list of your accounts, credit cards, loans etc.
On the right side of the dashboard you can view:
- information about “Tax Free”
- the “Upcoming Transactions”
Mobile phone’s dashboard consists of a single information column and a footer.
The footer menu consists of 4 categories:
- My Portfolio
 , where the User can view, manage and determine all his/her accounts or his/her favorite ones.
 - Transfers , where you can carry out monetary transactions such as Intrabank and DIAS transfers as well as bill payments or Credit cards payments.
- The User , where you can change your username and password, manage your devices and set up your alerts notifications.
- Services
 , where you can view the Exchange Rates and the available Attica branches and ATM’s.
After marking (if you wish) your favorite accounts, the application’s dashboard is customized as follows e.g.:


On a tablet, the left side of the dashboard is adjusted as such all of your marked as favorite accounts to be shown. By selecting “View All”, you are redirected to the application’s dashboard where all of your accounts are visible.
In the same way, on a mobile phone, the main information column’s list is adjusted to consist of all of your marked as favorite accounts. By selecting “View All”, you are redirected to the application’s dashboard where all of your accounts are visible.
The process of marking an account as favorite is explicitly explained in paragraph “Save your accounts as favorites”.
Tax Free
In order to have a more detailed view on “Tax free”, select “View All” in order the following screen to appear (tablet) or select the blue frame where “Tax Free” is displayed (smartphone):
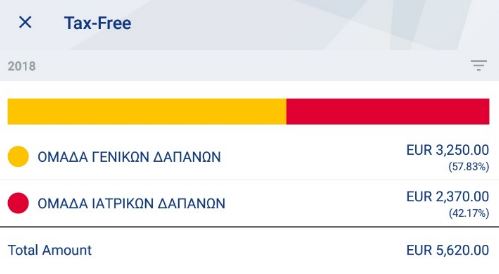
This screen shows, for the last two fiscal years, the total amount of your expenditures made by electronic transactions during each year, based on the amount needed to collect the Tax exemption defined by the current legislation.
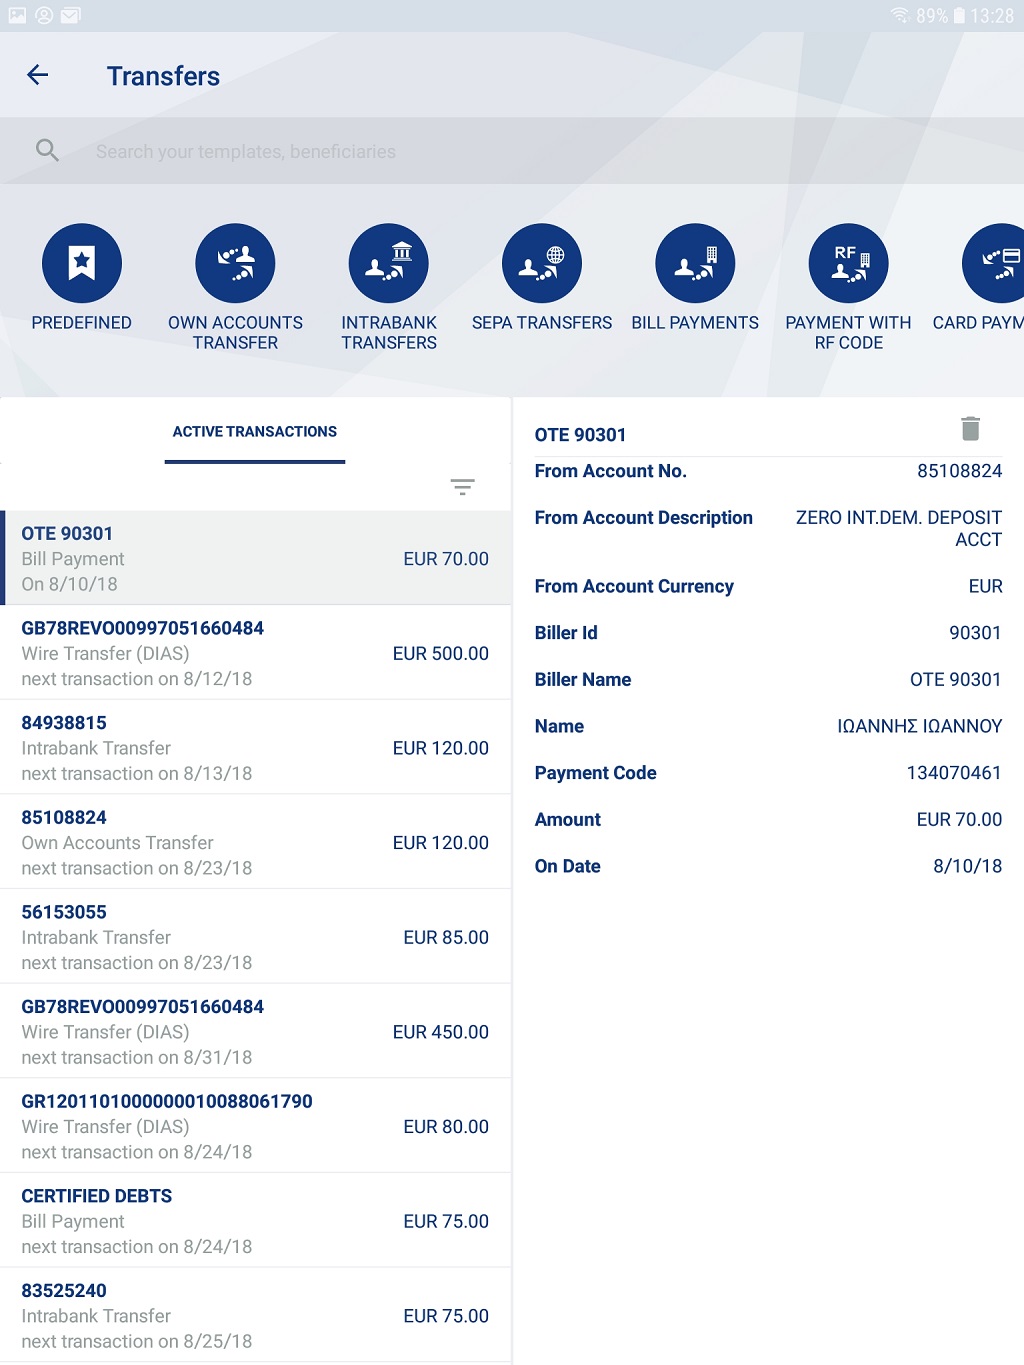
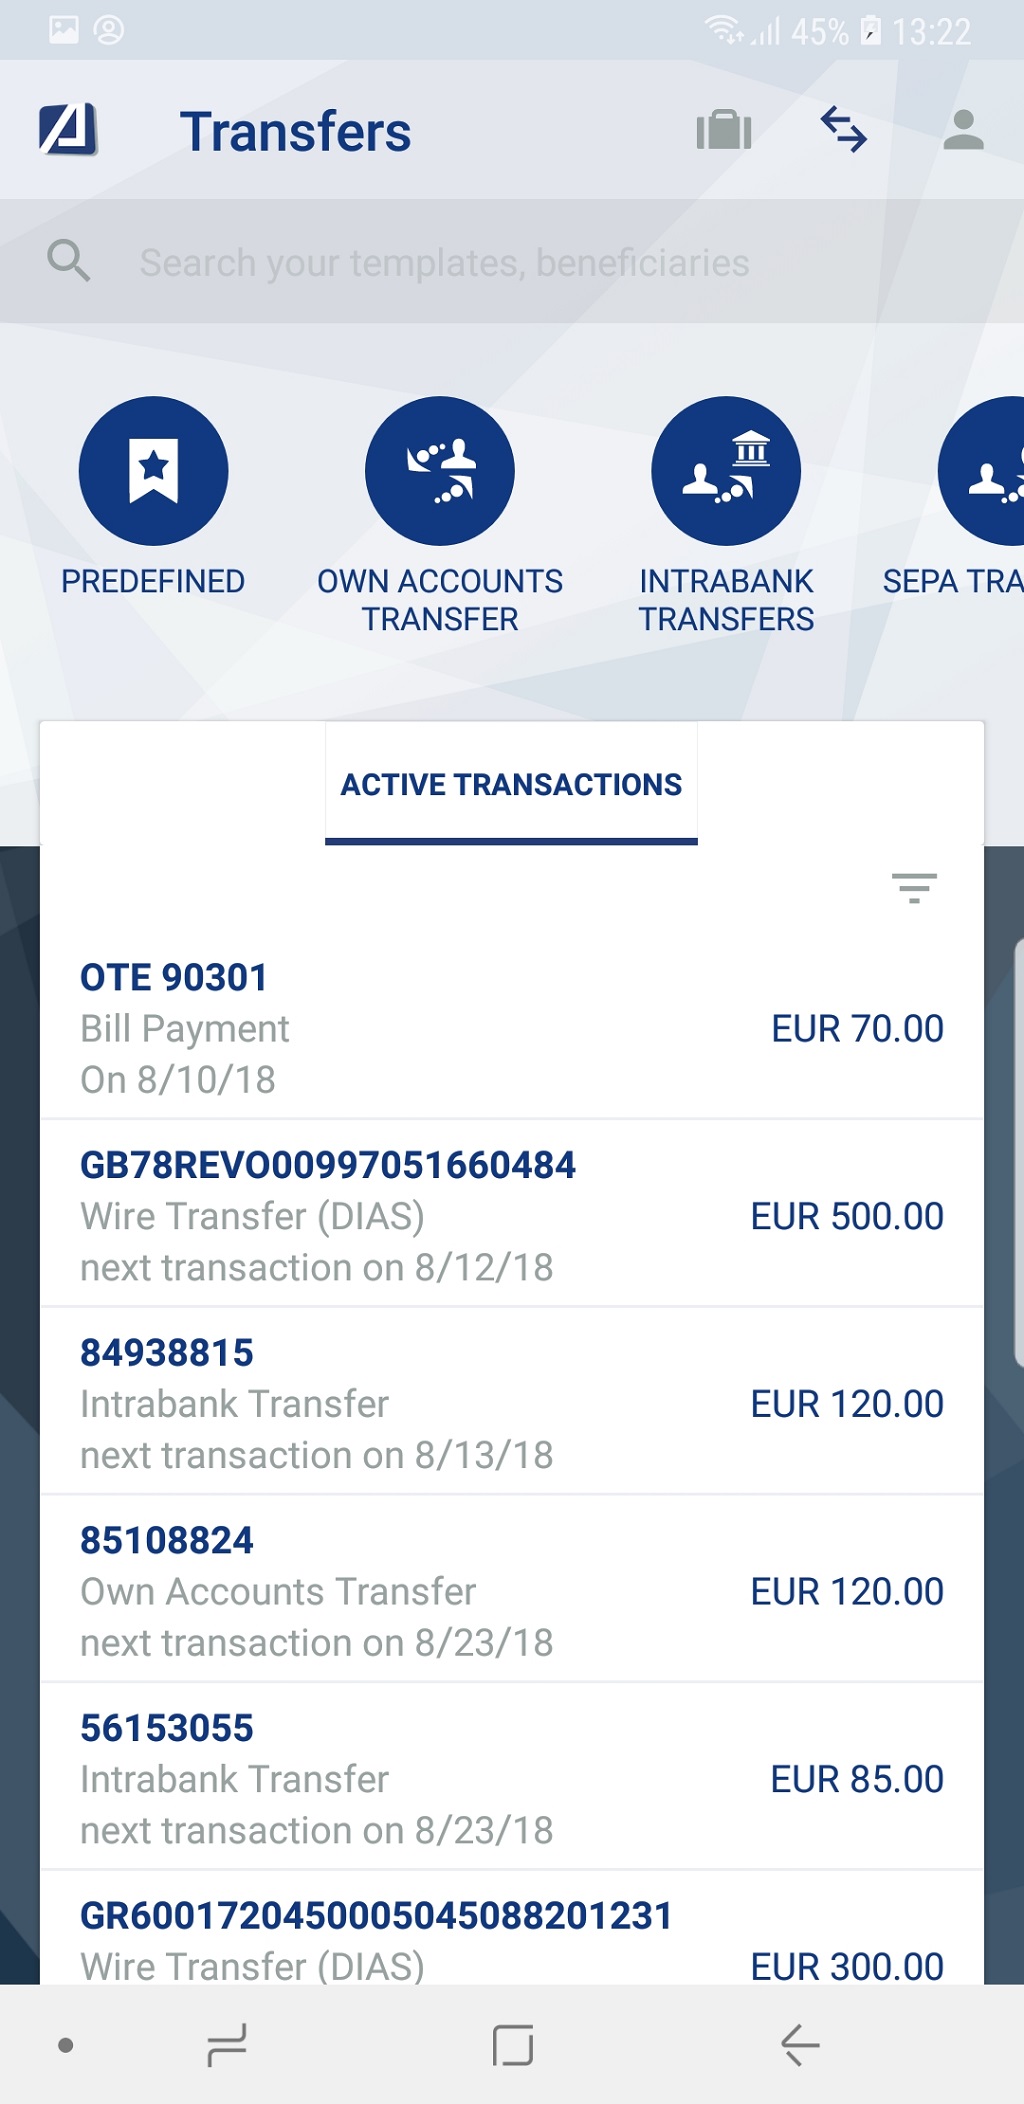
Active (or Upcoming) Transfers
In order to view the “Upcoming Transactions”, on a tablet, select “View All” at the end of the corresponding list in order to be redirected to the screen of Active Transactions as shown below:
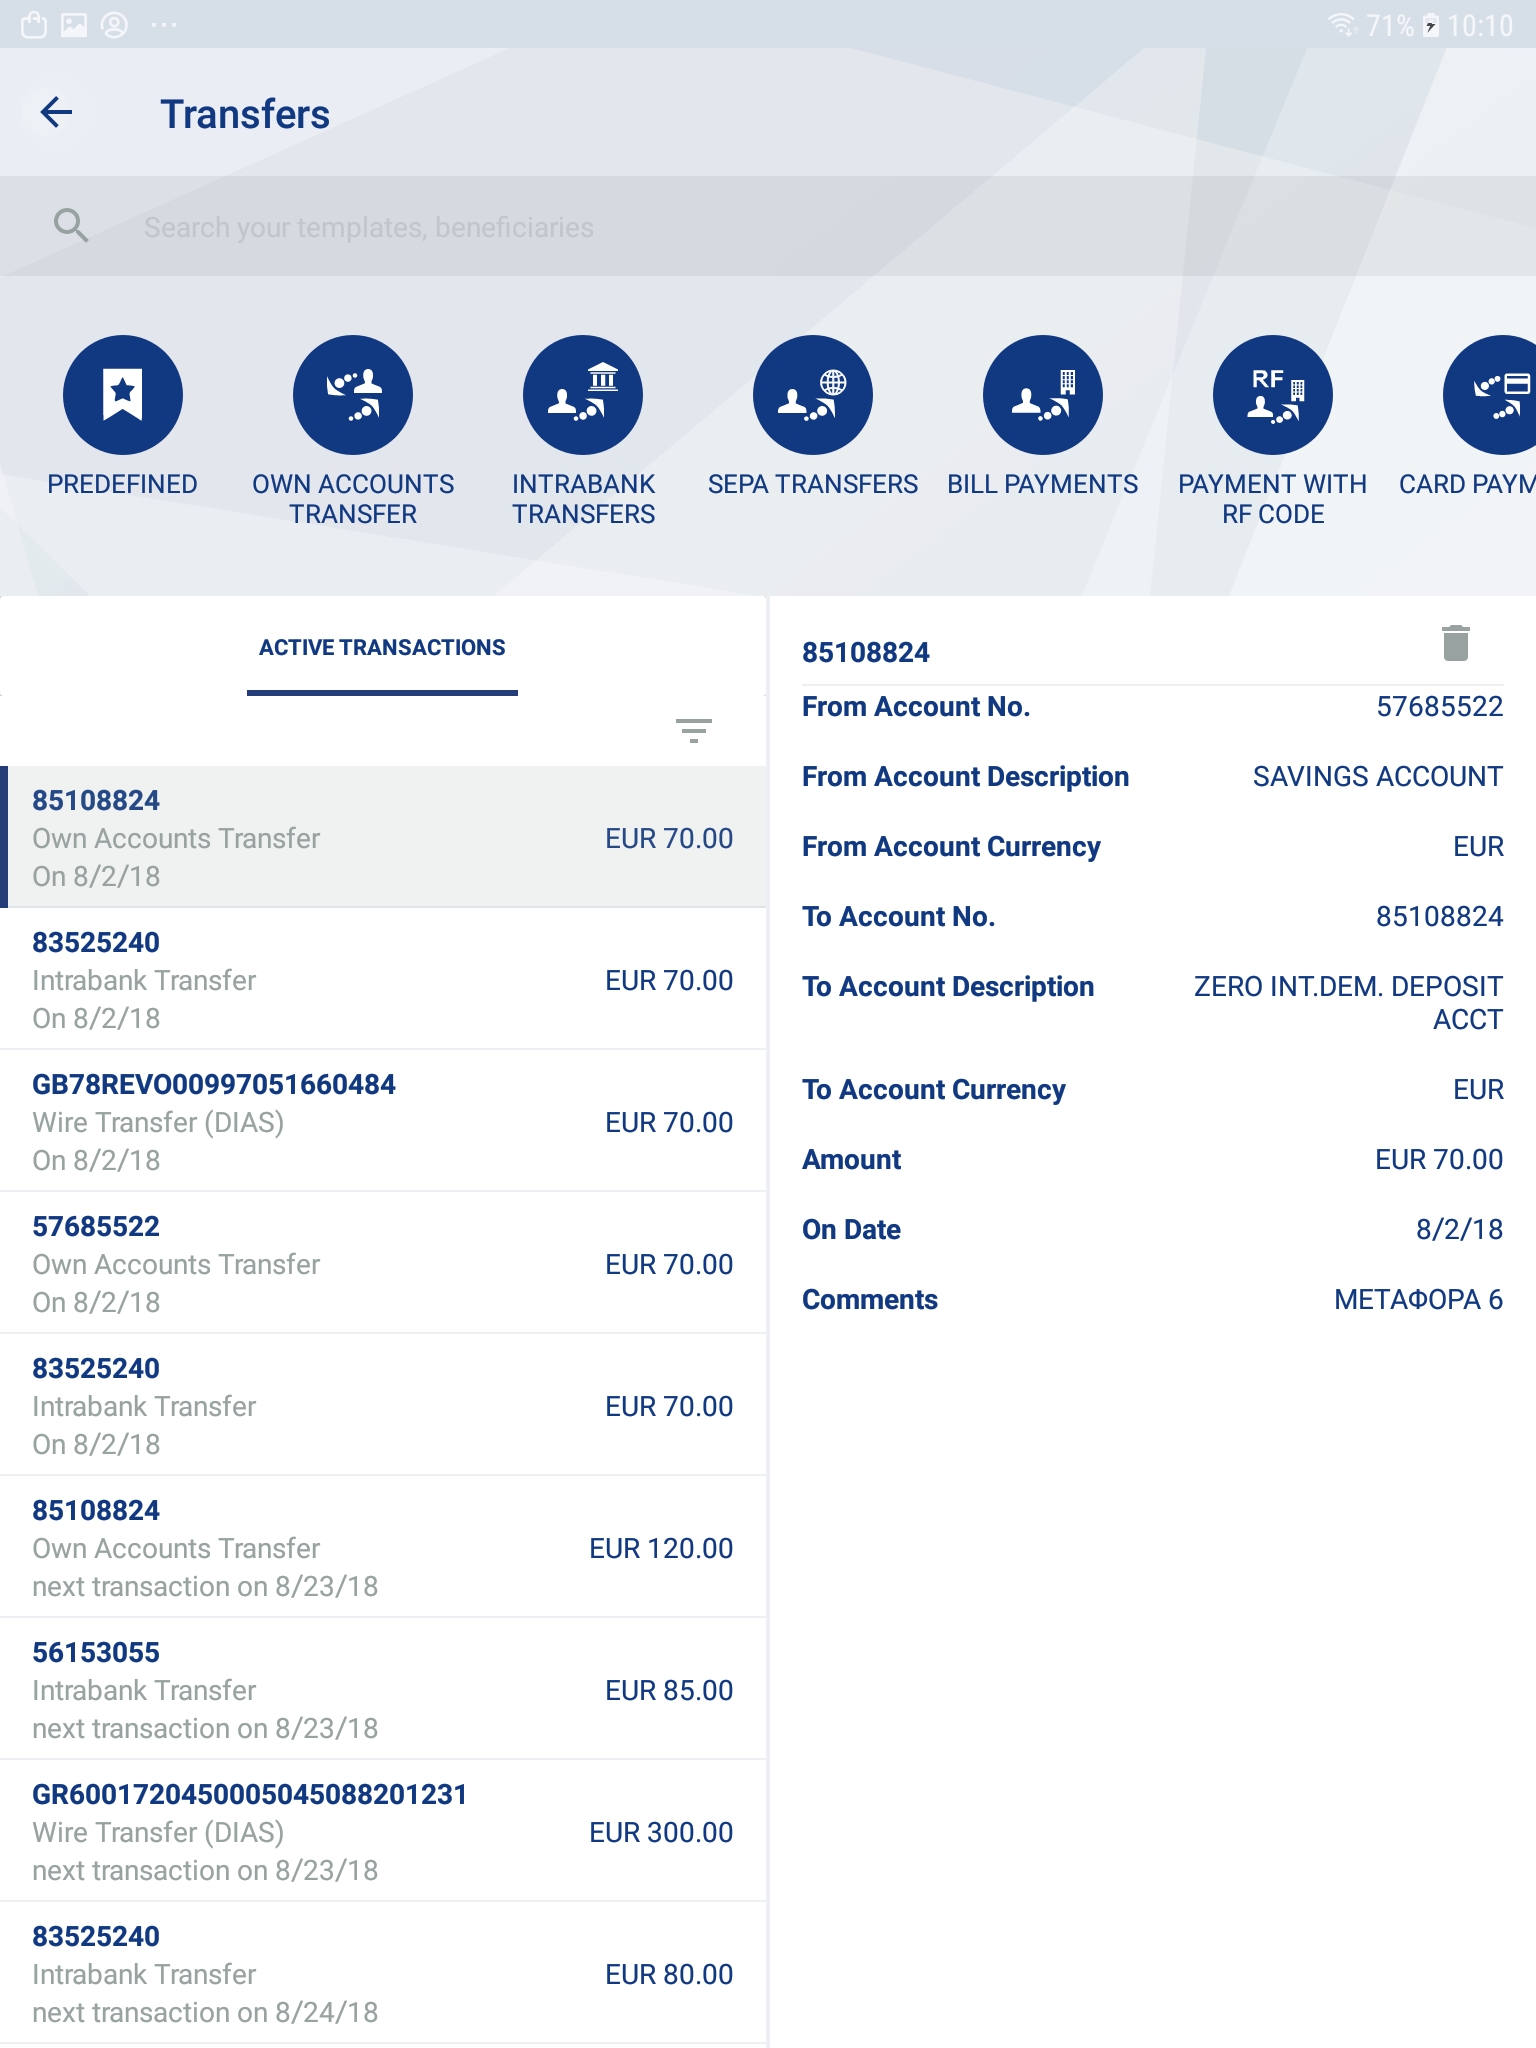
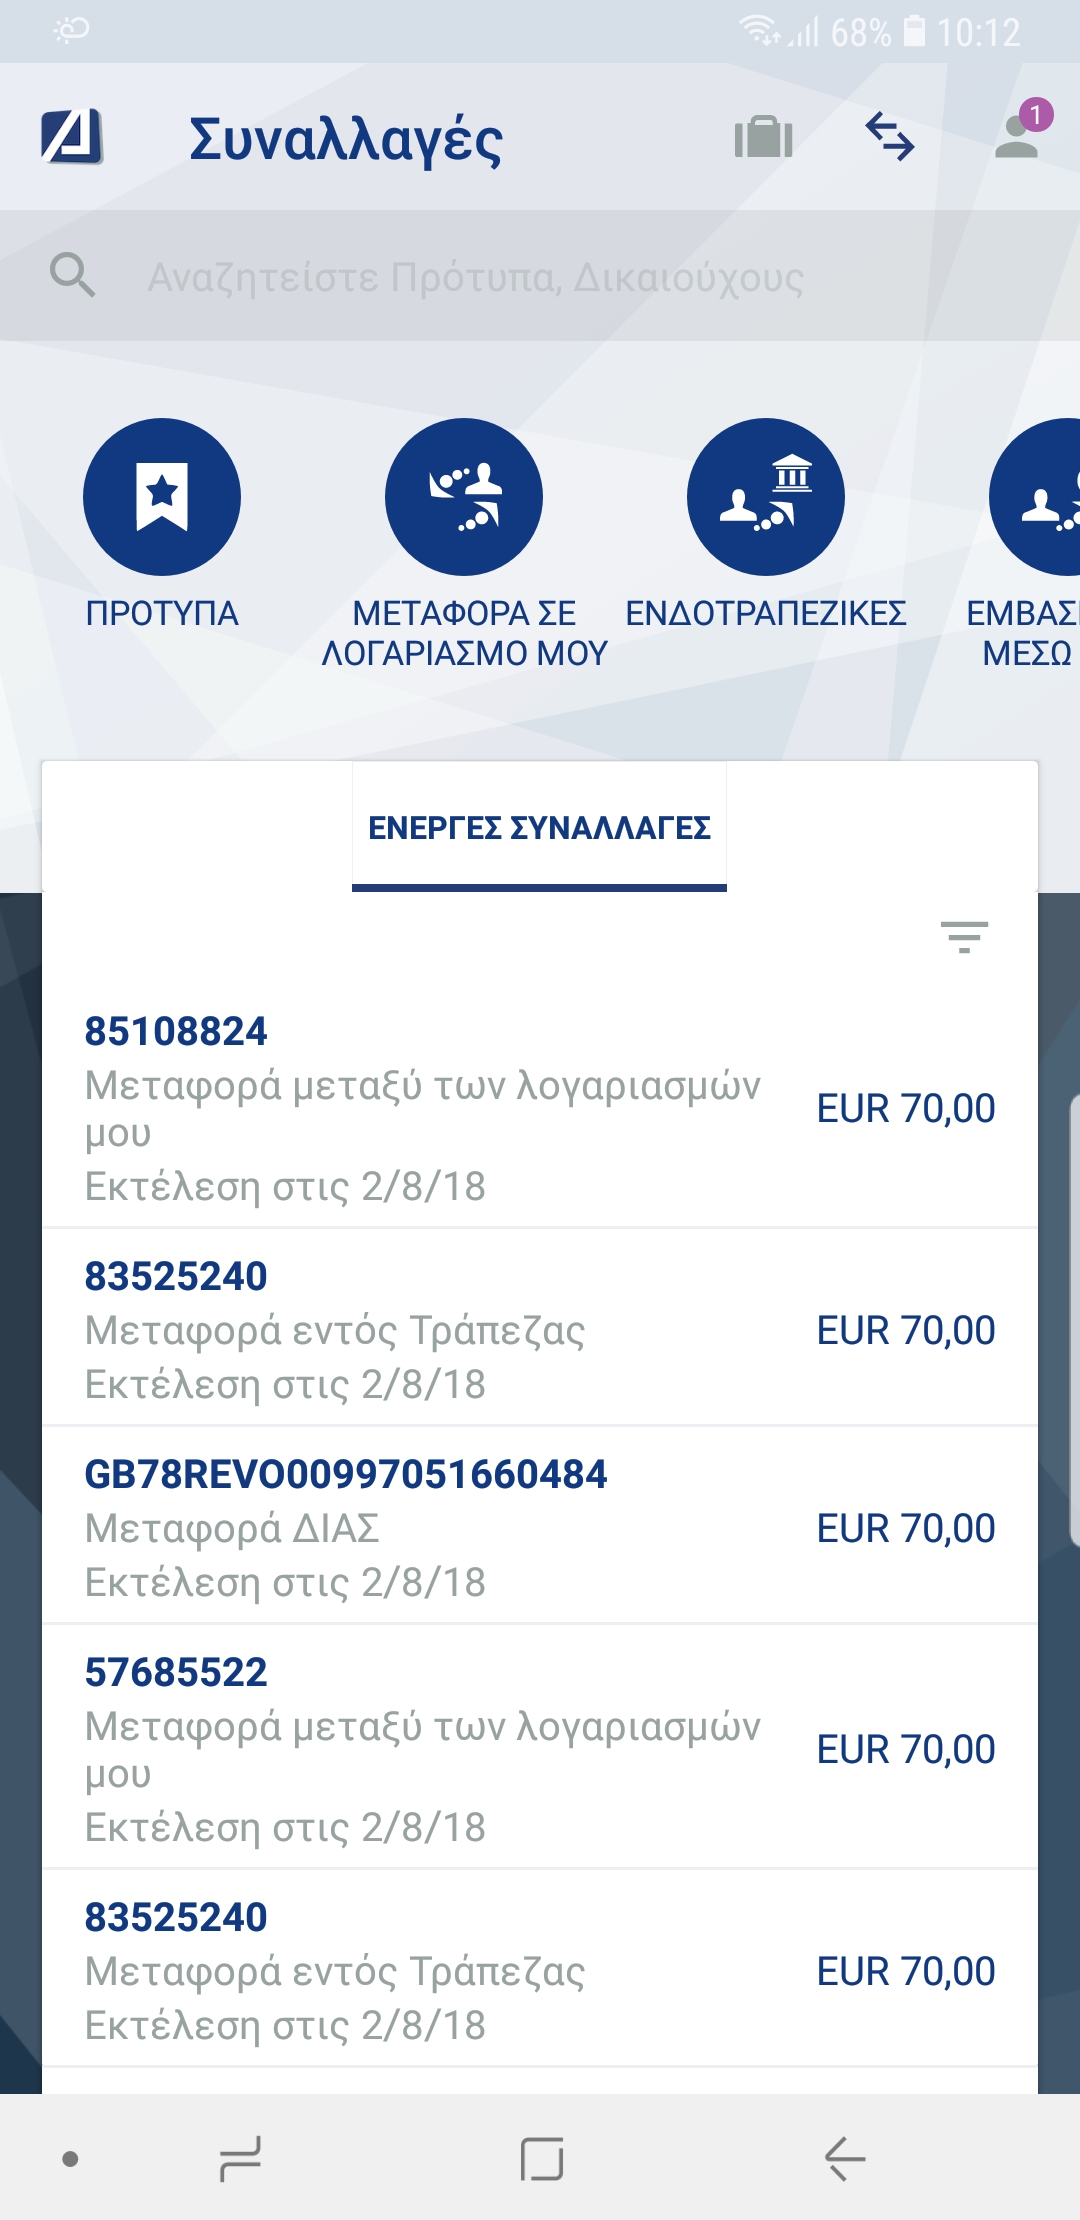
Active Transactions appear on the left side of the screen while the details related to a particular selected transaction are shown on the right side of the screen.
On a mobile phone, there is no shortcut on the dashboard and in order to view the “Active Transactions” you have to be redirected to the transfers menu as shown in the above screenshot.
By applying search filters, you can see your active transactions for a longer or shorter period of time and per account of interest.

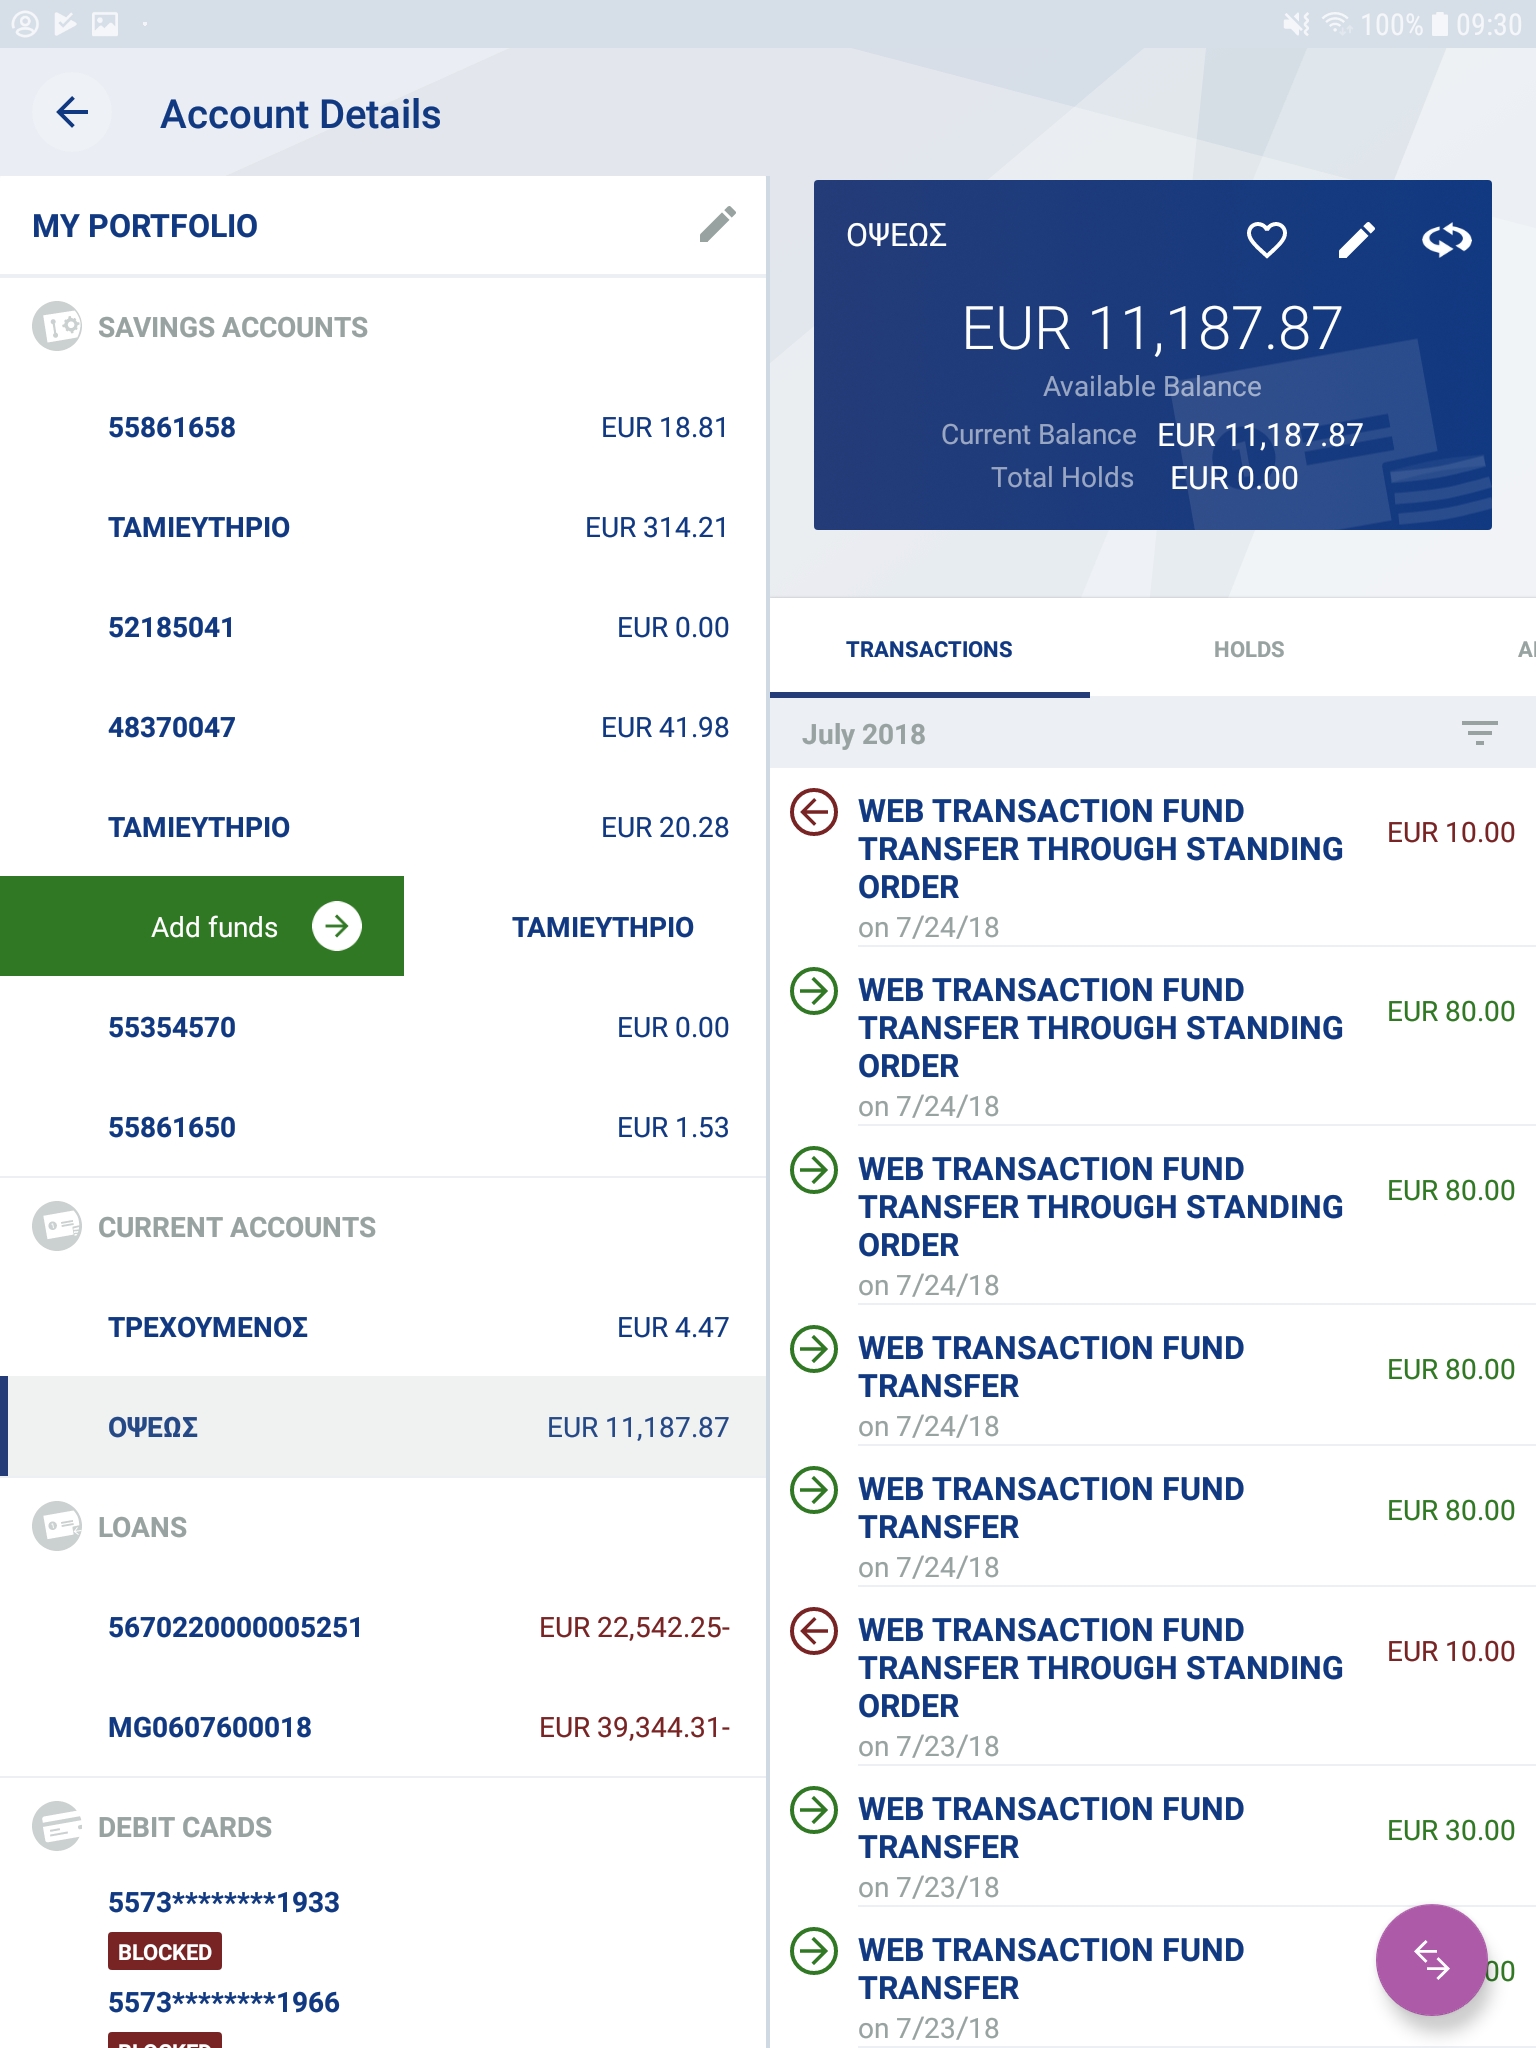
My Portfolio
“My Portfolio” consists of all your Bank accounts (current or savings), time deposits, loans, mutual funds and your debit, credit and prepaid cards.
Save your Accounts as favorites
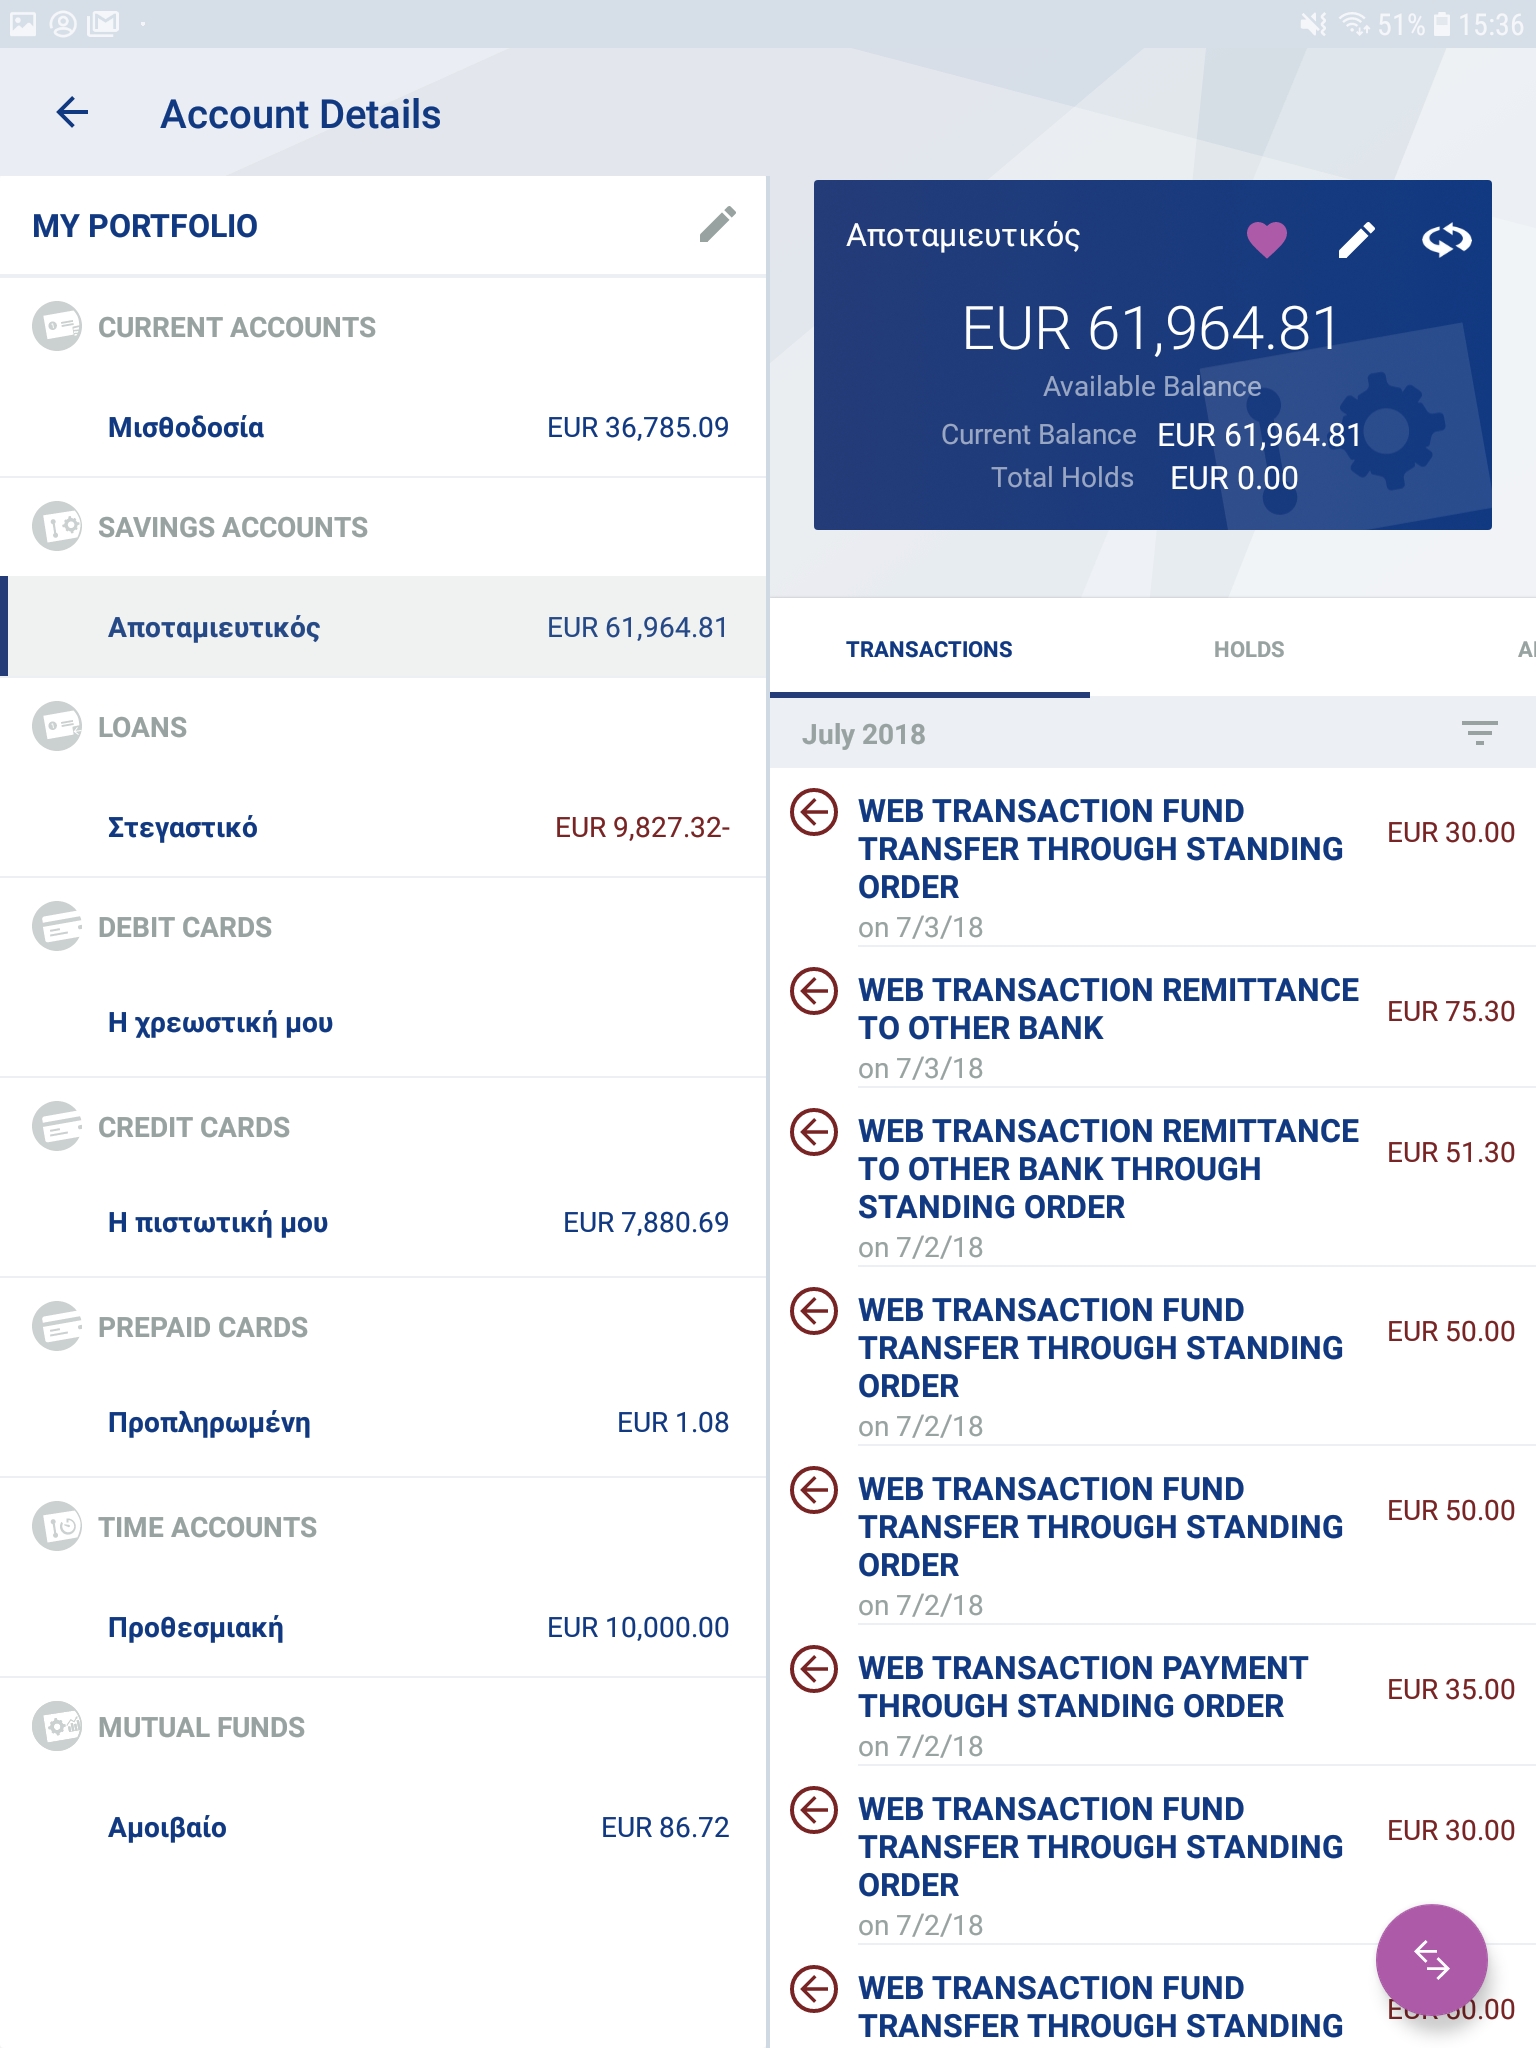

On a tablet, on the left side of “My portfolio” screen, all your accounts are shown, while on the right side of the screen, the details of any selected account or card are depicted.
On a mobile phone, there is a single information list containing all the accounts of the User.
- By selecting the “Edit” icon
 , you are redirected to the following screen in order to select (based on your preference) which of your accounts will be marked as your favorite ones (by clicking on the
  icon). You can also select the display order of your accounts by drag & drop* by selecting the “6 dots” icon . Select “Done” for your changes to be saved.

- Alternatively, by selecting an account from the left side of the screen where you can view its details, you can mark it as a favorite by clicking on the icon.
*Drag & drop: transfer an iconic object from one position to another
Assign a Nickname
From the dashboard screen, on both tablet and smartphone devices, by selecting the “Edit” icon , a new screen appears where you can assign a “Nickname” to a selected account or card.
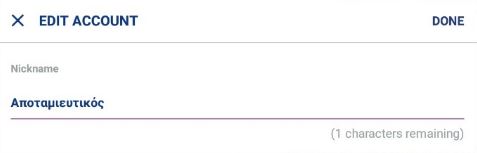
On the screen above, the “Edit Account” screen is shown. The maximum limit of characters for the nickname of an account is 15. Enter the nickname of your preference and then select “Done”.
Account main details
On a tablet, in order to see more details of a particular account or card, you only have to select that account from the left side of the screen. Further details of that account or card are then shown on the right side of the screen.
On a mobile phone, select an account from the main dashboard of the application and you will be redirected to a new screen where the details of the account or card are shown.

On a smartphone, you have to select an account from the main dashboard of the application. The above screen will be shown.
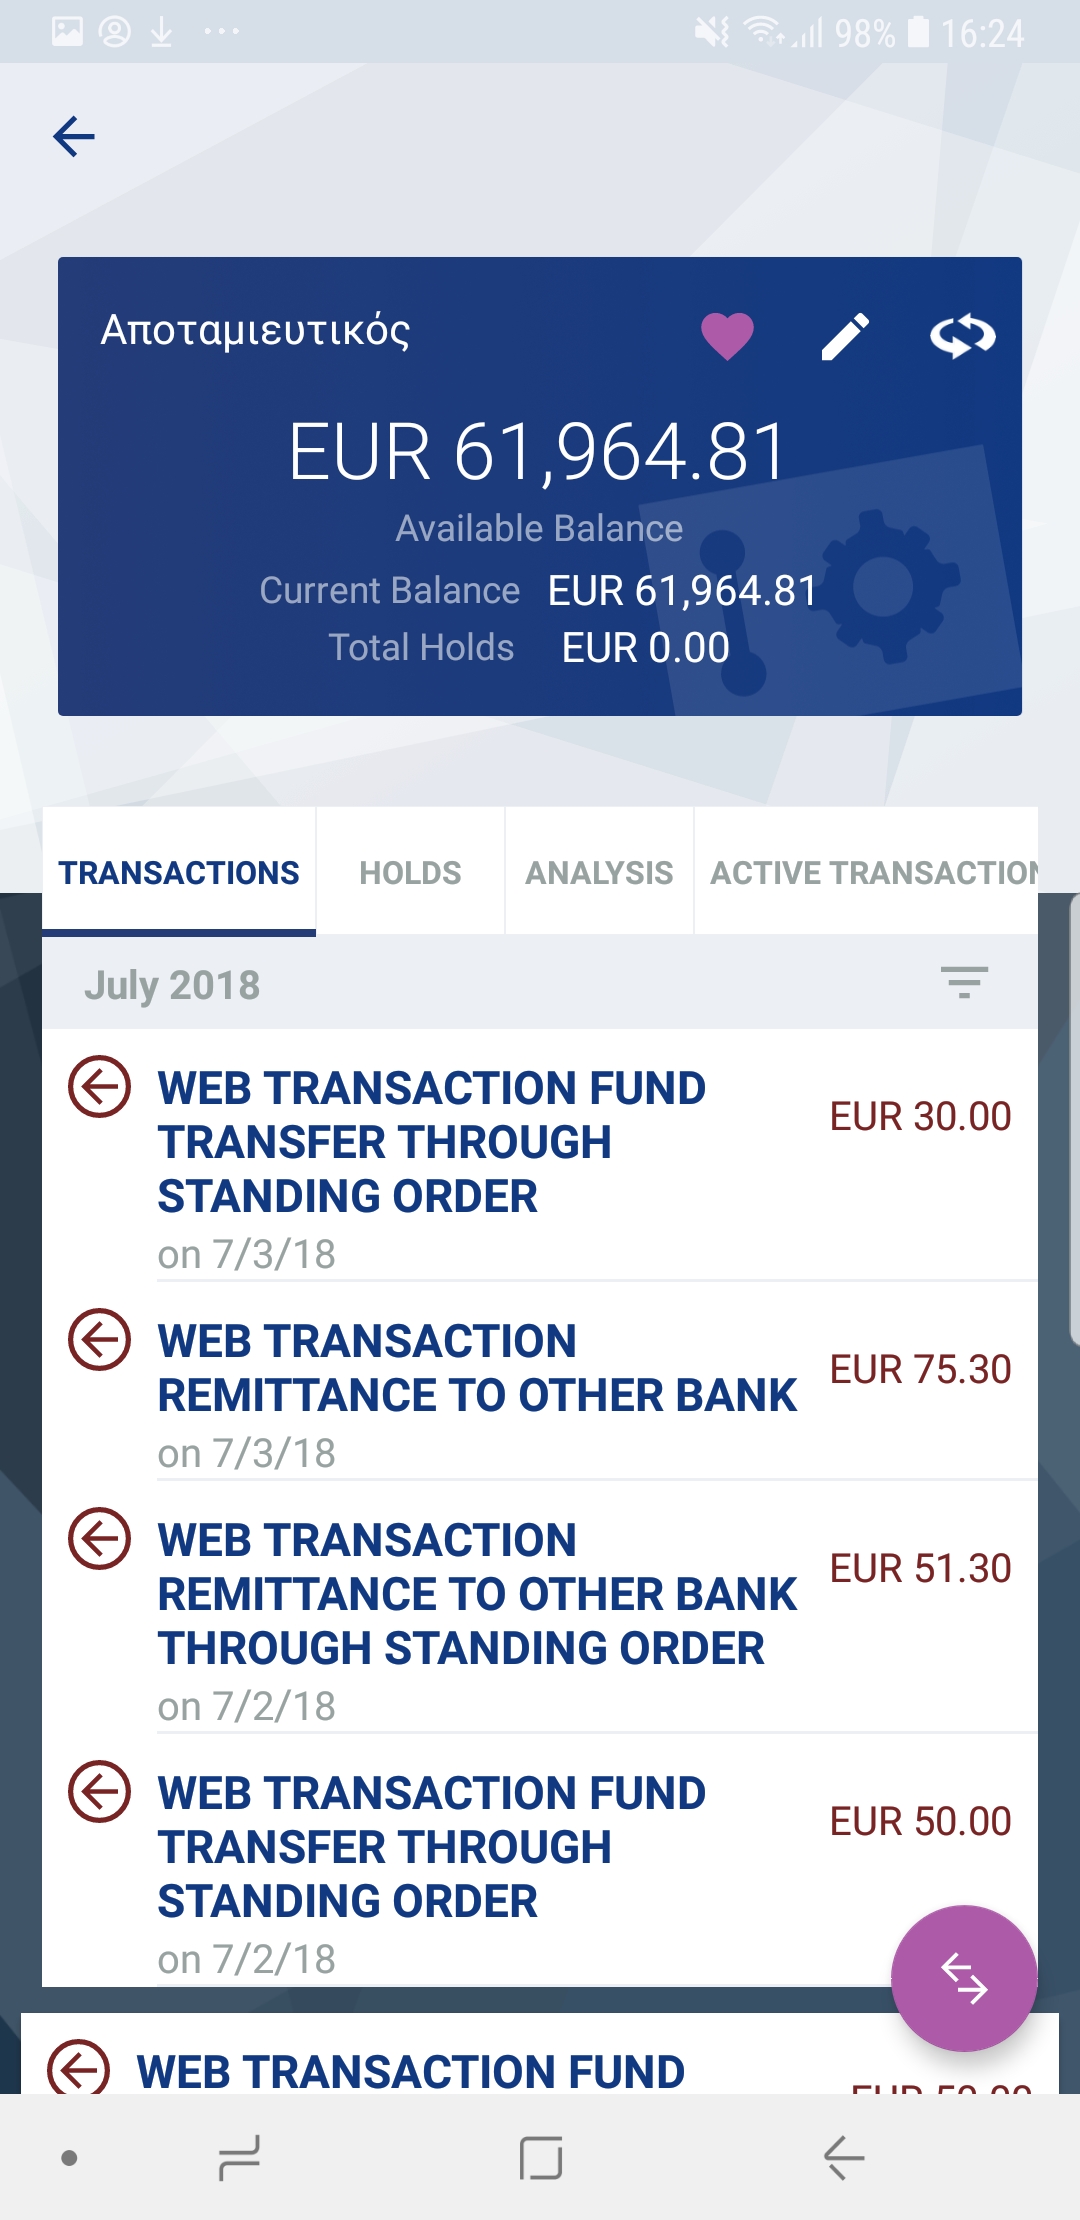
Current / Savings Accounts
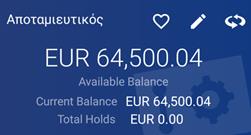
By selecting any Current or Savings account, the following information is shown:
- the Available Balance
- the Ledger Balance and
- the Total Holds
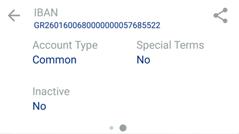
By clicking on the account’s ![]() icon, the Blue card is rotated, and more details of such an account are shown such as:
icon, the Blue card is rotated, and more details of such an account are shown such as:
- the IBAN
- the Product name
- the Branch
- the Beneficiary
- the Date Opened
- the Special terms flag
- the Account Type and
- the Inactive account flag

In addition, there is the option to send the account’s IBAN via email or any other media supported by selecting the icon.
Under the account’s blue card there are 4 tabs:
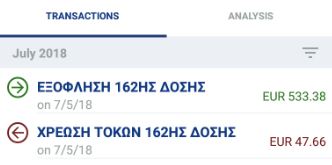
- Transactions, which consist of your account’s Transaction History. By default, all the transactions made from that account via any channel (e.g. e-banking, ATMs, Branches) within the last month are shown.
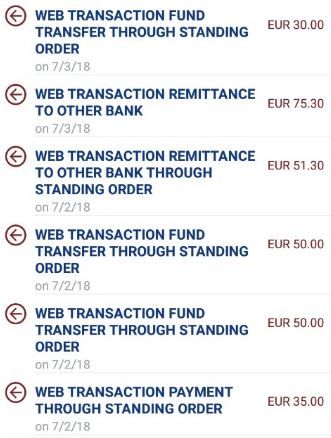
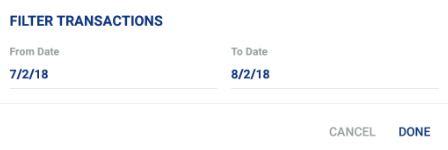
By clicking on the search filters, you can view your carried out transactions for a longer or shorter period. For each transaction, except for the information shown on the list, by clicking on it, you can see further details related to it.
- Holds, which consists all potential holds of that particular account.
- Analysis of the account, where the Available Balance and Total Holds are shown.
- Active transactions, corresponding to the upcoming transfers or payments for which that particular account will be debited.
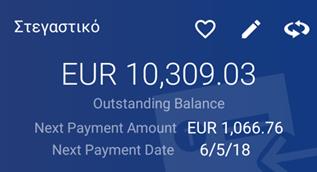
Loans
By selecting any Loan, the following information is shown:
- the Outstanding Balance
- the Next Installment Payment Amount and
- the Next Payment Date
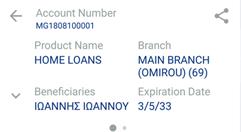
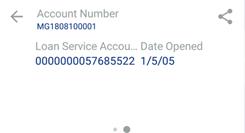
By selecting the ![]() icon on the right corner of the Blue card, more information on the loan’s details is shown such as:
icon on the right corner of the Blue card, more information on the loan’s details is shown such as:
- the Account Number
- the Product Name
- the Branch
- the Beneficiary
- the Expiration Date
- the Service Account
- the Contract Date and
- the Date Opened
In addition, there is the option to send the account’s IBAN via email or any other media supported by selecting the ![]() icon.
icon.
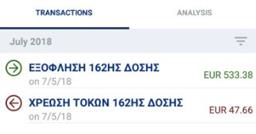
Under the Blue card there are 2 tabs:
- Transactions, which consist of your Loan’s Transaction History. By default all the transactions regarding this loan are shown. By clicking on the search filters, you can view your carried out transactions for a longer or shorter period. For each transaction, except for the transaction date, transaction details and the debit or credit amount as well as the Loan’s ledger balance are also shown after a transactions is carried out.
- Analysis of the loan, which contains information regarding:
- the Disbursement Amount
- the Outstanding balance
- the Current Interest Rate
- the Next Installment Payment Amount
- the Next Payment Date and
- the Overdue Amount
Debit Cards
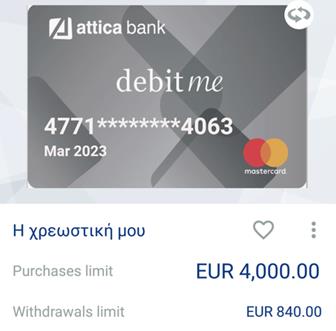
When you select a Debit Card, the following information is shown:
- the Card Number
- the Expiration Date,
- the Purchases limit and
- the Withdrawals limit
By rotating the card ![]() , the following information is also available:
, the following information is also available:
- the Product Name
- the Cardholder name
- the Status
- the Purchases today
- the Withdrawals today and
- the Branch


Under the card’s information section, the Transaction History of this card is shown.
By default, all the transactions made with that card via any channel (e.g. e-banking, ATMs, Branches) within the last month are shown.
By clicking on the search filters, you can view your carried out transactions for a longer or shorter period. For each transaction, except for the information on the list, if you click on it, further details are shown.
In the case of Debit Cards, there is also the option to block the card.
By selecting the ![]() icon at the top right corner of the information screen, you can immediately block your card if there is an appropriate reason to do so (e.g. card is stolen, card is lost etc.)
icon at the top right corner of the information screen, you can immediately block your card if there is an appropriate reason to do so (e.g. card is stolen, card is lost etc.)
You will be requested to enter a One-Time-Password (OTP) via SMS or Hardware Token.
Select “Confirm” if you agree with the details that will appear on the screen.
Modify Linked Accounts
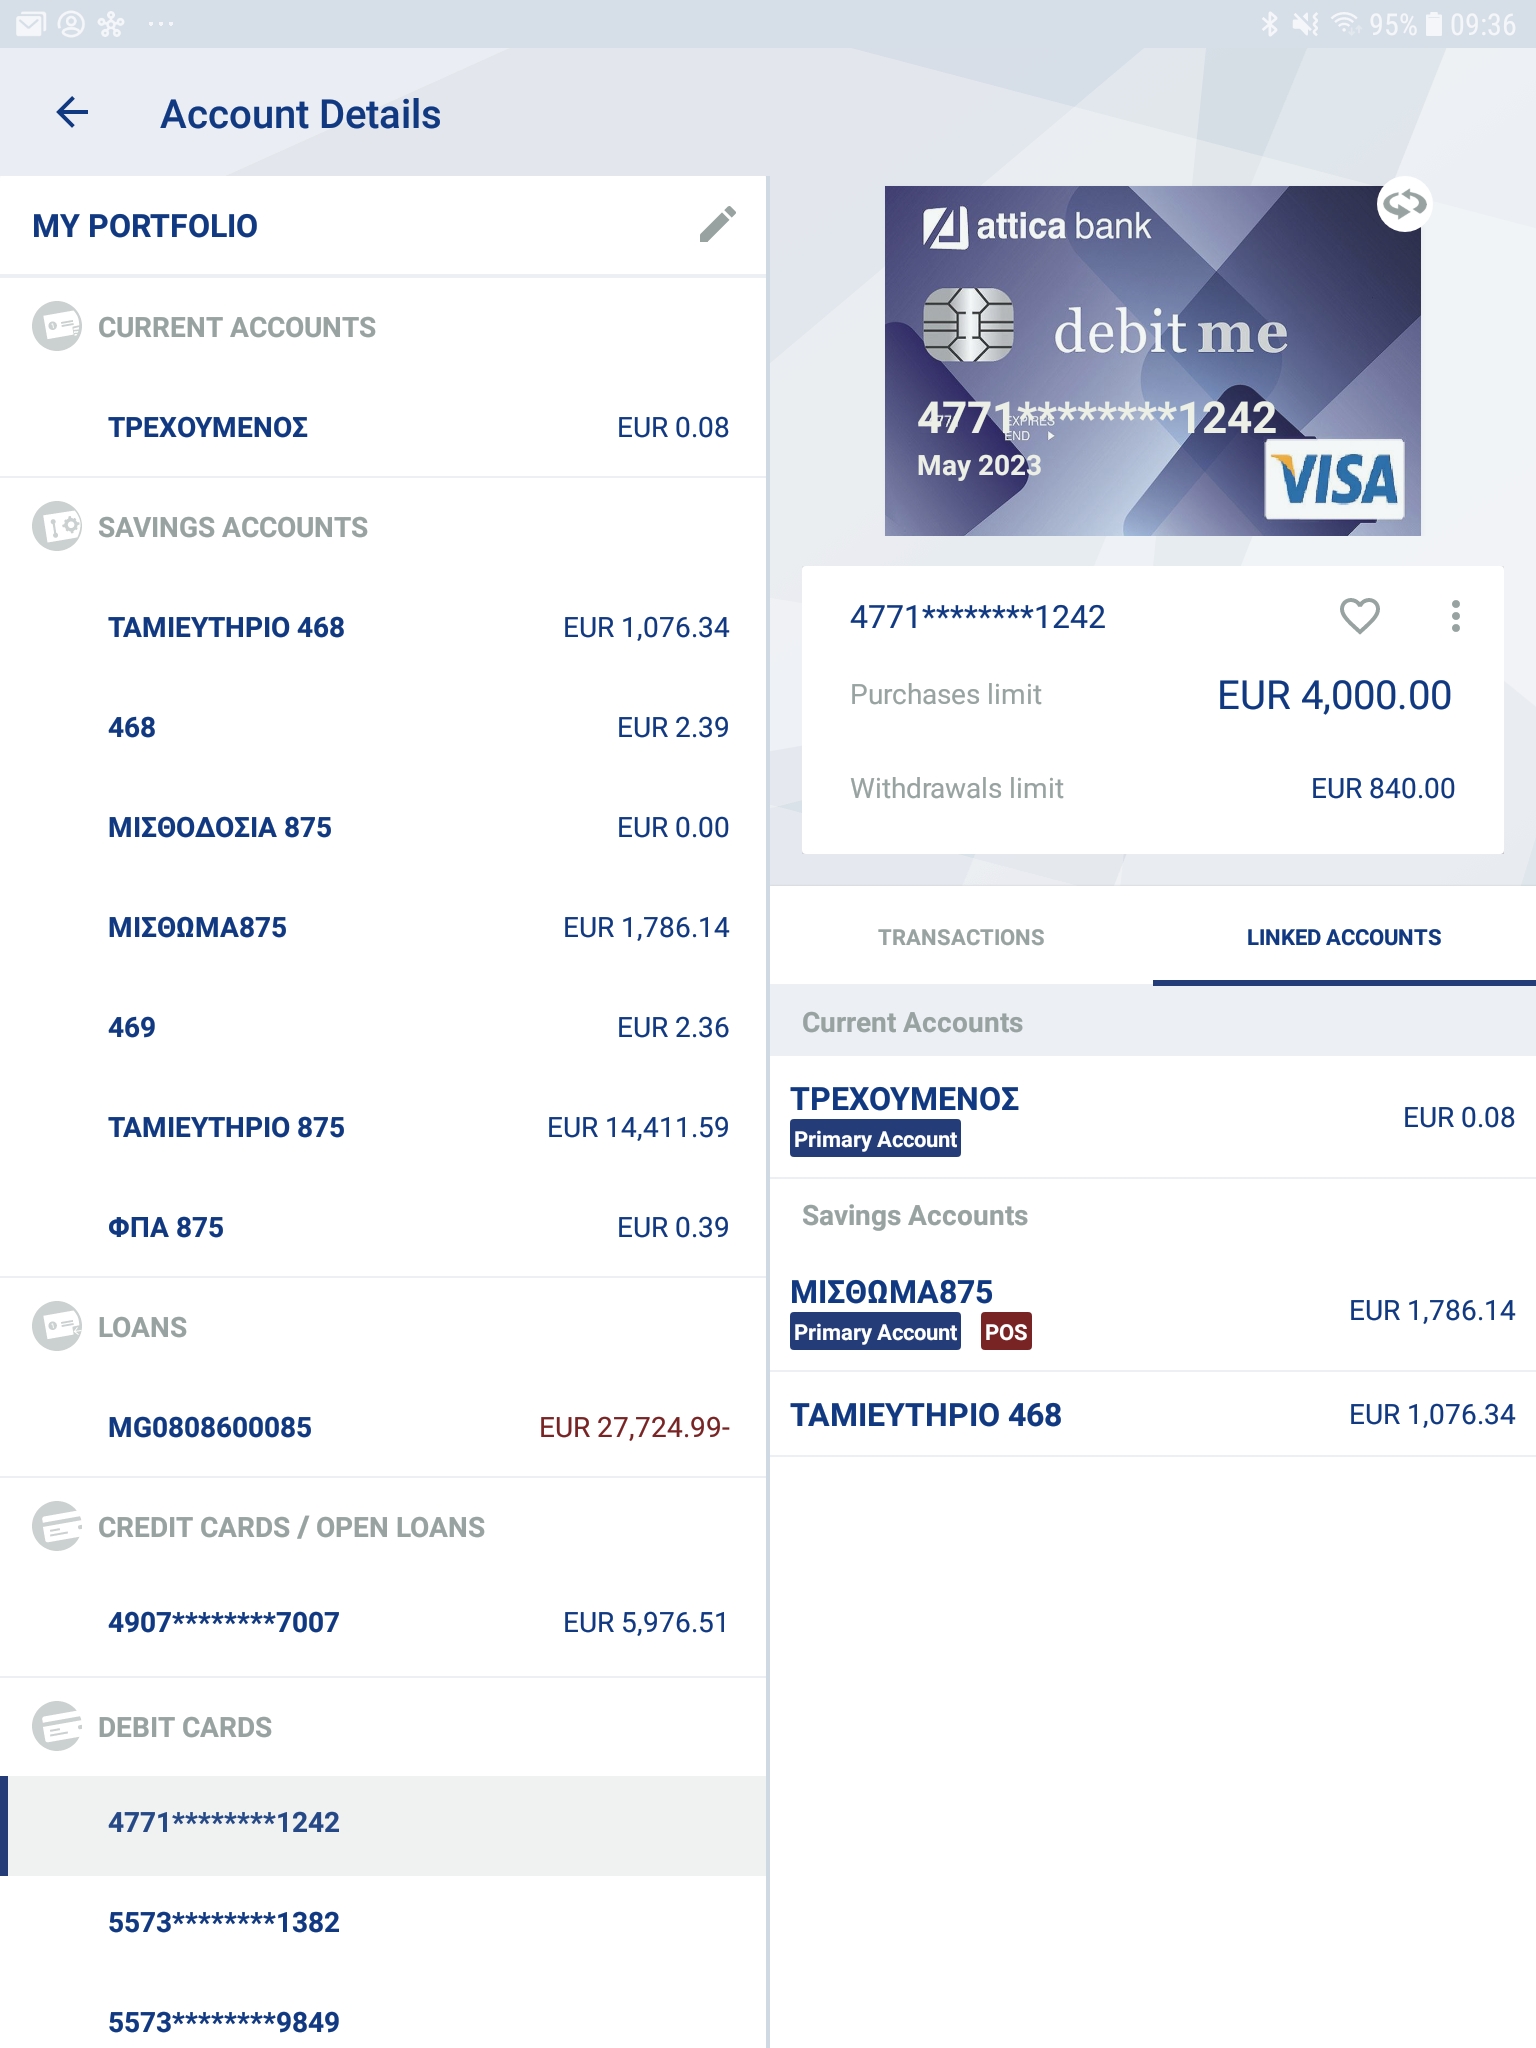

Linked accounts are located right next to ‘Transactions’ tab of your debit card.
PRIMARY account is the account used for cash withdrawals via ATM whereas POS is the account used for your purchases via POS terminals.
In the screen, you can view the PRIMARY account linked to your debit card for each account category (Current, Savings) and the POS account linked to your debit card for purchases via POS terminals.
You can however, if you wish, add or remove linked accounts to your debit card or change the ones which are PRIMARY and POS account. By selecting ![]() icon in the bottom right of the displayed debit card, for tablet and smartphone, you are navigated in the options menu of the card as shown below:
icon in the bottom right of the displayed debit card, for tablet and smartphone, you are navigated in the options menu of the card as shown below:
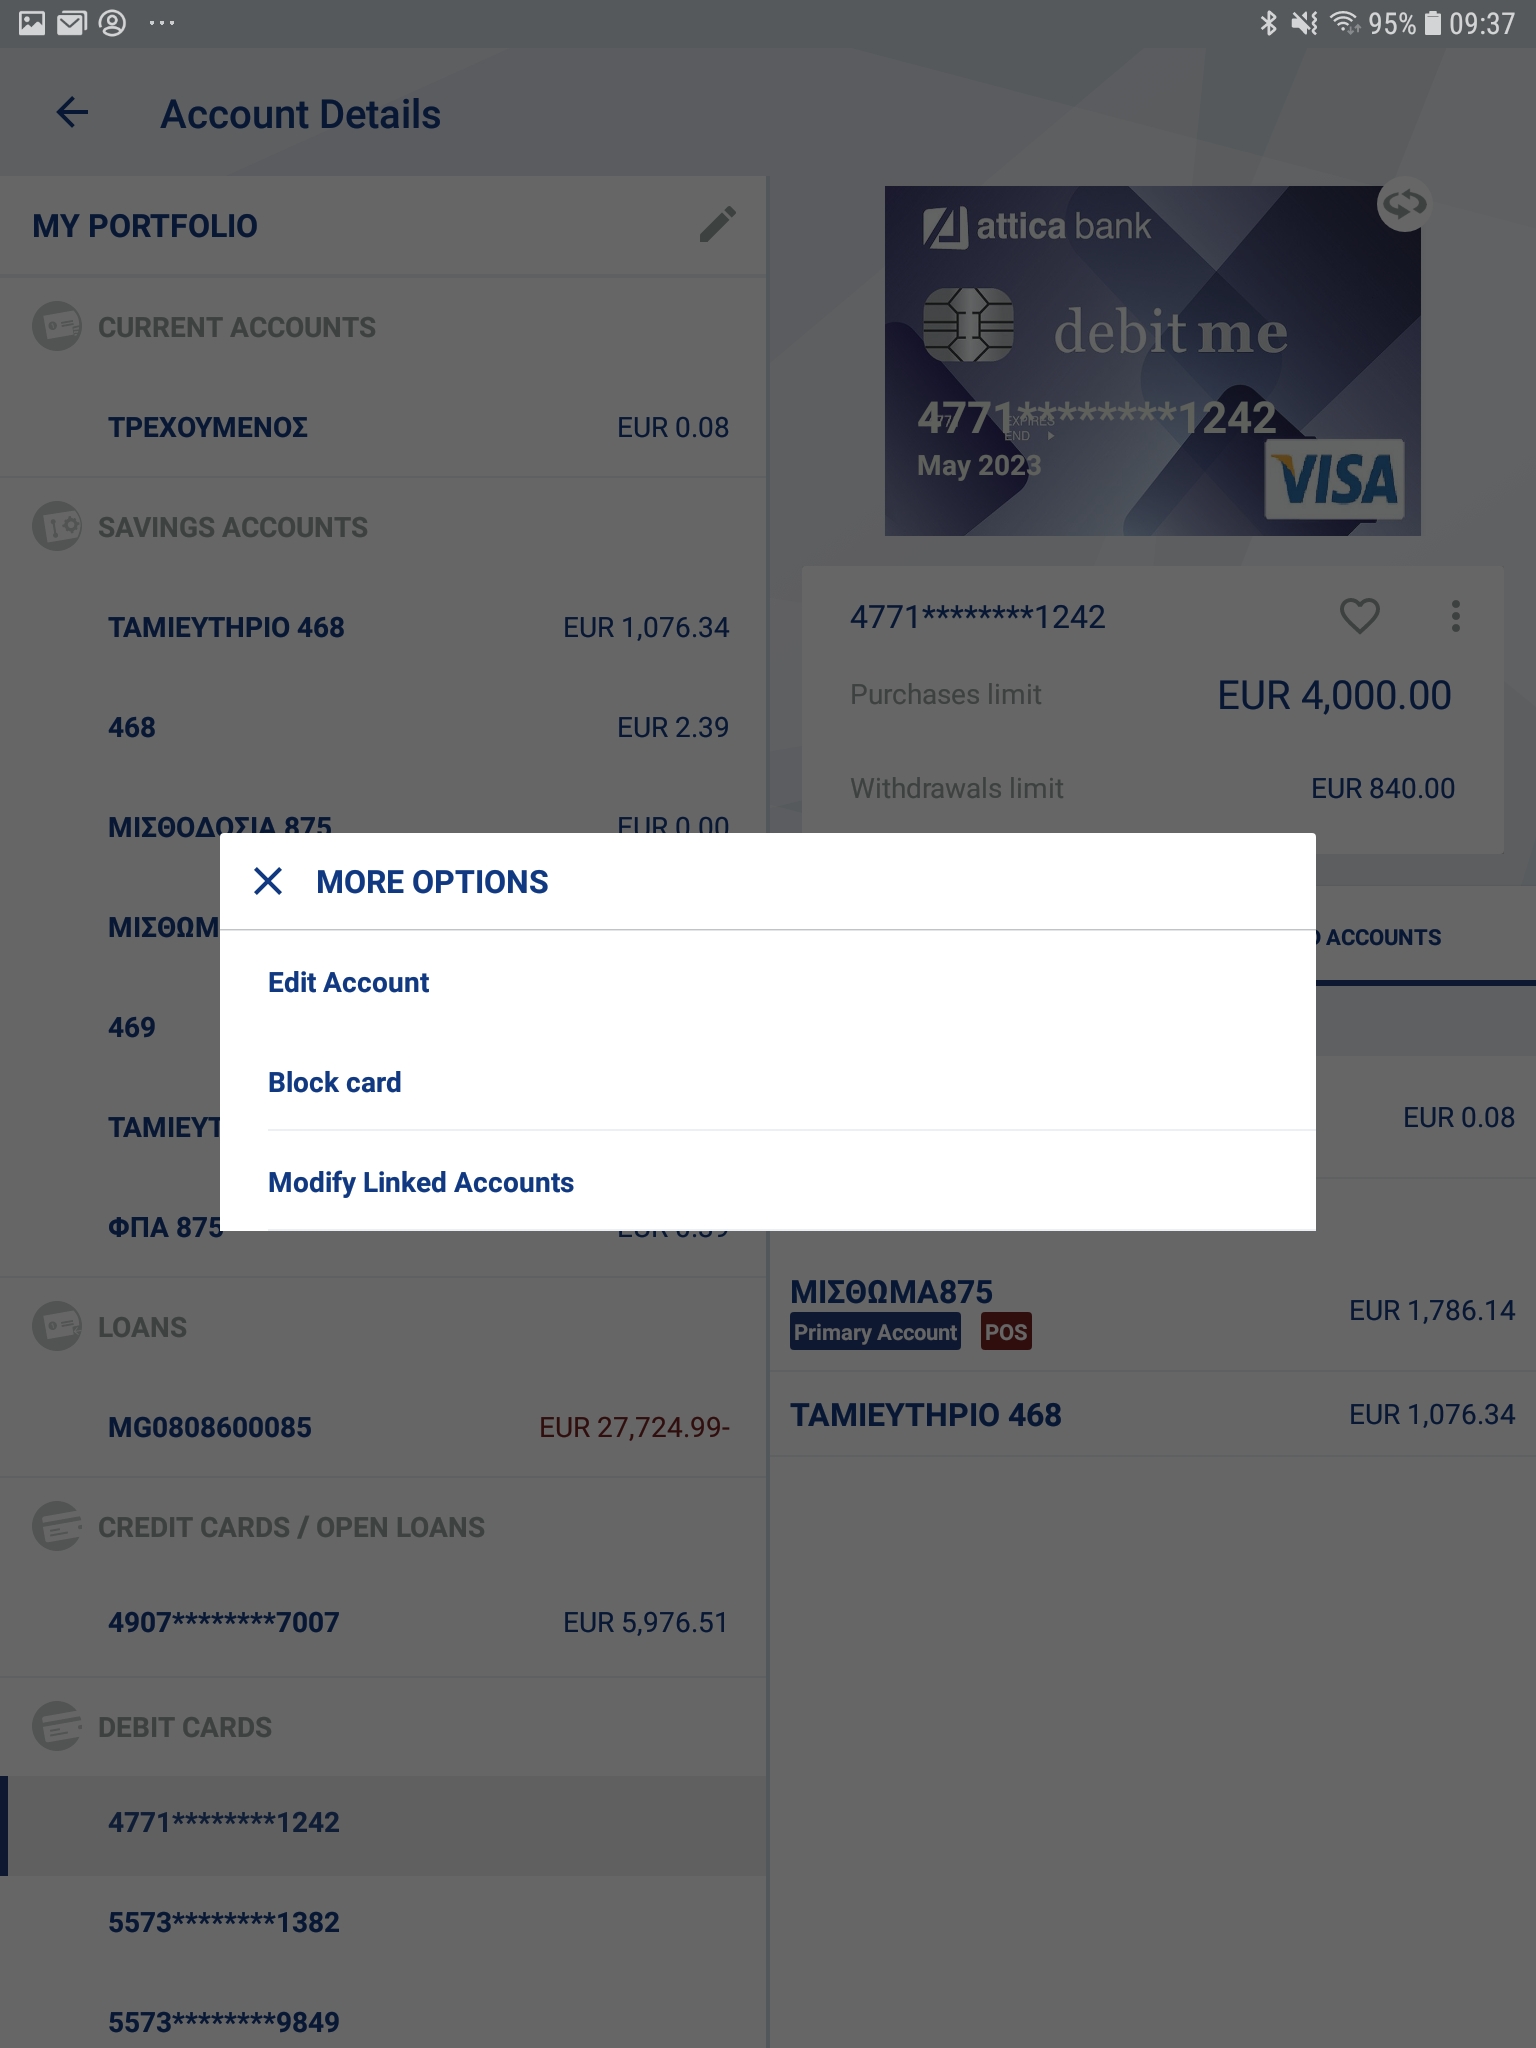
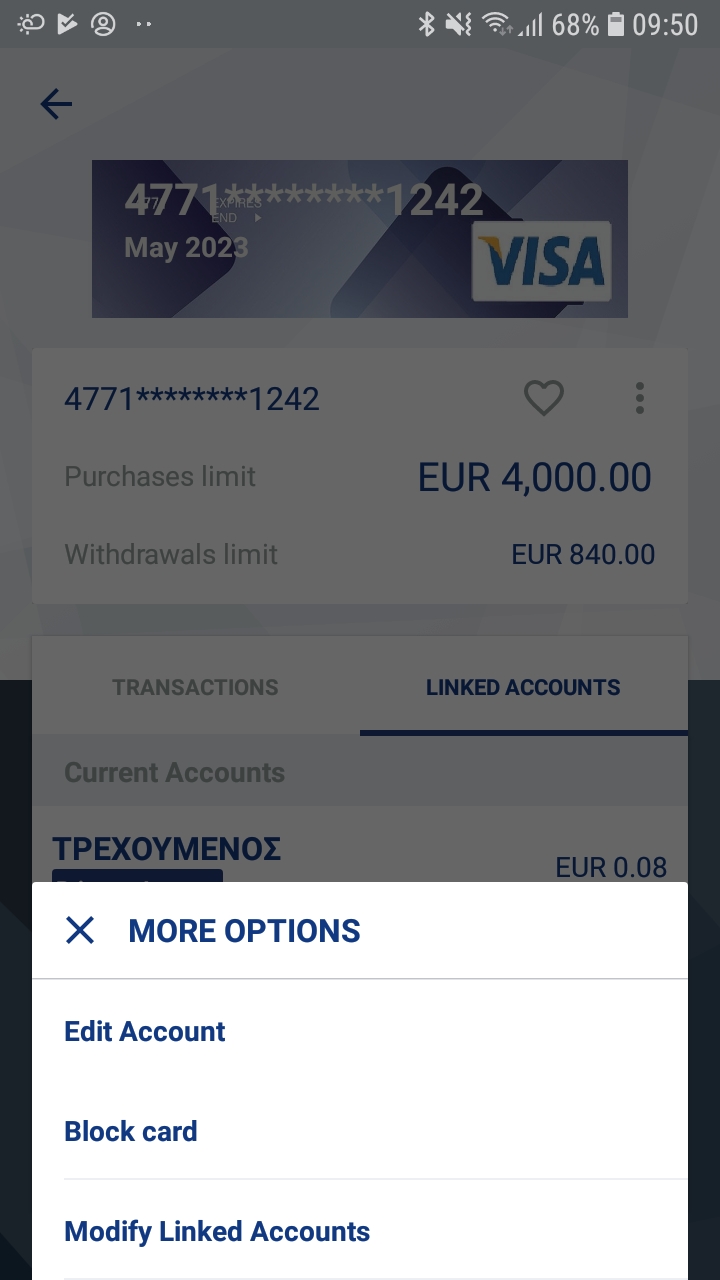
By selecting Modify Linked Accounts, for iPad and iPhone, you are navigated to the following screens:
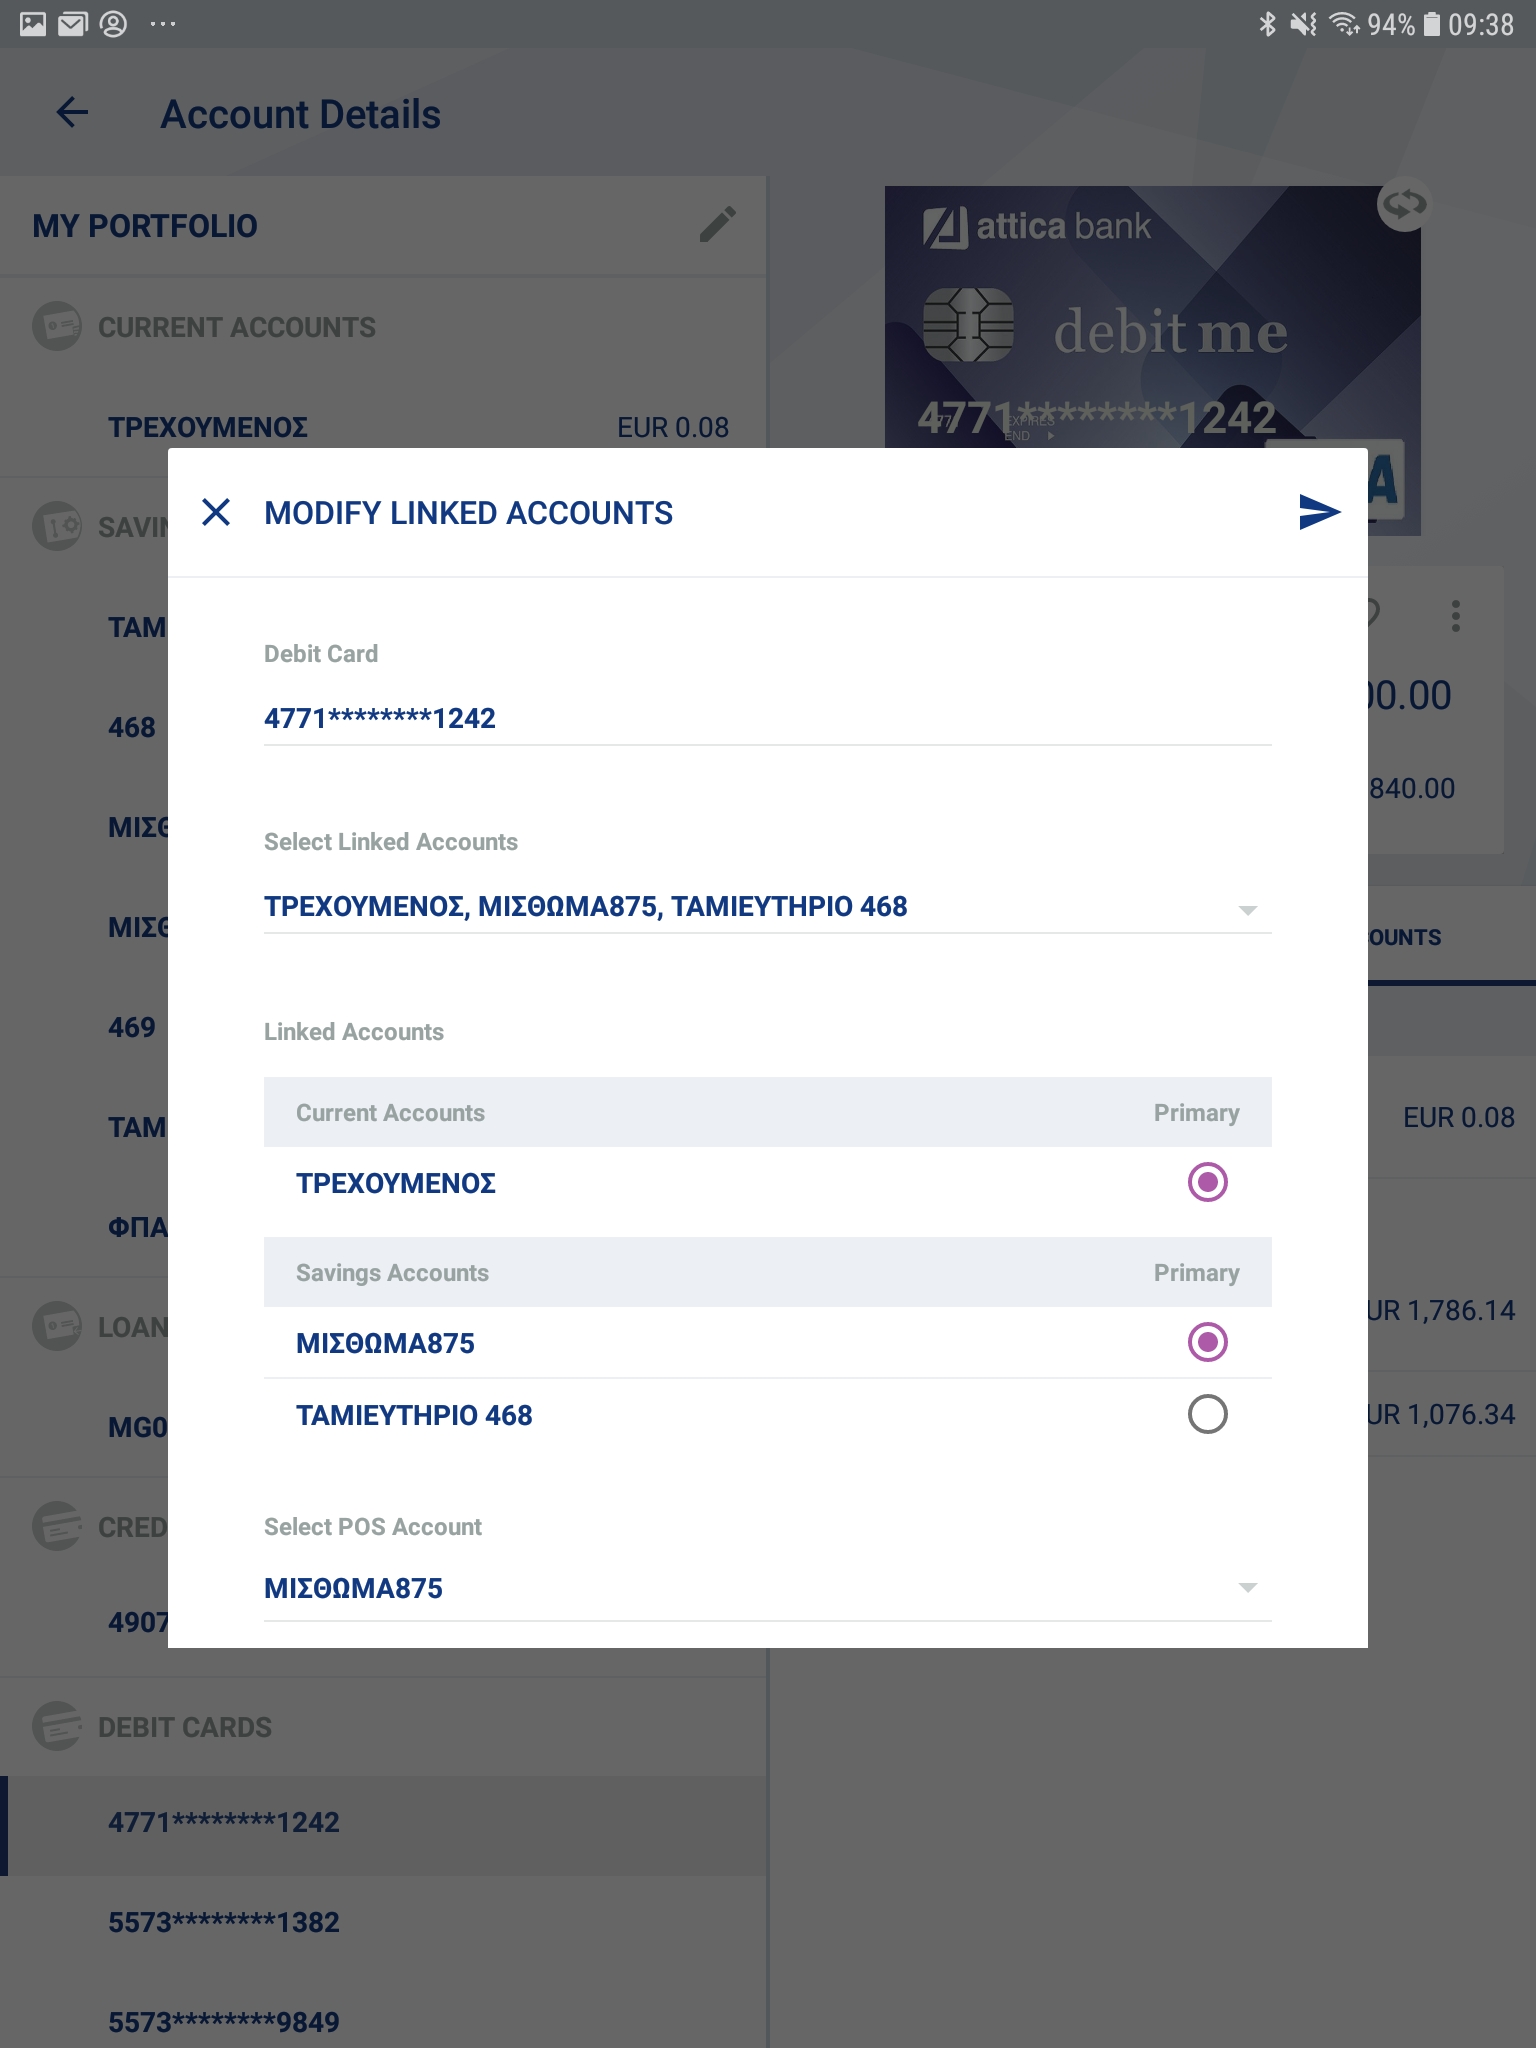
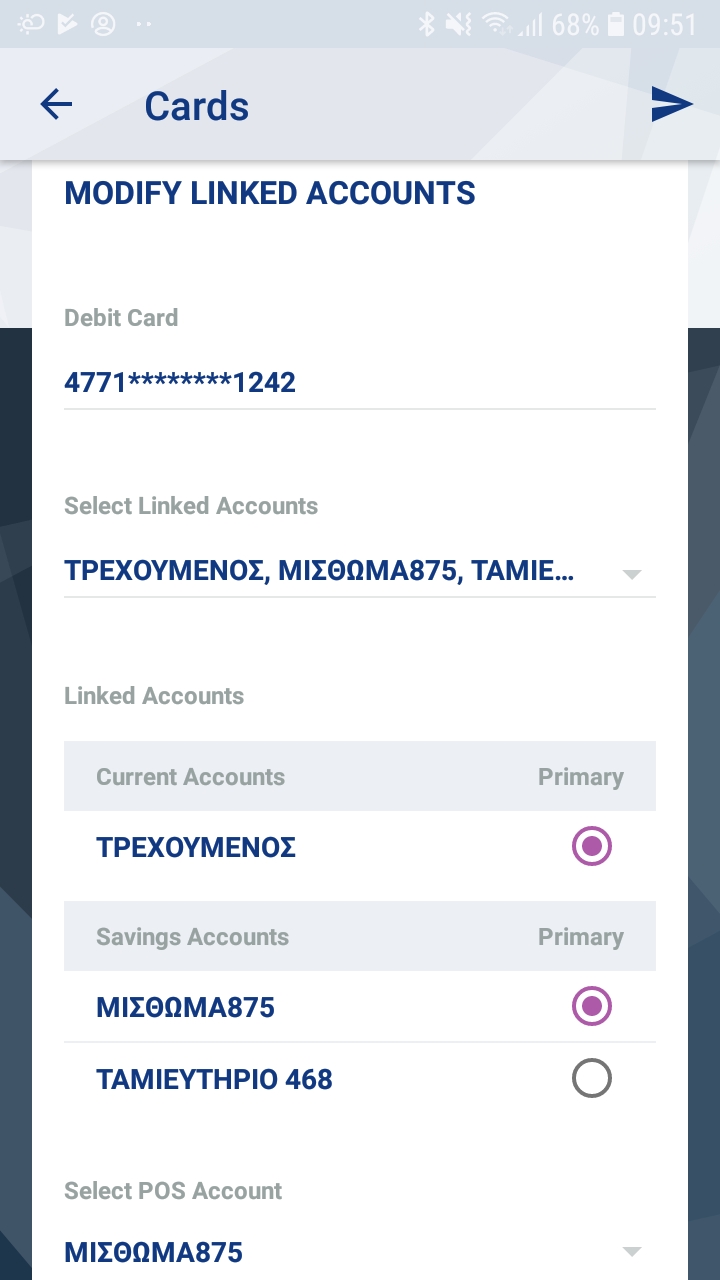
As shown in Modify Linked Accounts screen, accounts are categorized in Current, Savings and POS Account. From the two first categories, there’s one PRIMARY account for each category and from the PRIMARY ones, there is one account acting as POS Account.
So, as a first step, in order to add or remove accounts to your debit card, you should select “Selected Linked Accounts”. The display of the relevant screens for tablet and smartphone is the following:
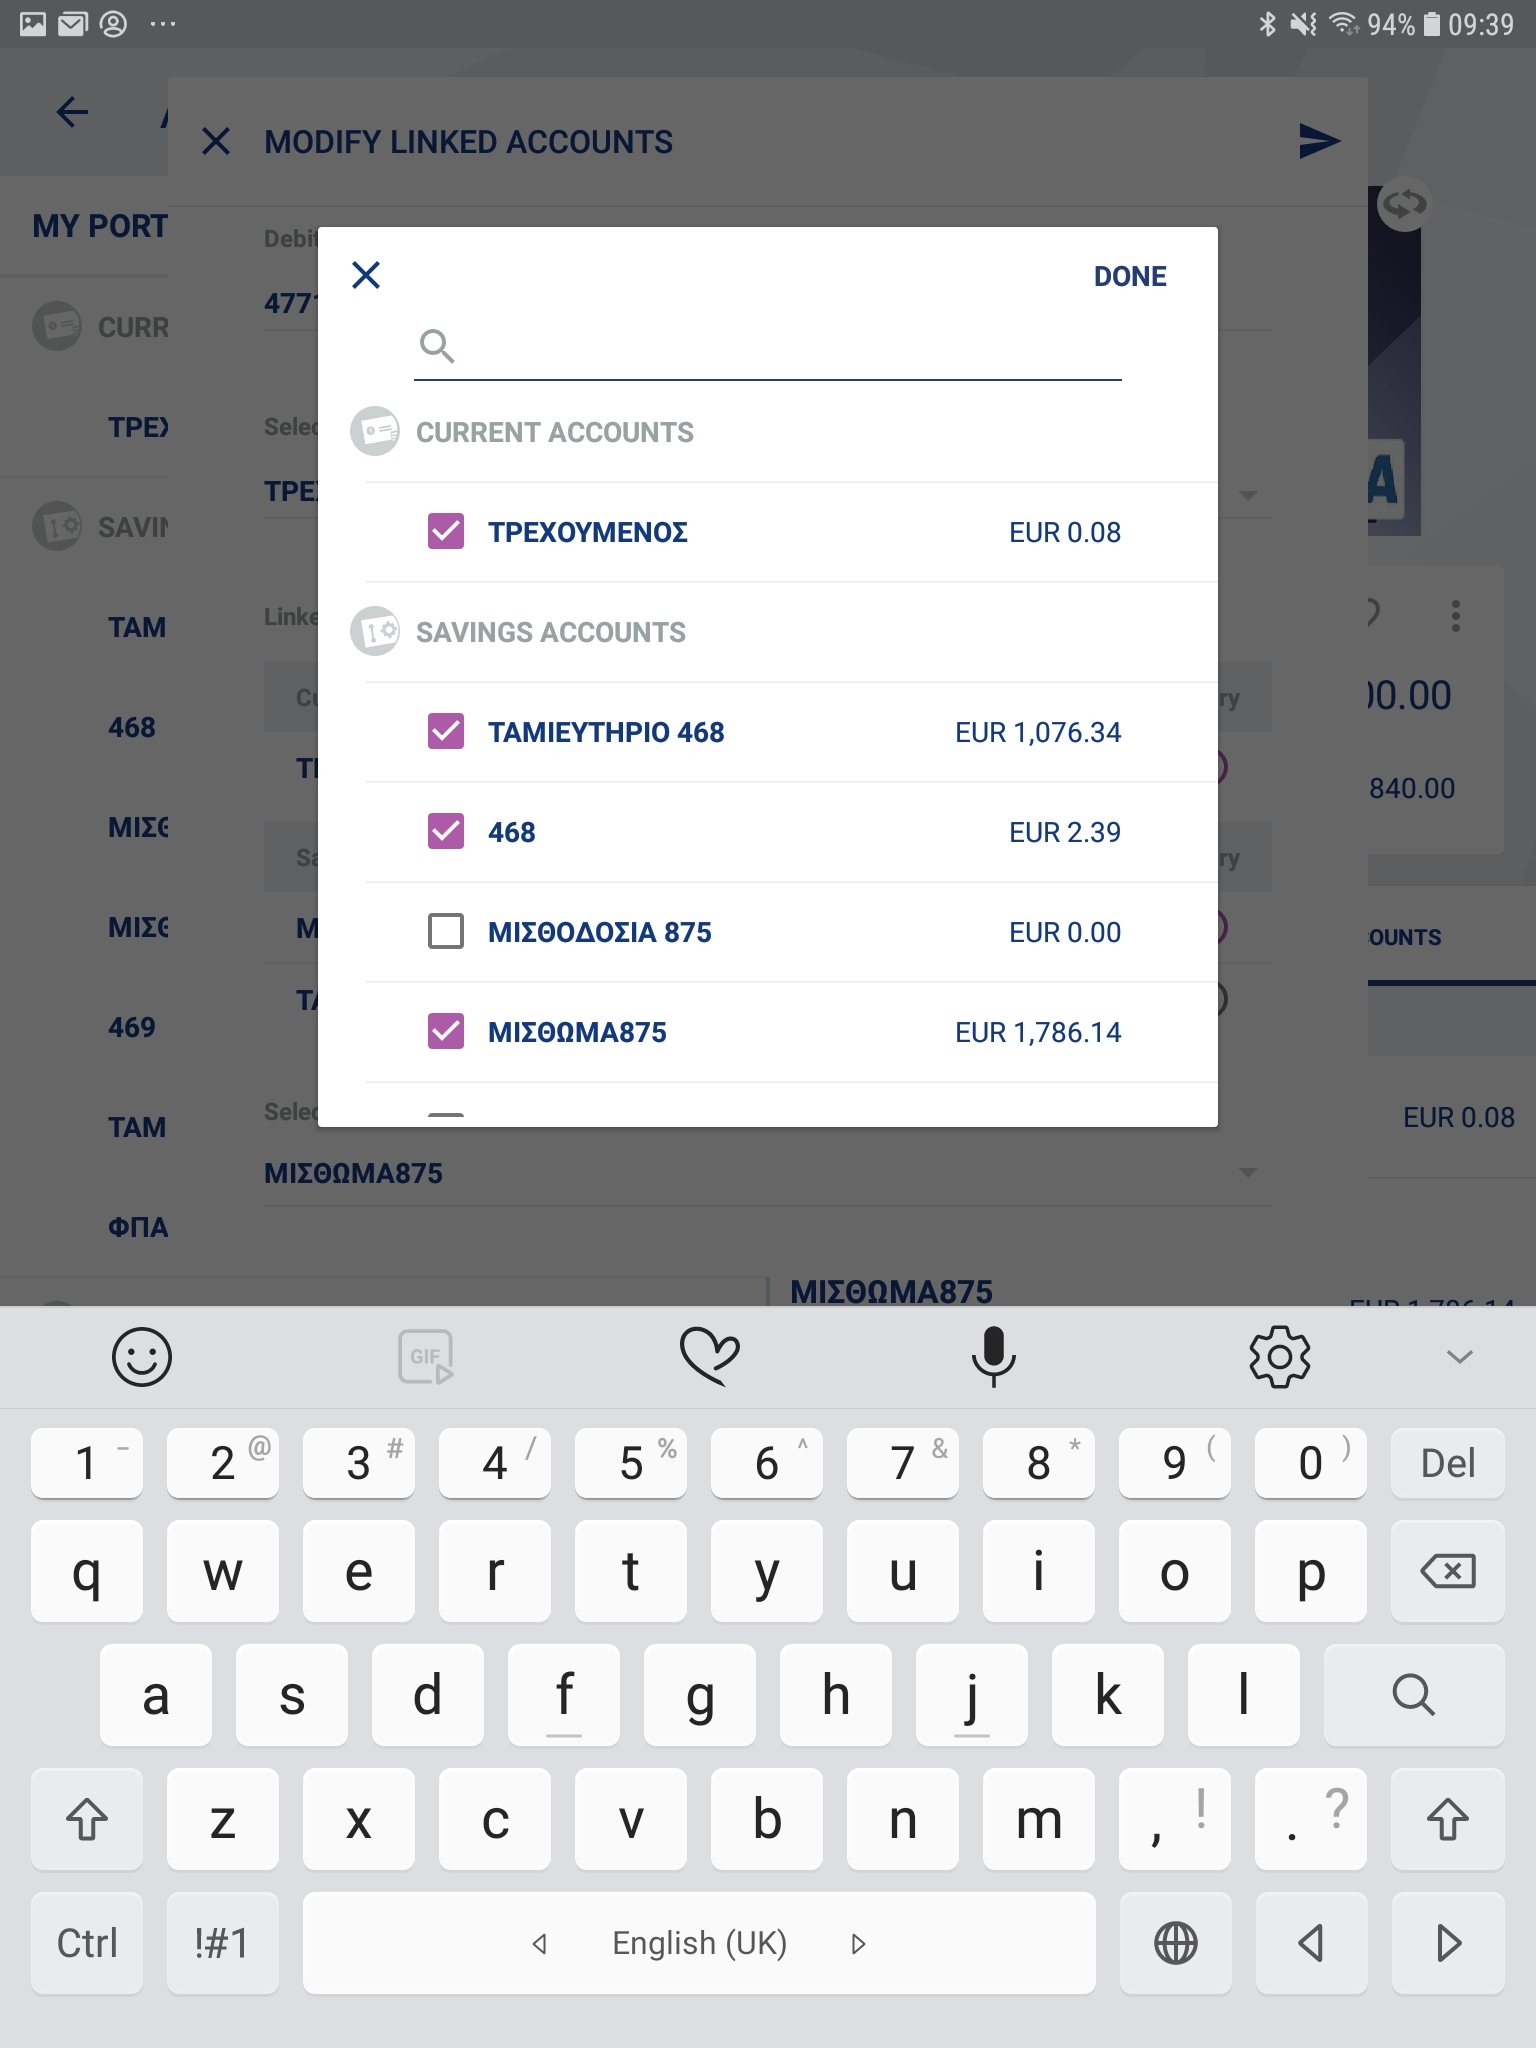

In that point, you select the accounts you wish to be linked to your debit card and confirm (Done). The maximum number of linked accounts for each category is 12.
As a second step, from the LINKED ACCOUNTS (Current and Savings), you choose the PRIMARY ones in each category via the radio buttons.
Up to a third point, in the Select POS Account field, you are directed in a dropdown list which contains the selected PRIMARY accounts.
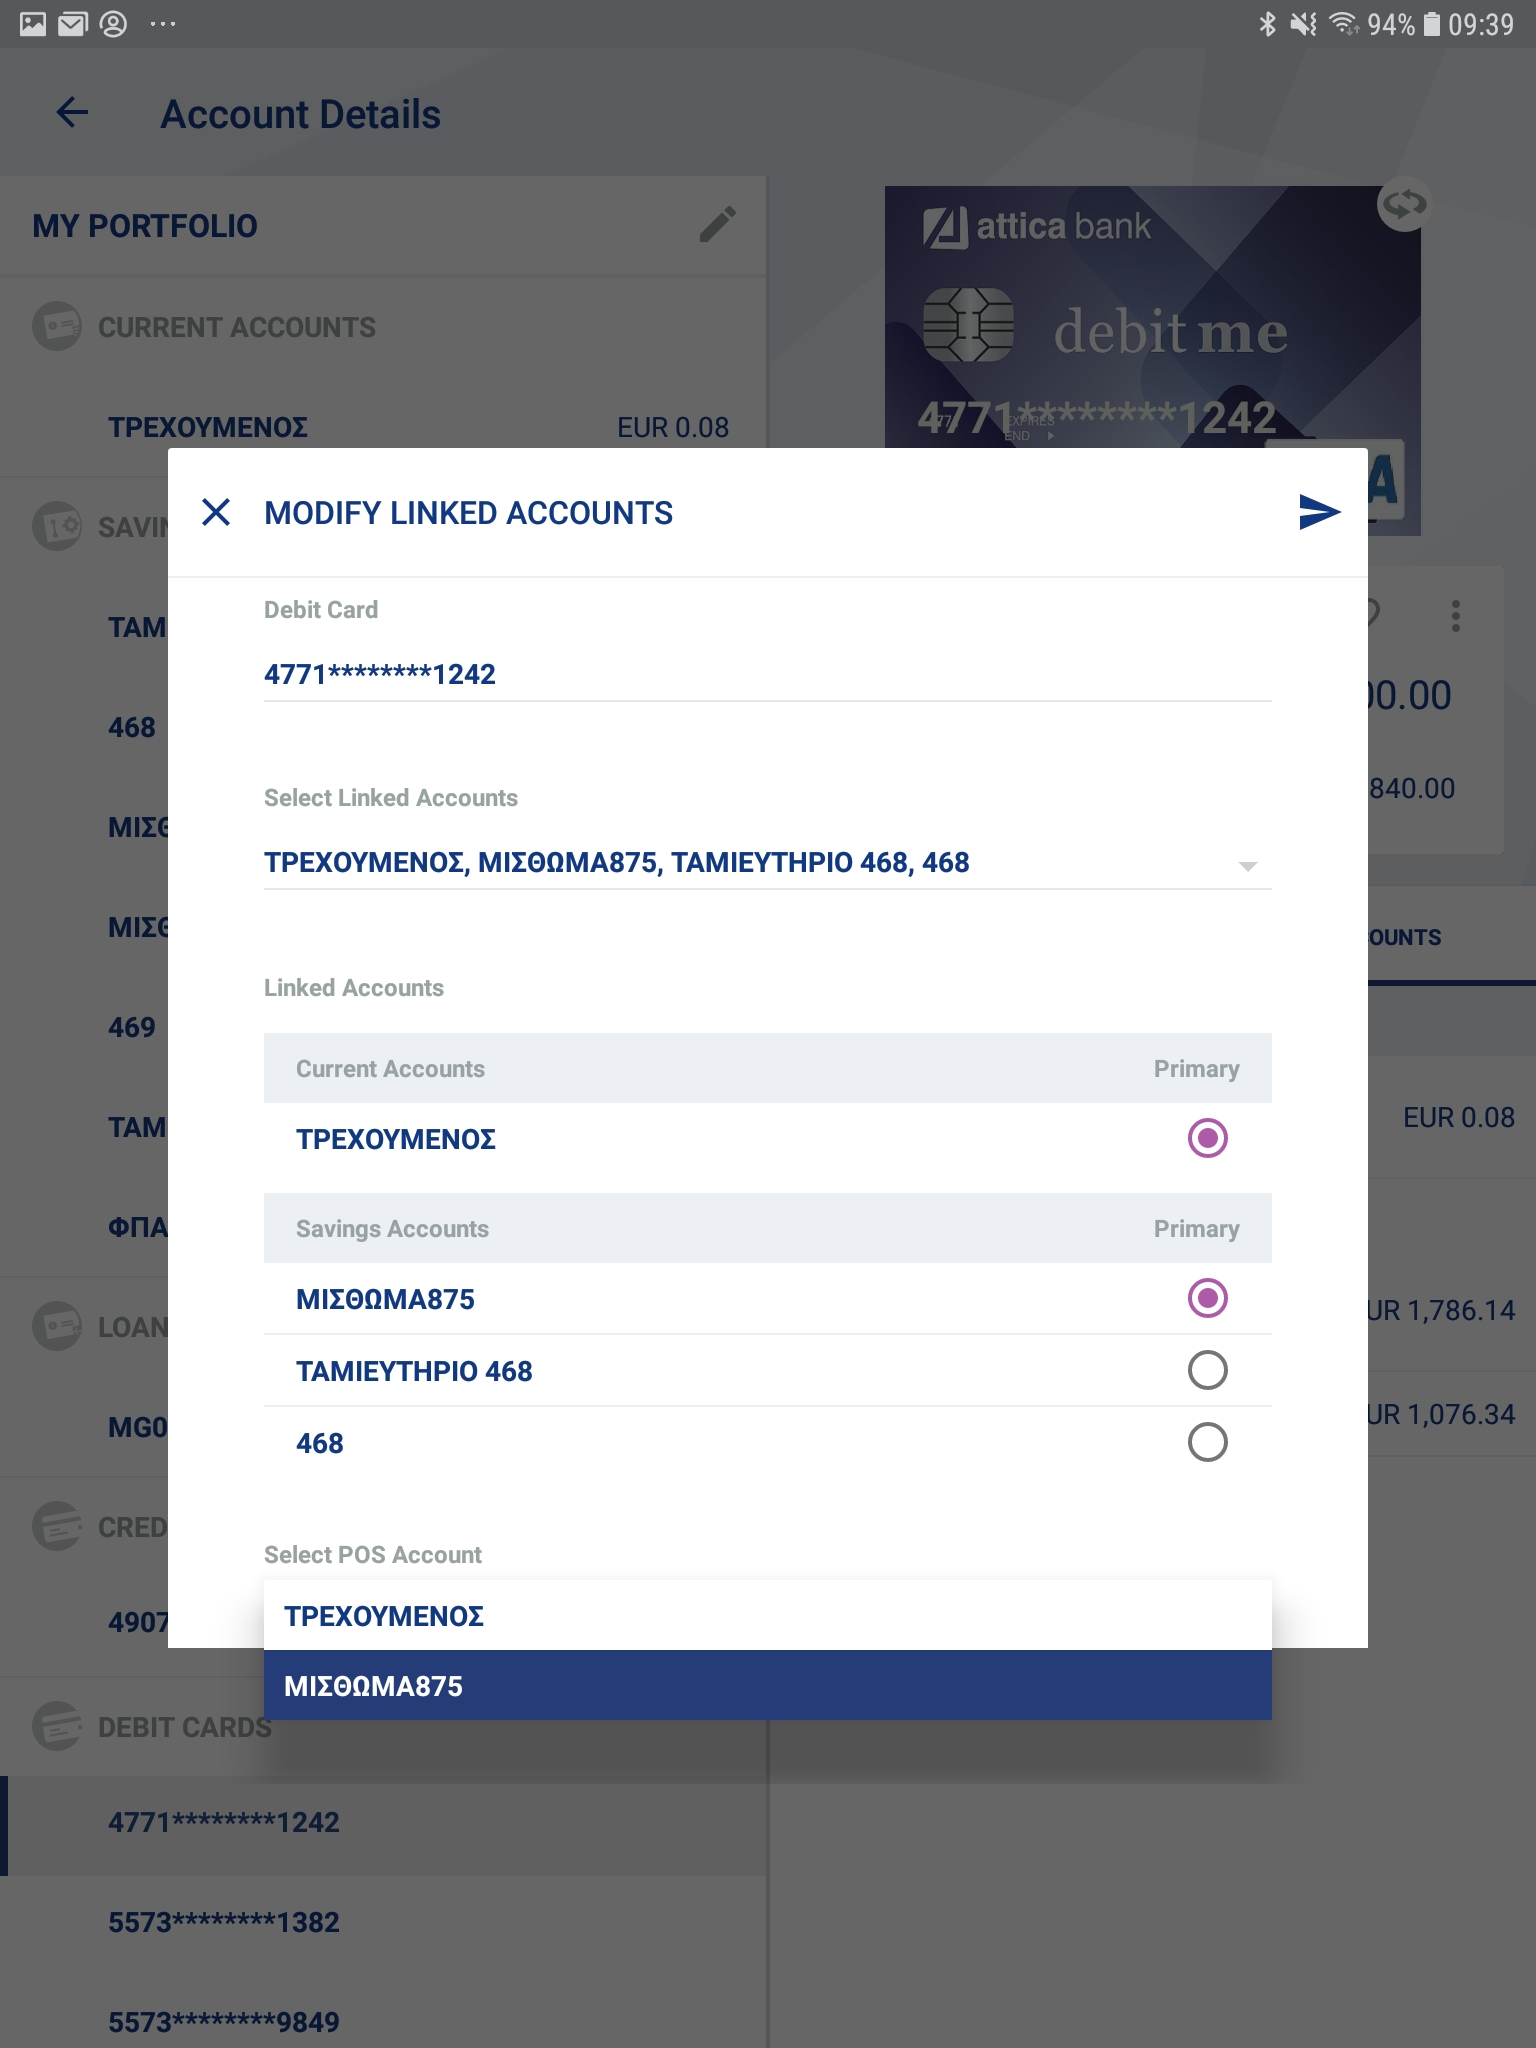
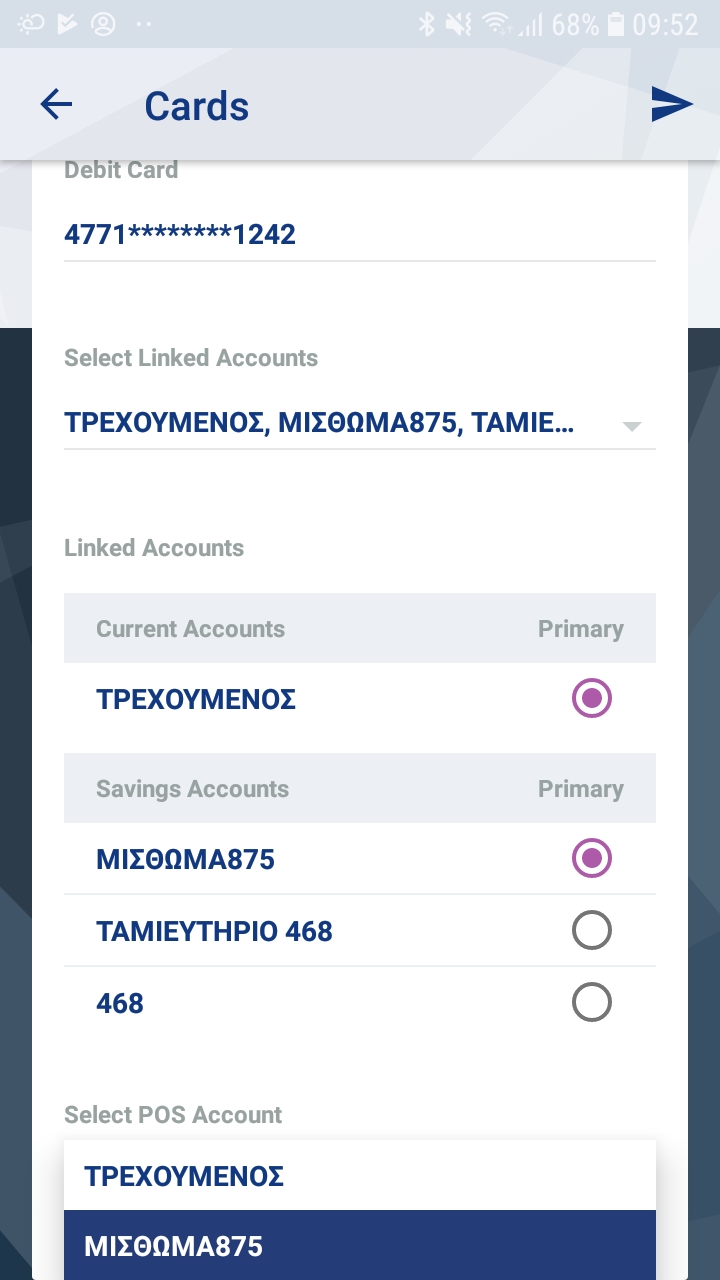
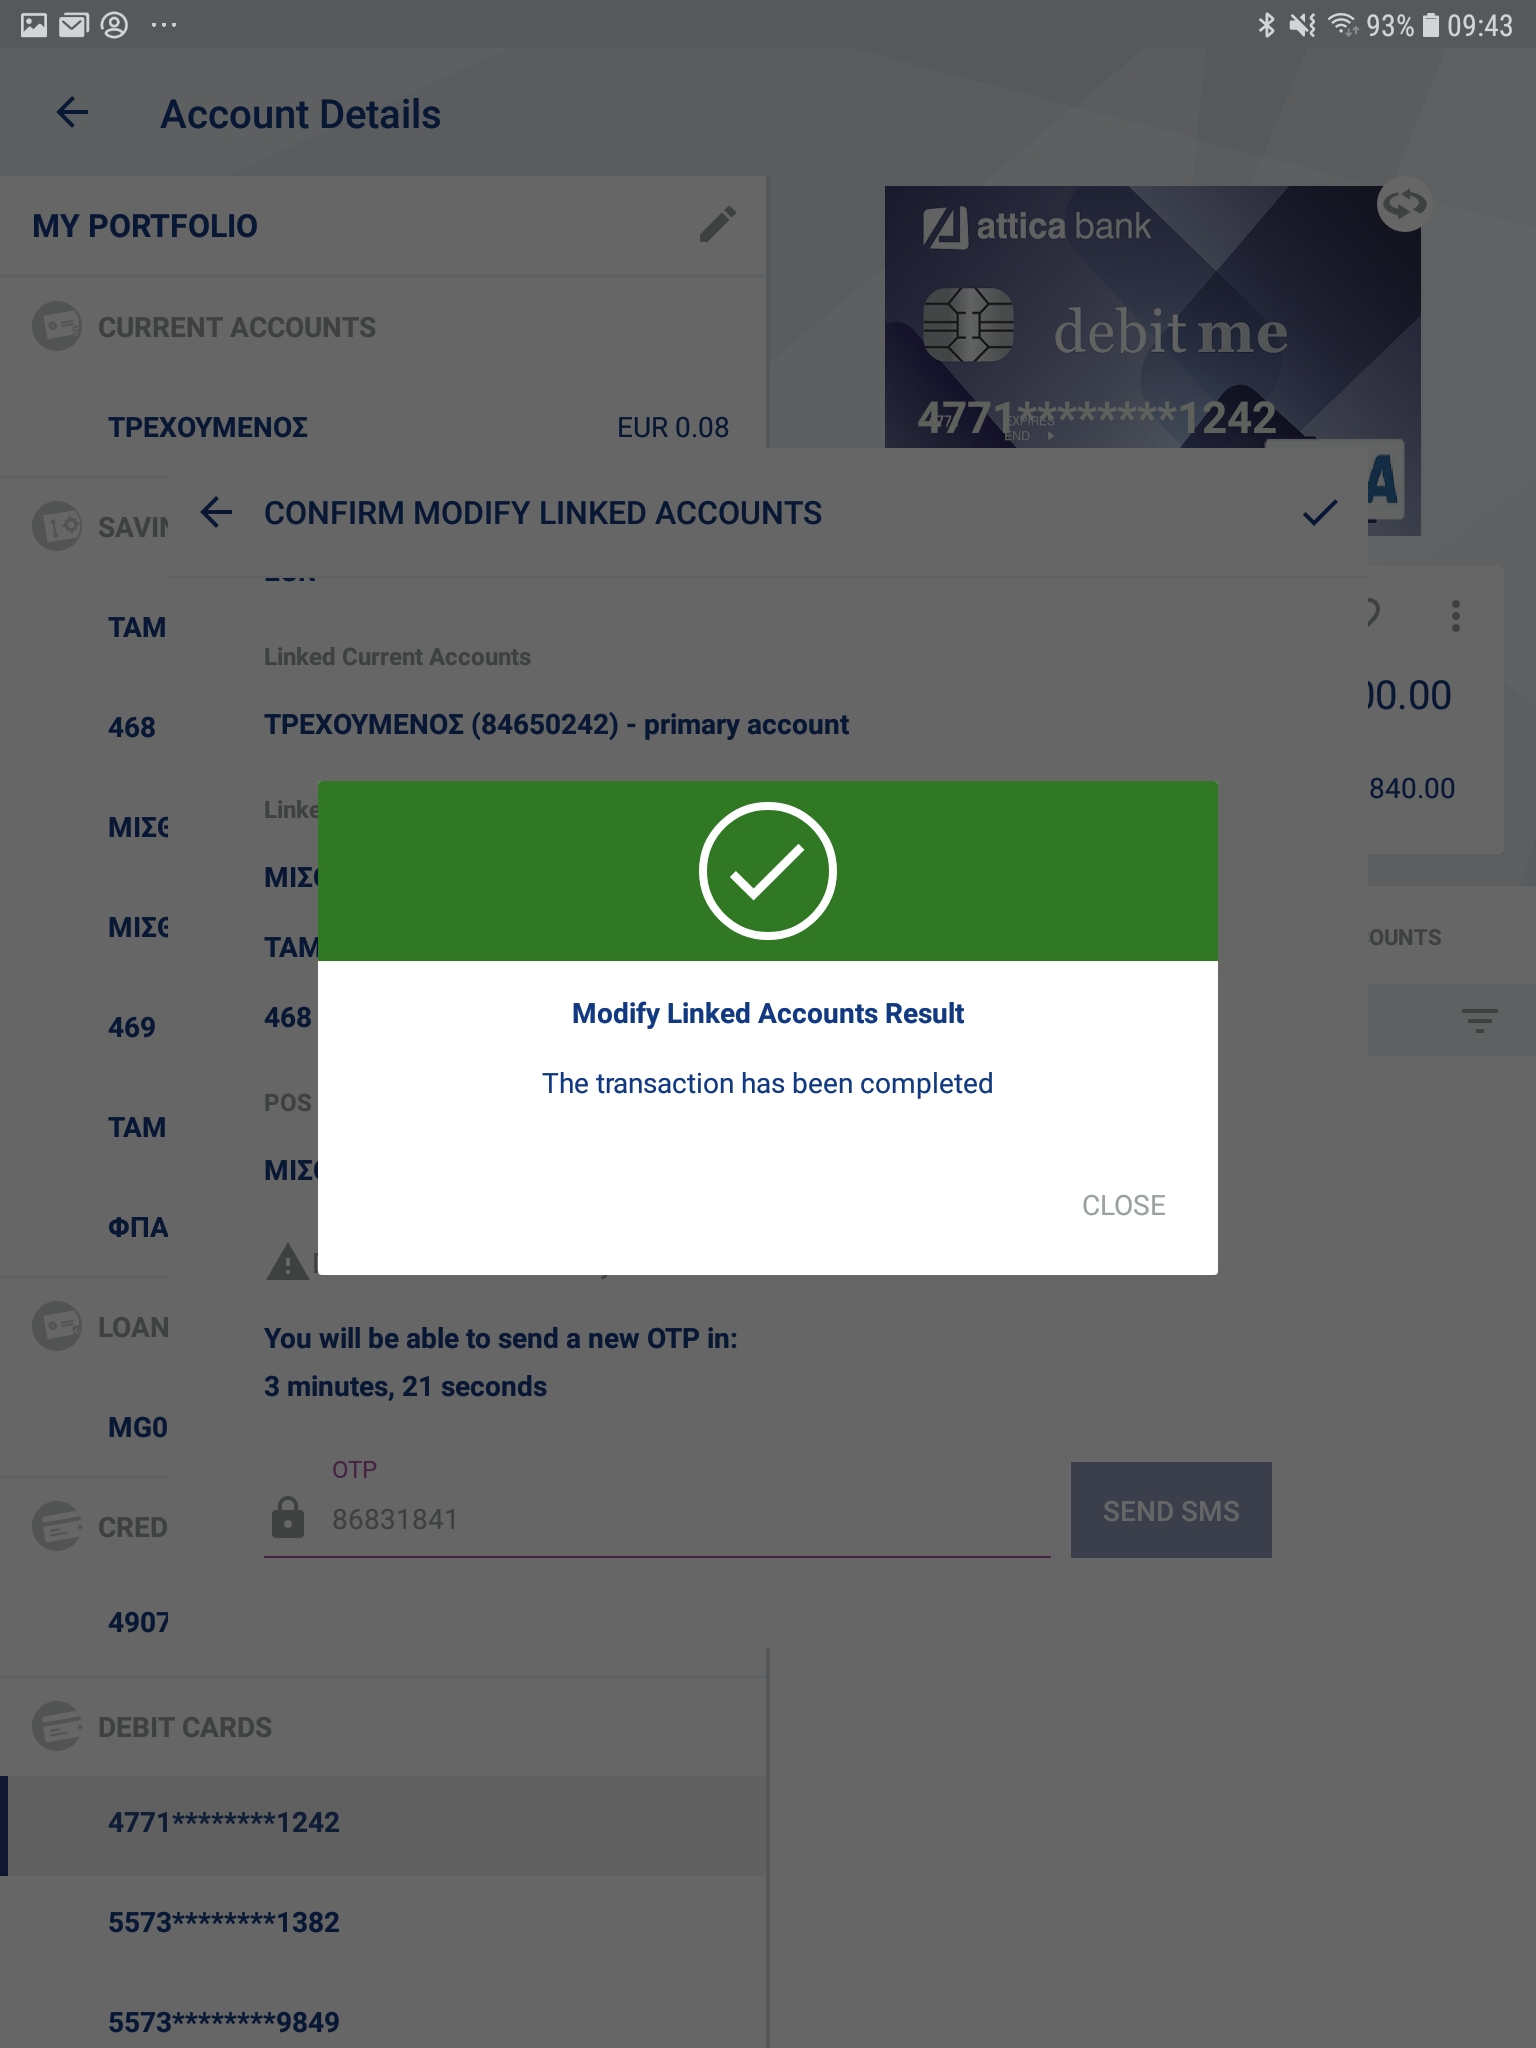
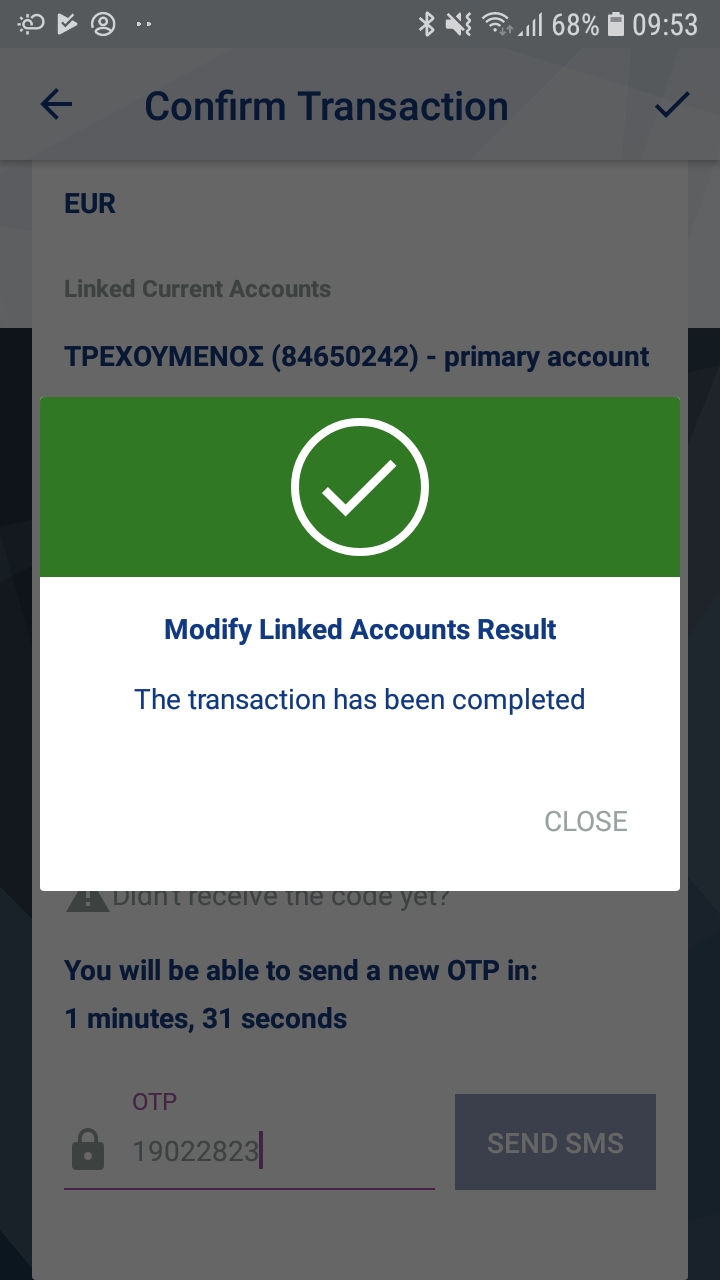
You should choose one of them and then press ![]() from the upper right of the screen. Next, you are directed to ‘Confirm Transaction’ screen where you are requested to insert a one-time password via SMS or Hardware Token device.
from the upper right of the screen. Next, you are directed to ‘Confirm Transaction’ screen where you are requested to insert a one-time password via SMS or Hardware Token device.
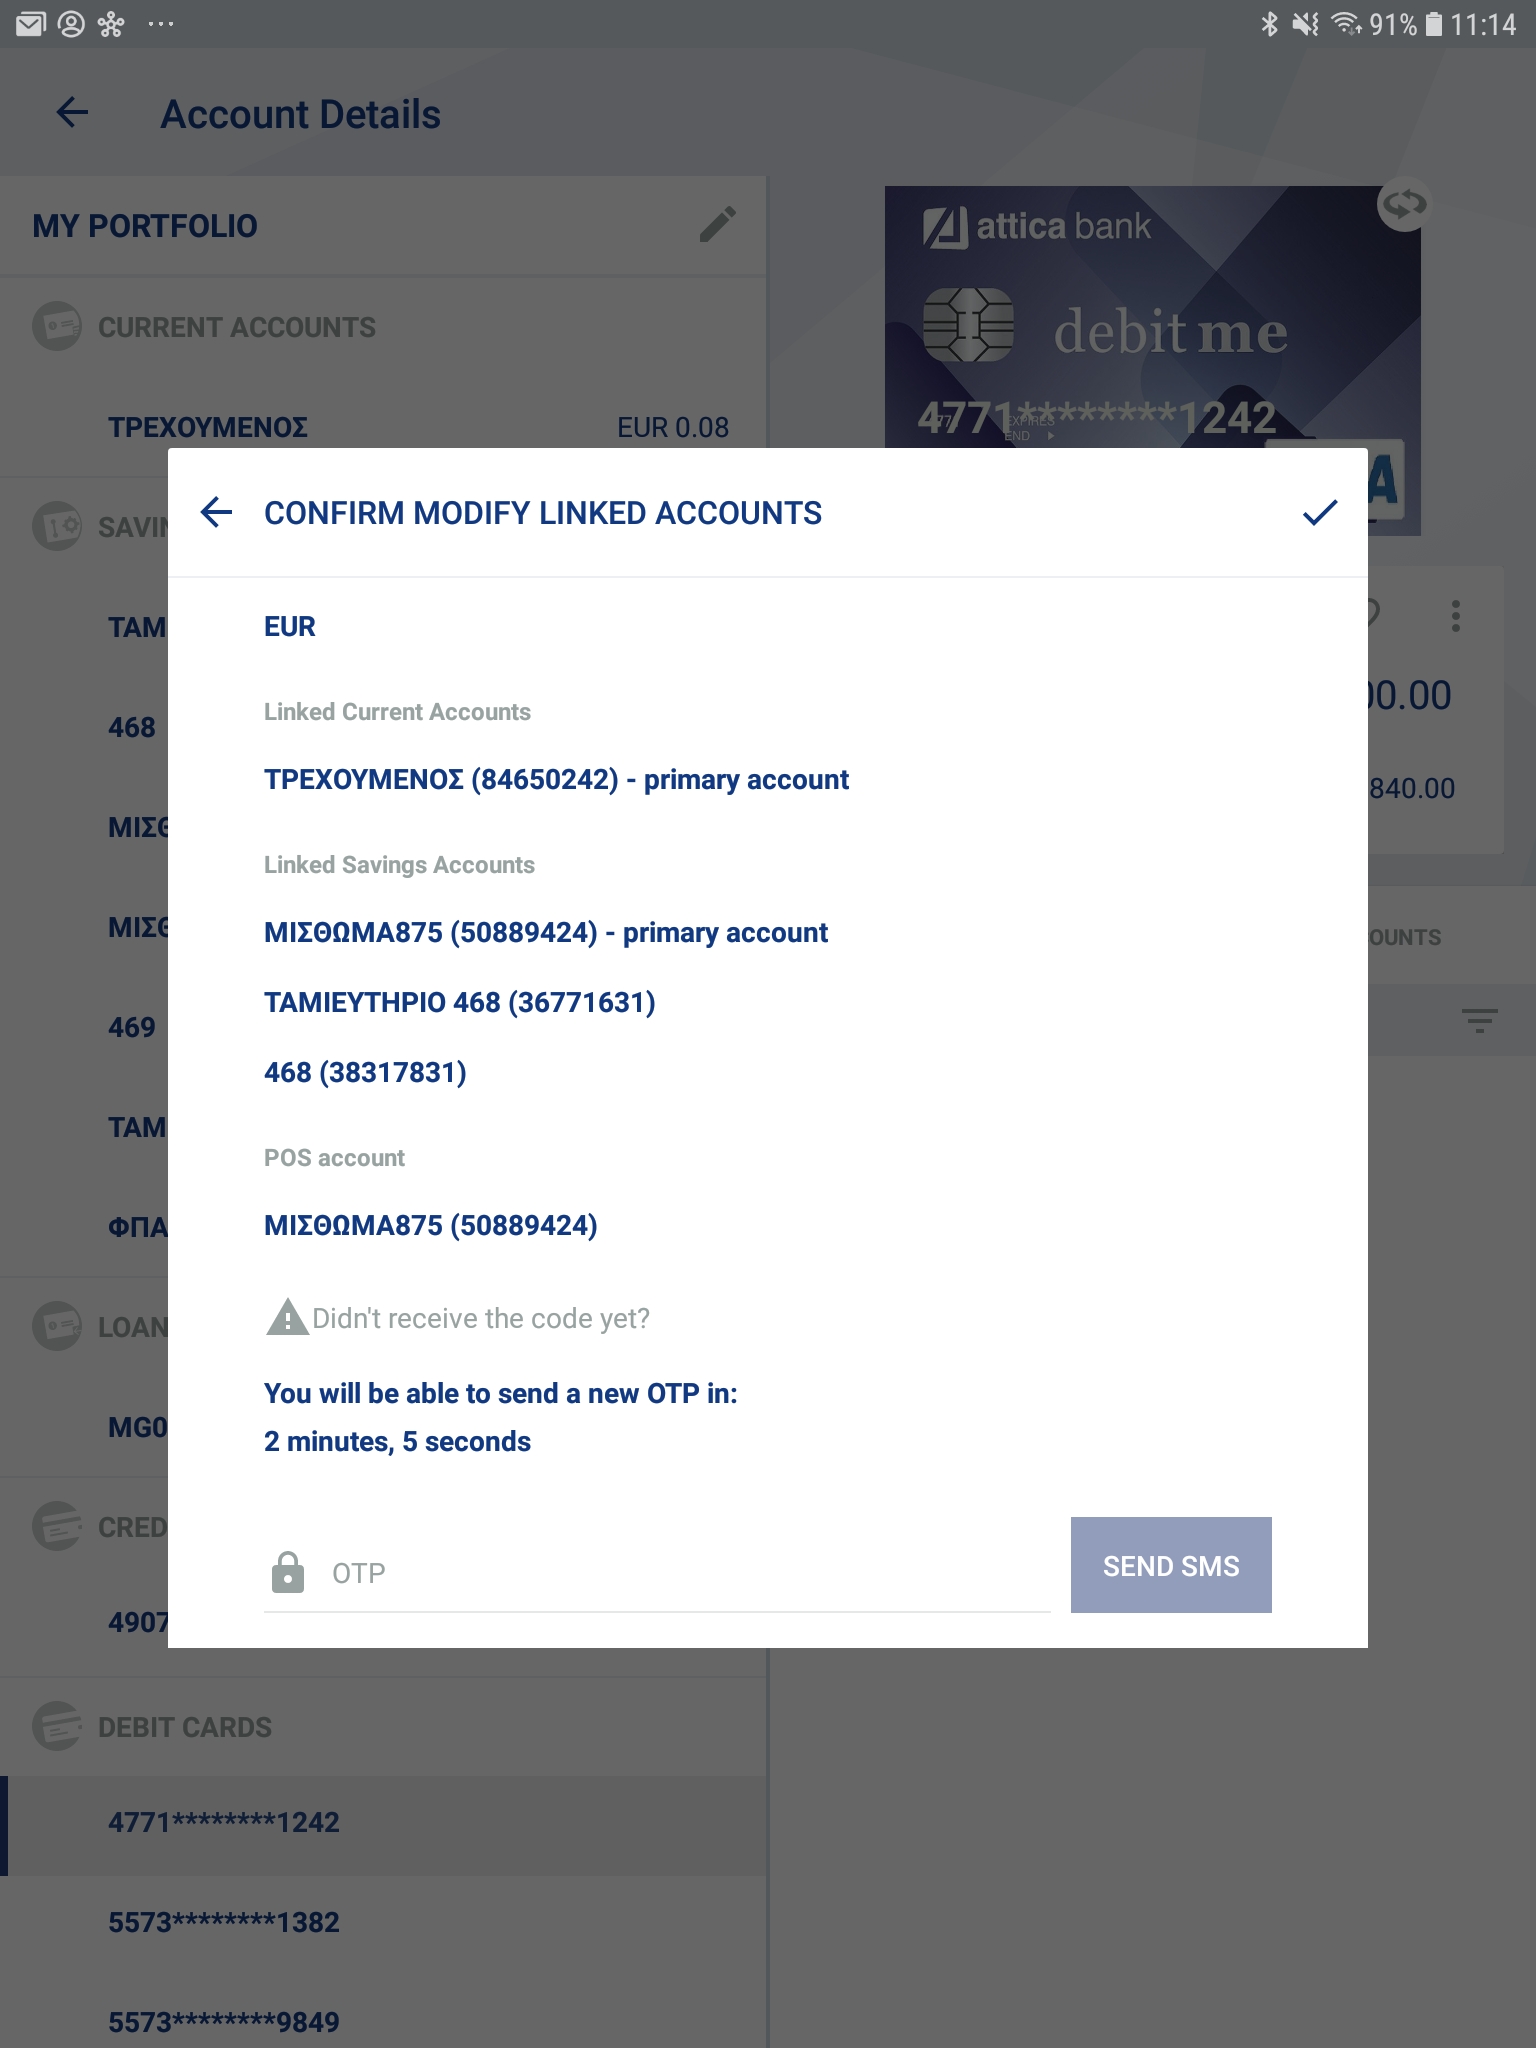
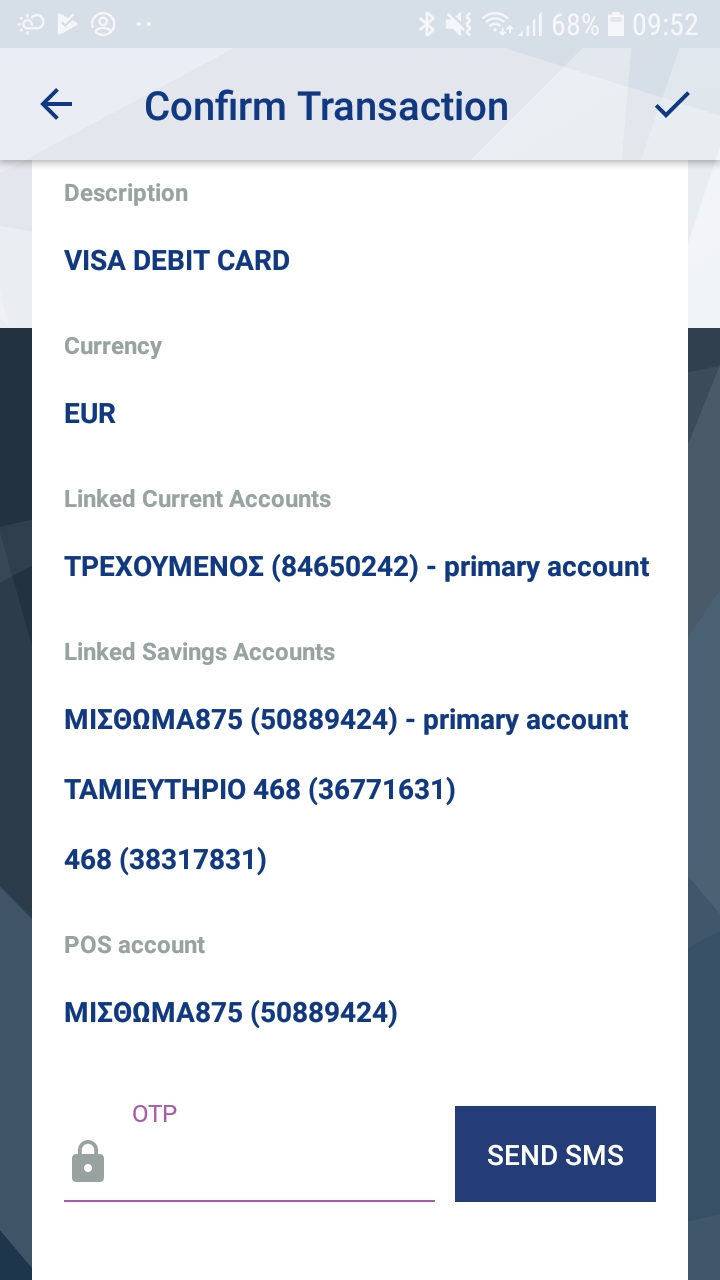
Once you insert the one-time password, select √ from the upper right of the screen for Confirmation. You will get the relevant message that the transaction has been completed.
Credit Cards
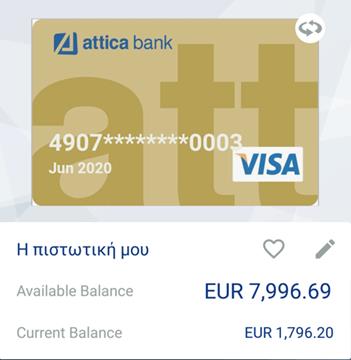
When selecting a Credit Card, the following information is shown:
- the Card Number
- the Expiration Date
- the Available Balance and
- the Ledger Balance
In addition, by rotating the card ![]() , the following information is also available:
, the following information is also available:
- the Product Name
- the Cardholder name
- the Status
- the Add-on Card Number
- the corresponding Name/Surname and
- the Credit Limit


Under the card’s information section, there are 4 tabs:
- Transactions, which consists of your card’s transaction history. By default, all the transactions carried out with this Credit Card after the issuance of the last card’s statement are shown.
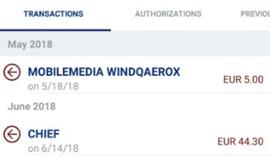 For each transaction, if you click on it, further information is available.
- Authorizations, which consist of all the credit card’s accrued debits that have not been cleared
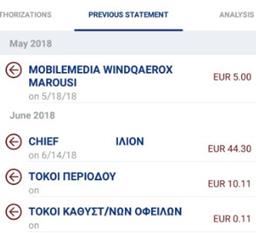
- Previous Statement, which corresponds to the transactions that are included in the last issued statement of the card.
- Analysis of the details of the credit card, which consist of:
- the Credit Limit
- the Last Statement Balance
- the Minimum Payment
- the Payment due on
- the Last Payment Amount
- the Last Statement Issued Date and
- the Total amount of installments
Prepaid Cards
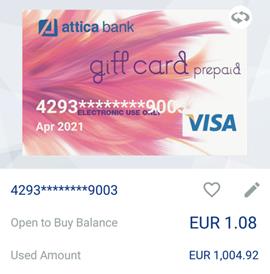
On the first page of the Prepaid Cards, the following information is shown:
- the Card Number
- the Expiry Date
- the Current Balance and
- the Used Amount
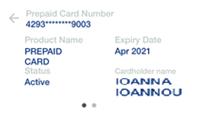
By rotating the card ![]() , additional information is shown:
, additional information is shown:
- the Product Name
- the Cardholder name
- the Status and
- the Limit
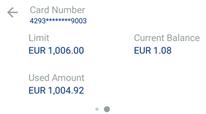
Under the aforementioned information, there are 2 tabs:
- Transactions, which consists of your card’s Transaction History. From the predefined settings of the application, all the transactions made by that card are shown.
For each transaction further information is shown, if you click on it.
- Authorizations, which consists all the credit card’s accrued debits that have not yet been cleared.
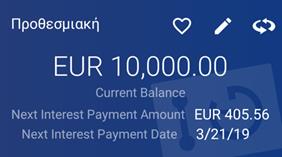
Time Accounts
By clicking on a Time account, the following information is shown:
- the Ledger Balance
- the Next Interest Payment Amount and
- the Next Interest Payment Date
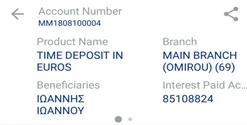
By selecting the ![]() icon on the right corner of the blue area, the card is rotated and more information of the account is shown such as:
icon on the right corner of the blue area, the card is rotated and more information of the account is shown such as:
- the Account Number
- the Product Name
- the Branch
- the Beneficiary
- the Maturity Date
- the Date Opened and
- the Interest Amount

In addition, there is the option to send the account’s IBAN via email or any other media supported by selecting the  icon.
icon.
Under the account’s information section, there is 1 tab:
- The Analysis of the time account, which consist of
- the Ledger Balance
- the Interest Rate
- the Next Payment Amount and
- the Next Payment Date
Insurance Products
Vehicle Insurance
By selecting any Vehicle Insurance, the following information is shown:
- The Insurance Premium
- The Contract Number
- The Expiry Date of the Contract

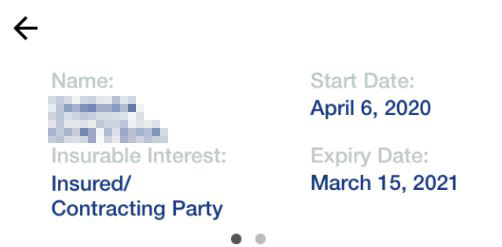
By selecting the ![]() icon on the right corner of the Blue card, more information on the vehicle’s insurance details is shown such as:
icon on the right corner of the Blue card, more information on the vehicle’s insurance details is shown such as:
- The Name and Surname of the contract owner
- The Insurable Interest which describes the relationship between the Customer and the contract and can get the following values: Contracting party, Insured or Insured / Contracting party.
- The Start Date of the Contract
- The Expiry Date of the Contract
- The Vehicle Type
- The Vehicle Registration Number
 |
 |
Home Insurance
By selecting any Home Insurance, the following information is shown:
- The Insurance Premium
- The Contract Number
- The Expiry Date of the Contract
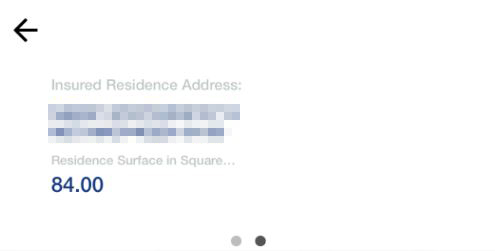
By selecting the ![]() icon on the right corner of the Blue card, more information on the home’s insurance details is shown such as:
icon on the right corner of the Blue card, more information on the home’s insurance details is shown such as:
- The Name and Surname of the contract owner
- The Insurable Interest which describes the relationship between the Customer and the contract and can get the following values: Contracting party, Insured or Insured / Contracting party.
- The Start Date of the Contract
- The Expiry Date of the Contract
- The Insured Residence Address
- The Residence Surface in Square Meters
 |
 |
Transfers/Payments
About
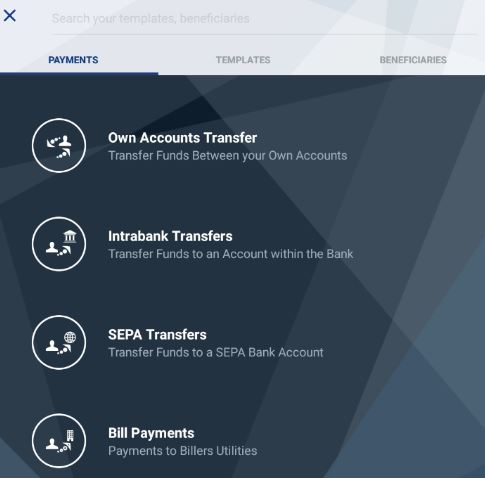
In order to carry out a monetary transaction, select the ![]() icon from the application’s main dashboard from the tablet’s or smartphone’s top screen so as to be redirected to the transfers screen. The transfers’ screen consists of a search bar and an icons’ row, where each icon corresponds to a particular transaction type.
icon from the application’s main dashboard from the tablet’s or smartphone’s top screen so as to be redirected to the transfers screen. The transfers’ screen consists of a search bar and an icons’ row, where each icon corresponds to a particular transaction type.
Alternatively, you can carry out a particular transaction on both devices by swiping right or left on a particular account and by swiping right on a particular card from the application’s main dashboard.
By swiping right*, all the possible transactions to be credited to your particular account or card appear on the screen as shown below:


In the same way, by swiping left*, all the possible transactions to be debited to your particular account appear on the screen:

*Swipe left or right a particular account: Swipe is defined as slide my finger off the screen. In that case, swipe is defined as “sliding my finger off an account by moving it on the left or on the right”.
Predefined Templates
Predefined templates ![]() is the first icon on the Transfers’ screen icons row. By selecting it, a screen opens that contains the “Templates” and the “Beneficiaries”. In addition, at the top of the screen there is a search filter bar that can be used to find a specific Template, or a specific Beneficiary in an easy and quick way.
is the first icon on the Transfers’ screen icons row. By selecting it, a screen opens that contains the “Templates” and the “Beneficiaries”. In addition, at the top of the screen there is a search filter bar that can be used to find a specific Template, or a specific Beneficiary in an easy and quick way.
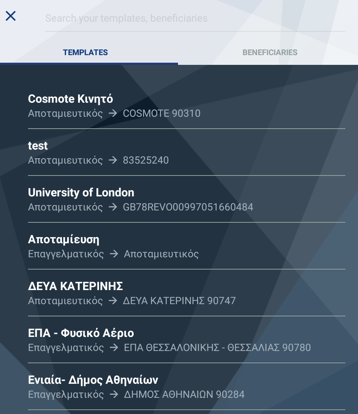
Templates are created via e-banking from the “Manage Templates” and “Manage Beneficiaries” menus.
Attica Mobile gives the User the option to save a template when a particular transaction (transfer or payment) is carried out.
Own Accounts Transfer
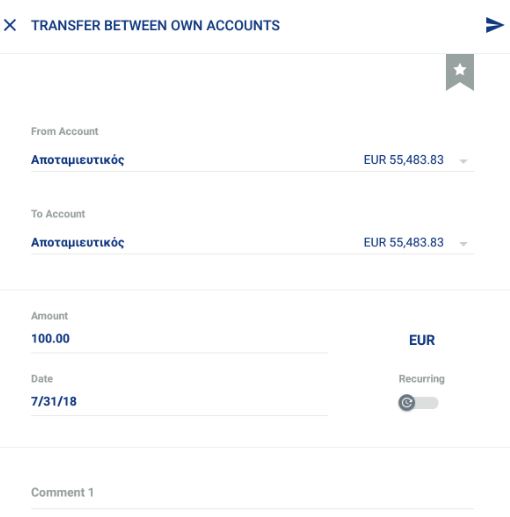
In order to transfer funds to one of your own accounts, select the “Own Account Transfer” ![]() . Then select the “From Account” and “To Account”, enter the “Date” and the “Amount” and select whether this is going to be a single or a recurring transfer. In addition, you may add any “Comments”. Select “Submit” and then “Confirm”.
. Then select the “From Account” and “To Account”, enter the “Date” and the “Amount” and select whether this is going to be a single or a recurring transfer. In addition, you may add any “Comments”. Select “Submit” and then “Confirm”.
After the transfer is completed, there is a “Cyber Receipt” available in a PDF format for downloading to your device. Furthermore, the receipt can be sent through any application supported by the device by retrieving the file from the location it has been saved.
Finally, there is the option to “Save this transfer as Template”.
In case the transaction fails to be completed, an error message appears on the screen, containing the reasons for this failure.
Intrabank Transfers

In order to transfer funds to a third party’s Attica Bank account, select “Intrabank Transfers” ![]() . Select the “From Account” from the dropdown list and either a “Beneficiary”, if you have already created one on e-banking, or, otherwise, enter the Beneficiary’s account. Subsequently, enter the “Amount”, the “Date” and select whether this is going to be a single or a recurring transfer. In addition, you may add any “Comments”. Select “Submit” and then “Confirm”. You will be requested to enter a One-Time-Password (OTP) via SMS or Hardware Token.
. Select the “From Account” from the dropdown list and either a “Beneficiary”, if you have already created one on e-banking, or, otherwise, enter the Beneficiary’s account. Subsequently, enter the “Amount”, the “Date” and select whether this is going to be a single or a recurring transfer. In addition, you may add any “Comments”. Select “Submit” and then “Confirm”. You will be requested to enter a One-Time-Password (OTP) via SMS or Hardware Token.
After the transfer is completed, there is a “Cyber Receipt” available in a PDF format for downloading to your device. Furthermore, the receipt can be sent through any application supported by the device by retrieving the file from the location it has been saved.
Finally, there is the option to “Save this transfer as Template”.
In case the transaction fails to be completed, an error message appears on the screen, containing the reasons for this failure.
SEPA Transfers (Transfers trhough DIAS)
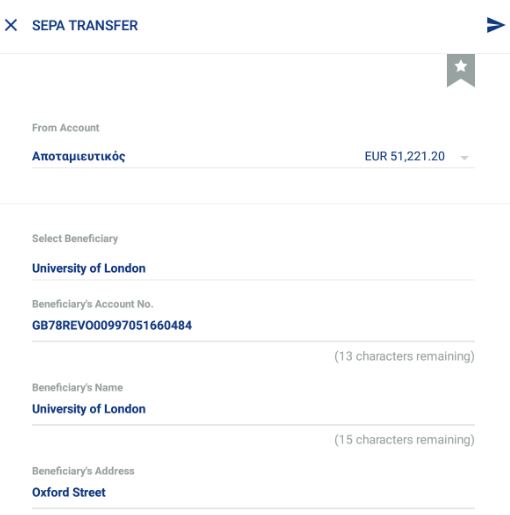
In order to transfer funds to another account of a domestic or foreign Bank, select “SEPA Transfers” ![]() . Then, select “From Account” from the dropdown list and a “Beneficiary”, if you have already created one on e-banking, or otherwise enter the Beneficiary account’s IBAN and the Beneficiary’s name. Subsequently, enter the “Amount”, the “Date” and select whether this is going to be a single or a recurring transfer. In addition, you may add the Beneficiary’s address, and any “Comments”. You must also choose whether the transfer charges will be shared or paid entirely by yourself (for transfers to a foreign bank the charges can be only shared). Select “Submit” and then “Confirm”. You will be requested to enter a One-Time-Password (OTP) via SMS or Hardware Token.
. Then, select “From Account” from the dropdown list and a “Beneficiary”, if you have already created one on e-banking, or otherwise enter the Beneficiary account’s IBAN and the Beneficiary’s name. Subsequently, enter the “Amount”, the “Date” and select whether this is going to be a single or a recurring transfer. In addition, you may add the Beneficiary’s address, and any “Comments”. You must also choose whether the transfer charges will be shared or paid entirely by yourself (for transfers to a foreign bank the charges can be only shared). Select “Submit” and then “Confirm”. You will be requested to enter a One-Time-Password (OTP) via SMS or Hardware Token.
After the transfer is completed, there is a “Cyber Receipt” available in a PDF format for downloading to your device. Furthermore, the receipt can be sent through any application supported by the device by retrieving the file from the location it has been saved.
Finally, there is the option to “Save this transfer as Template”.
In case the transaction fails to be completed, an error message appears on the screen, containing the reasons for this failure.
Bill Payments
In order to pay Bill Payments to Organizations/Companies, select “Bill Payments” ![]() .
.
Alternatively, you can carry out a particular bill payment by swiping left on a particular account from the application’s main dashboard and from the corresponding screen to select “Bill Payments”.
Select the “From Account” from the dropdown list and choose the “Biller”. On the Biller dropdown list, there is a text frame, where if you type part of the biller’s name or part of the biller’s reference number, the dropdown list is narrowed down so that you can more easily and quickly select the biller of interest. Depending on the biller, the corresponding fields to be filled in will open.
Detailed instructions regarding such payments for the following companies are given below:
- Billers with one Payment Code
- e-Paravolo Payment
- Ergosimo - Labour Ticket Payment
- TSMEDE Semester Proceeds
- TSMEDE Settlement Installment Payments with Notice
- EYDAP- Payments to EYDAP
- Teli Kykloforias
- Certified Debts- Payments to Tax Office
Billers with only one payment code
Select an account from the ”From Account” and a Biller from the “Biller” dropdown lists. Enter the “Amount”, select if this payment is going to be a “Single Transaction” or a “Standing Order”, determine the “Transaction Date” (same date or future date), enter the person’s liable for payment “Name” and the “Payment Code“ of the bill.
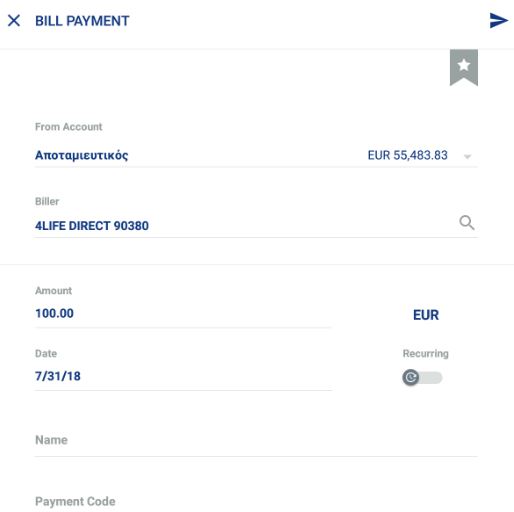
Select “Submit” and then “Confirm”. You will be requested to provide an OTP via SMS or Hardware Token.
After the payment is completed, there is a “Cyber Receipt” available in a PDF format for downloading to your device. Furthermore, the receipt can be sent through any application supported by the device by retrieving the file from the location it has been saved.
Finally, there is the option to “Save this transfer as Template”.
In case the transaction fails to be completed, an error message appears on the screen, containing the reasons for this failure.
E-paravolo
Type on the “Biller” some of the letters of the “e-paravolo” e.g. type e-p. The biller dropdown list will be narrowed accordingly so that you can select “e-paravolo” in a more easy way. Enter the “Amount”, the person’s liable for payment “Name”, the “Payment Code (Part 1)” and the “Payment Code (Part 2)”.
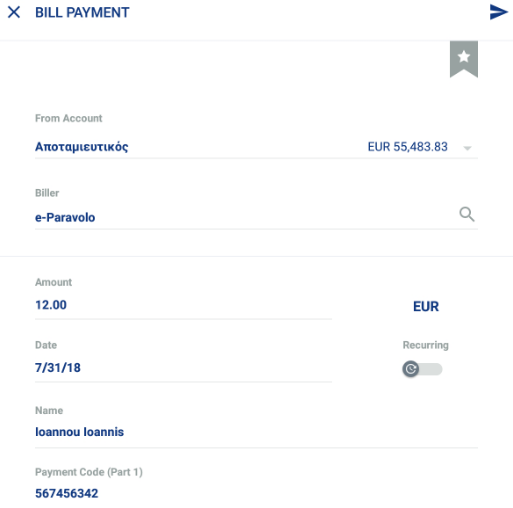
Select “Submit” and then “Confirm”. You will be requested to provide a One-Time-Password (OTP) via SMS or Hardware Token.
After the payment is completed, there is a “Cyber Receipt” available in a PDF format for downloading to your device. Furthermore, the receipt can be sent through any application supported by the device by retrieving the file from the location it has been saved.
In case the transaction fails to be completed, an error message appears on the screen, containing the reasons for this failure.
Ergosimo
Ergosimo - Labour Ticket Payment is used for a labor’s payment in some specific cases of the private sector.
In case you wish as an employer to pay the Ergosimo-Labour Ticket Payment for one of your employees, select the “From Account” and type on the “Biller” some of the first letters e.g. type erg. The biller dropdown list will be narrowed accordingly so that you can select “Ergosimo” in a more easy way. After you make your biller selection, the corresponding frames will open in order to be filled in. (Be careful: these are the official details which have been referenced to HDIKA).

Select “Submit” and then “Confirm”. You will be requested to enter a One-Time-Password (OTP) via SMS or Hardware Token.
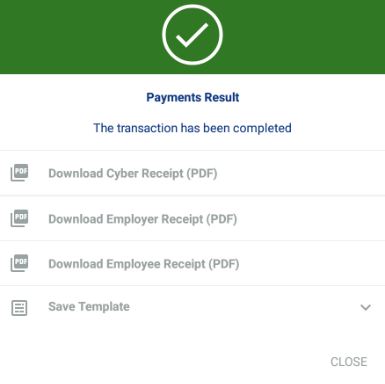
After the transfer is completed, there are three “Cyber Receipts” available in a PDF format for downloading to your device (Cyber receipt, Employer’s receipt, Employee’s receipt). Furthermore, the receipt can be sent through any application supported by the device by retrieving the file from the location it has been saved.
Finally, there is the option to “Save this transfer as Template”.
In case the transaction fails to be completed, an error message appears on the screen, containing the reasons for this failure.
TSMEDE Semester Proceeds
Type on the “Biller” some of the letters of the “TSMEDE Semester proceeds” e.g. TSM. The biller dropdown list will be narrowed accordingly so that you can select “TSMEDE Semester proceeds” in a more easy way. After you make your biller selection, the corresponding frames will open in order to be filled in. Enter the “Notice Number”.
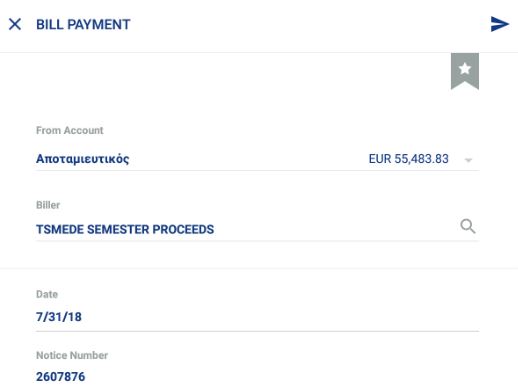
Select “Submit”. And then “Confirm”. You will be requested to enter a One-Time-Password (OTP) via SMS or Hardware Token.
After the transfer is completed, there is a “Cyber Receipt” available in a PDF format for downloading to your device. Furthermore, the receipt can be sent through any application supported by the device by retrieving the file from the location it has been saved.
In case the transaction fails to be completed, an error message appears on the screen, containing the reasons for this failure.
TSMEDE Settlement Installment Payments
Type on the “Biller” some of the letters of the “TSMEDE Settlement Payments” e.g. TSM. The biller dropdown list will be narrowed accordingly so that you can select “TSMEDE Settlement Installments Payments with Notice” in a more easy way. After you make your biller selection, the corresponding frames will open in order to be filled in. Enter the “Notice Number”.
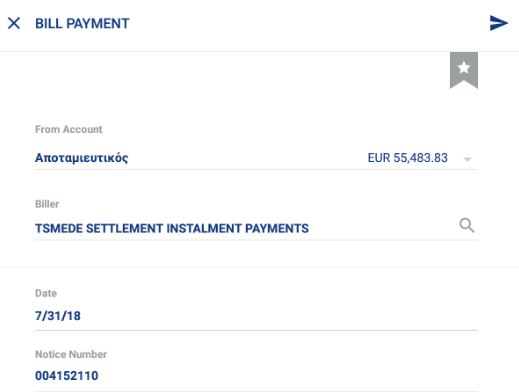
Select “Submit”. You will be requested to enter a One-Time-Password (OTP) via SMS or Hardware Token. Click on “Confirm”.
After the payment is completed, there is a “Cyber Receipt” available in a PDF format for downloading to your device. Furthermore, the receipt can be sent through any application supported by the device by retrieving the file from the location it has been saved.
In case the transaction fails to be completed, an error message appears on the screen, containing the reasons for this failure.
EYDAP
Type some of the letters of “EYDAP” e.g. EYD. The biller dropdown list will be narrowed accordingly so that you can select “EYDAP – Payments to EYDAP” in a more easy way. Then enter the “Amount”, the “Name”, the “Voucher Number” and the “Expiration Date” as referenced on the EYDAP bill.
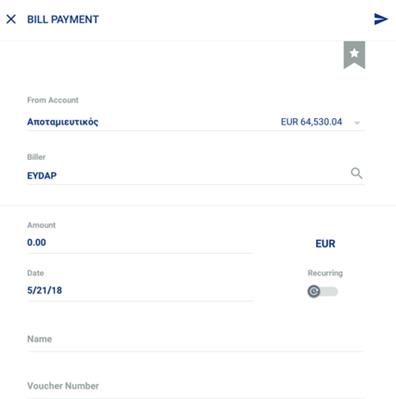
Select “Submit”. You will be requested to provide an OTP via SMS or Hardware Token. Then select “Confirm”.
Select “Submit”. You will be requested to enter a One-Time-Password (OTP) via SMS or Hardware Token. Then, select “Confirm”.
After the payment is completed, there is a “Cyber Receipt” available in a PDF format for downloading to your device. Furthermore, the receipt can be sent through any application supported by the device by retrieving the file from the location it has been saved.
In case the transaction fails to be completed, an error message appears on the screen, containing the reasons for this failure.
Teli Kykloforias
Type on the “Biller” some of the letters of the “TELI KYKLOFORIAS” e.g. Teli. The biller dropdown list will be narrowed accordingly so that you can select “Teli Kykloforias” in a more easy way. Enter the “Amount”, the “Name”, the “Transaction ID Part 1”, the “Transaction ID Part 2”, the “VAT No” and the “Plate Number”, as referenced on TAXISNET official document.
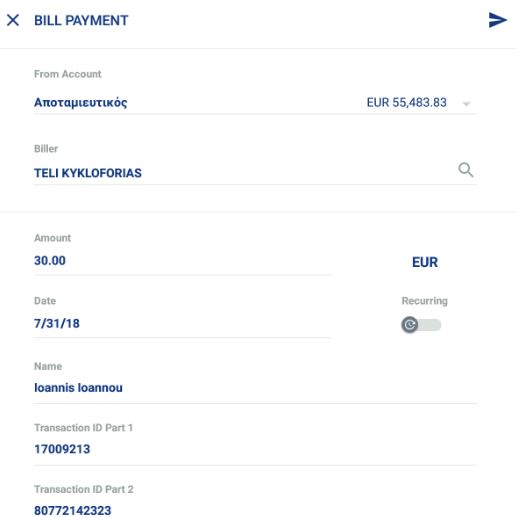
Select “Submit”. You will be requested to enter a One-Time-Password (OTP) via SMS or Hardware Token. Then, click “Confirm”.
After the payment is completed, there is a “Cyber Receipt” available in a PDF format for downloading to your device. Furthermore, the receipt can be sent through any application supported by the device by retrieving the file from the location it has been saved.
In case the transaction fails to be completed, an error message appears on the screen, containing the reasons for this failure.
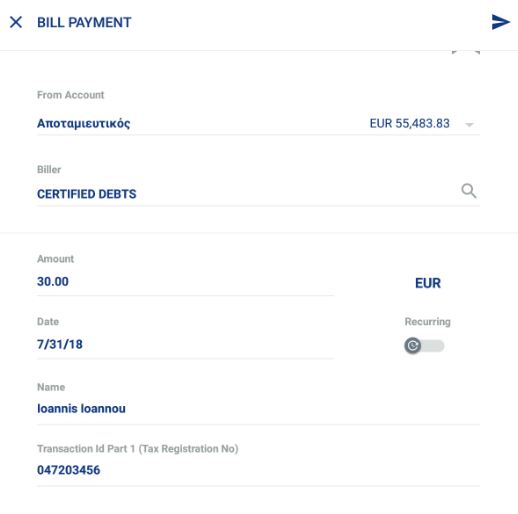
Certified Debts
Type on the “Biller” some of the letters of the “Certified debts” e.g. Cert. The biller dropdown list will be narrowed accordingly so that you can select “Certified Debts – Payments to Tax Office” in a more easy way. Select if this payment is going to be a “Single Transaction” or a “Standing Order”, determine the “Transaction Date” (same date or future date), Enter the “Amount”, the “Name”, the “Transaction ID Part 1 (Tax Registration No)”, the” Transaction ID Part 2” and the “Transaction ID Part 3” as referenced on TAXISNET official document.
Select “Submit”. You will be requested to enter a One-Time-Password (OTP) via SMS or Hardware Token.
After the payment is completed, there is a “Cyber Receipt” available in a PDF format for downloading to your device. Furthermore, the receipt can be sent through any application supported by the device by retrieving the file from the location it has been saved.
In case the transaction fails to be completed, an error message appears on the screen, containing the reasons for this failure.
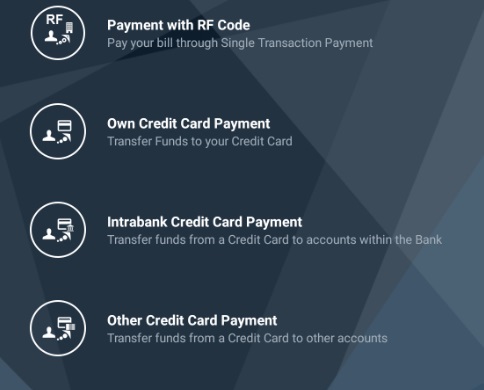
Payment with RF Code
The Payment with RF Code is a new bill payment method to utility companies where you do not have to search for the biller as for the usual bill payment. Click on the ![]() icon. You only need to enter the 25 – digit Payment Code which always starts with the letters RF and contains all information related to the utility company.
icon. You only need to enter the 25 – digit Payment Code which always starts with the letters RF and contains all information related to the utility company.
When you possess such a bill (e.g. EFKA), you can select the Single Transaction payment and enter the Amount, the Debtor’s Full Name and the Payment Code.
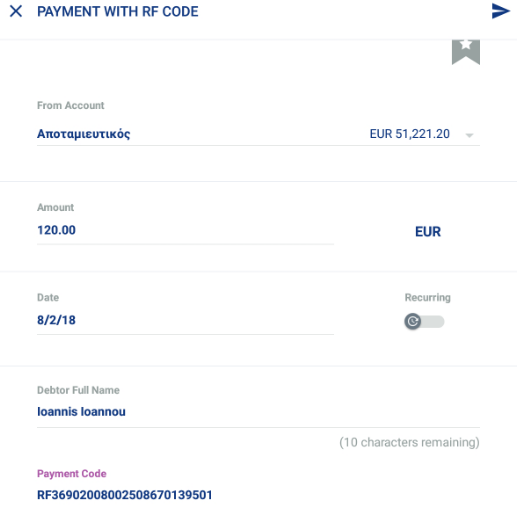
You can also select whether this is going to be a single or a recurring transaction, as of the rest of the transaction payments.
Select “Submit” and you will be navigated to the “Confirm Single Transaction Payment” screen where the full details of the transaction payment are shown.
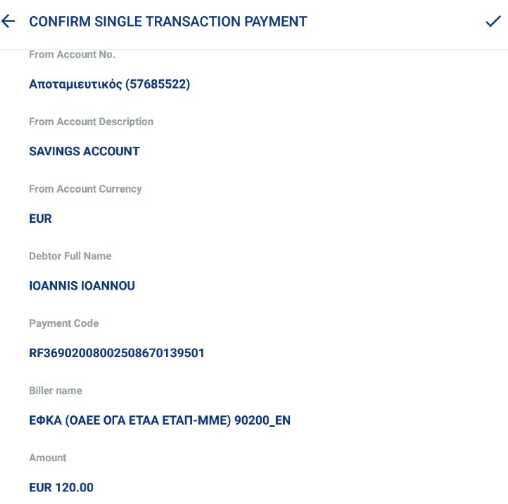
This information also contains the payee’s full name as well as the rest of the transaction information.
In order for the transaction to be completed, a One-Time-Password (OTP) will be requested either via SMS or Hardware Token. Enter the One-Time-Password (OTP) and select “Confirm”.
After the transfer is completed, there is a “Cyber Receipt” available in a PDF format for downloading to your device. Furthermore, the receipt can be sent through any application supported by the device by retrieving the file from the location it has been saved.
Finally, there is the option to “Save this transfer as Template”.
In case the transaction fails to be completed, an error message appears on the screen, containing the reasons for this failure.
Card Payments
To pay your Credit Card(s) / Open Loan(s) or to load your Prepaid Card(s), from the icons’ row on the Transfers’ screen, select the ![]() icon and from the “Card Payments” menu, choose the corresponding transaction option.
icon and from the “Card Payments” menu, choose the corresponding transaction option.
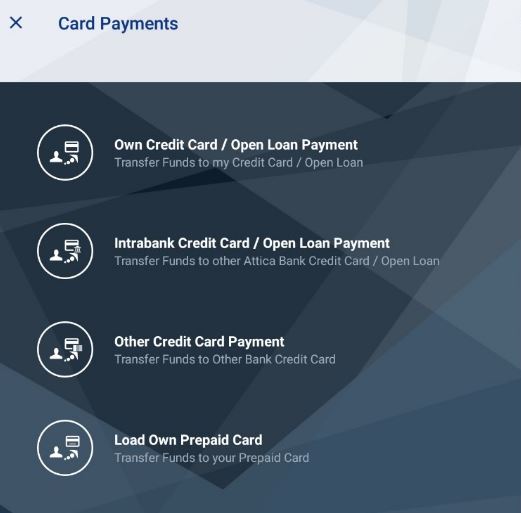
In addition, another way to pay or load one of your cards / open loans is to swipe right on the credit card / open loan frame or the prepaid card frame on the application’s main dashboard.

Own Credit Card / Open Loan Payment
Select the “From Amount”, the “Credit Card / Open Loan” and fill in the “Amount”. If you have only one credit card / open loan, the frame will be automatically pre-filled. Own credit card / open loan payment can only be a same date transaction. Subsequently click on “Submit” and then on “Confirm” in order for your transaction to be completed. You don’t need to enter a One-Time-Password (OTP).

After the payment is completed, there is a “Cyber Receipt” available in a PDF format for downloading to your device. Furthermore, the receipt can be sent through any application supported by the device by retrieving the file from the location it has been saved.
Intrabank Credit Card / Open Loan Payment
Select the “From Amount”, the “Credit Card / Open Loan” and fill in the “Amount”. Intrabank credit card / open loan payment can only be a same date transaction. Subsequently click on “Submit” and then on “Confirm” in order the transaction to be completed. You will be requested to enter a One-Time-Password (OTP) via SMS or Hardware Token.
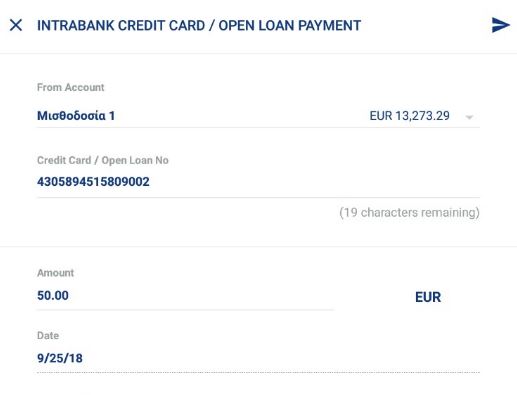
After the payment is completed, there is a “Cyber Receipt” available in a PDF format for downloading to your device. Furthermore, the receipt can be sent through any application supported by the device by retrieving the file from the location it has been saved.
Other Credit Card Payment
Select the “From Amount” and the “Bank” from the respective dropdown lists. Fill in the “Beneficiary’s Credit Card No.” and the “Amount”. Other credit card payment can only be a same date transaction. Subsequently click on “Submit” and then on “Confirm” in order for the payment to be completed. You will be requested to enter a One-Time-Password (OTP) via SMS or Hardware Token.
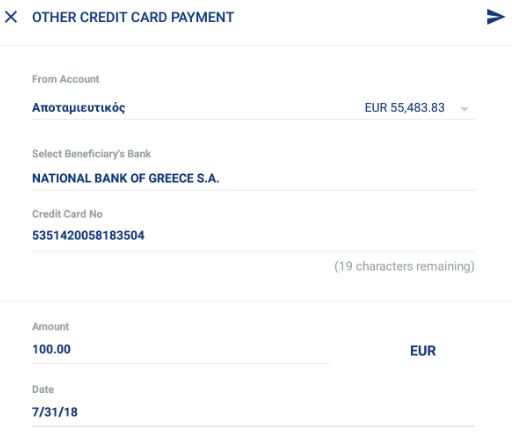
After the payment is completed, there is a “Cyber Receipt” available in a PDF format for downloading to your device. Furthermore, the receipt can be sent through any application supported by the device by retrieving the file from the location it has been saved.
Load Own Prepaid
Select the “From Amount” and the “Prepaid Card” from the dropdown lists. Fill in the “Amount”. Load pre-paid card can only be a same date transaction. If you have only one prepaid card, the frame will be automatically pre-filled. Subsequently click “Submit” and then “Confirm” in order the transaction to be completed. You will be requested to enter a One-Time-Password (OTP) via SMS or Hardware Token.
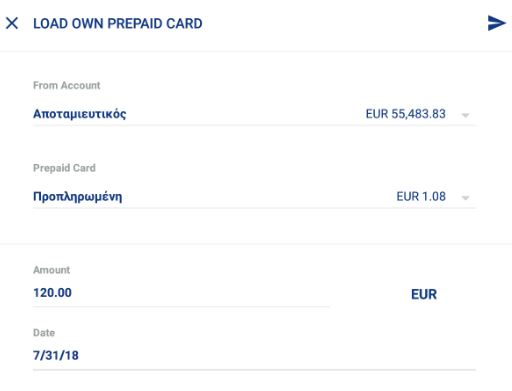
After the transfer is completed, there is a “Cyber Receipt” available in a PDF format for downloading to your device. Furthermore, the receipt can be sent through any application supported by the device by retrieving the file from the location it has been saved.
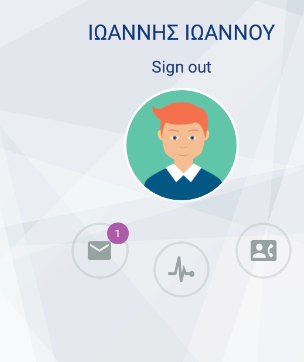
User
In order to have access to the User menu, select the ![]() icon either from the application’s header on a tablet or a smartphone.
icon either from the application’s header on a tablet or a smartphone.
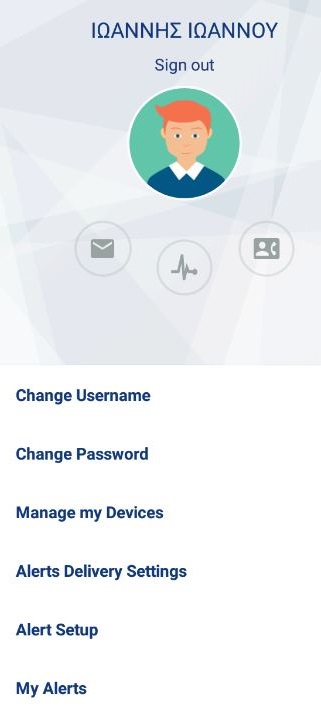
As it is shown on the above screen, there are three (3) icons under the user:
- the “Messages”
- the “Online Activity” and
- the “Contact Information”
Through the User menu, the User can:
- Change his Username and Password
- Manage his devices
- Set his Alert delivery Settings
Change Username
To change Username, select “Change Username”. The Username entered must be between 8 to 20 characters and symbols, and contain at least two (2) of the following:
- lowercase letter
- number and
- special Symbol: @, $, ^, =
Fill in the “New Username” on the screen that is displayed and select “Change Username”. Subsequently, select “Confirm” in order for your changes to be saved.
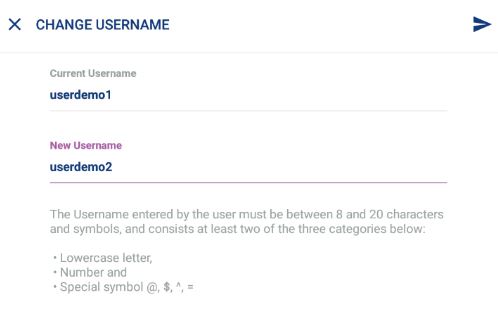
As a last point, you will get notified by email and SMS that your Username has been successfully changed.
Change Password
To change Password, select “Change Password”.
The Password entered must be between 8 and 20 characters, containing:
- uppercase letter
- lowercase letter
- number
- special symbol: @,#,$,%,+,=,^
In addition, it must not contain any sequence of numbers or part of the Username.
Fill in the “Old Password”, “New Password” and “Repeat New Password”. Then select “Change Password”. Subsequently, click “Confirm” in order your changes to be saved.
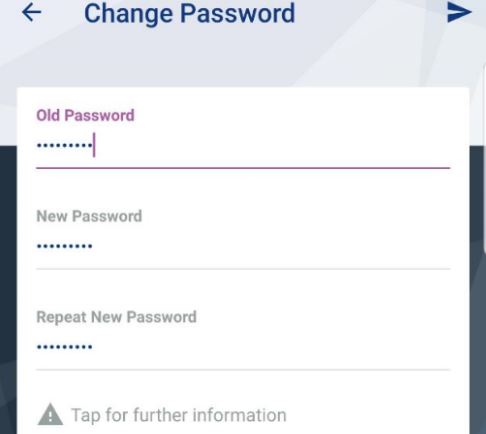
As a last point, you will get notified by email and SMS that your username has been successfully changed.
The new password will be in force for 6 months.
Manage my Devices
Through Attica Mobile, you can register your device in order to be able to have an easier and quicker access to the application via your iPad or iPhone by using the “Remember me” login features.
By selecting “Manage my devices”, you are given the option to “Register current device” and then, to select your login process of your preference.

You can register your device, in order to have an easier and quicker login access to the application. When you register your device, you install an avatar thus, you can use the “Remember me” log in features. These are:
- The use of a PIN. In order to log in, you select the user avatar and then you fill in the PIN. The PIN is set by the user when his device is registered to the application. In that case, an OTP will be requested via an SMS or a Hardware Token.
- The use of a Fingerprint. You select the user avatar and you can access the application through your fingerprint (if this feature is supported by the device you use). There are specific iOS and Android devices that can support this feature.
- The use of a PIN or In that case, you can store a fingerprint and select a PIN so that you can have the option to choose between the 2 options when logging in to Attica Mobile.
- The use of a Fingerprint or device PIN. In that case, you can store your fingerprint so that you can use it in order to log in to Attica Mobile or can use the device PIN you use in order to unlock your device.
- The use of your In that case, you can log in to the application by entering the username and password you use when you log in to Attica e-banking.
Select your login process of preference and click on “Submit”. Subsequently, you will be requested to enter a One-Time-Password (OTP) via SMS or Hardware Token.
Then, click on “Confirm”.
Alerts Delivery Settings & Alert Setup
For your safety, Attica Bank sends you mandatory alert notifications every time you change your Credentials. In addition, you are given the option to select if you would like to get notified whenever you carry out a monetary transaction via SMS and/or email.
By selecting “Alerts Delivery Settings”, you are directed to the following form which contains the Delivery Settings.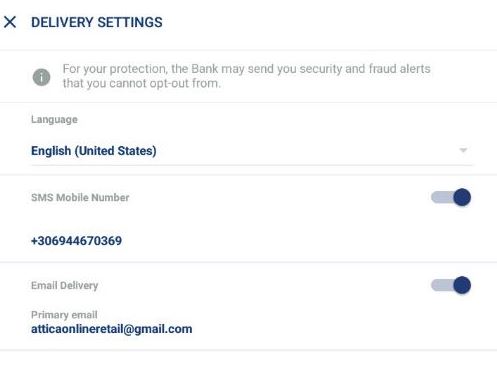
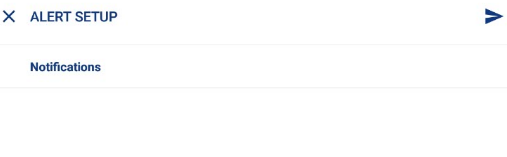
Select “Notifications” and you will be directed to the following form:
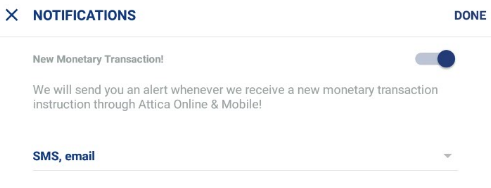
By tapping on “SMS, email”, you are directed to Delivery Options as shown below.

You will be asked for one-time-password SMS or via hardware token device.
Avatar Icons
User Icon
By clicking on the User icon ![]() , you are given the option to upload a photo to replace the empty avatar. You have the option to take an instant photo (“Take photo”) or to upload an already existing photo (“Choose existing photo”). In this way, you can easily personalize and distinguish your account, especially if you login to Attica Mobile through a device that is usable by many Users.
, you are given the option to upload a photo to replace the empty avatar. You have the option to take an instant photo (“Take photo”) or to upload an already existing photo (“Choose existing photo”). In this way, you can easily personalize and distinguish your account, especially if you login to Attica Mobile through a device that is usable by many Users.
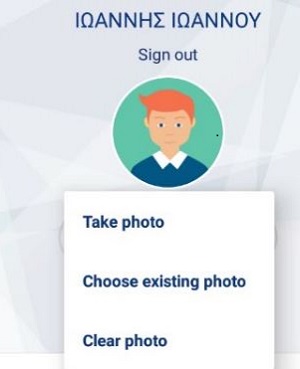
For the reverse process, you only have to click the user icon and select “Clear photo”.
Messages
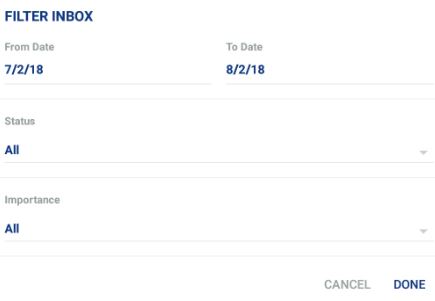
By clicking on the messages icon ![]() , you can see messages that are sent by the Bank. The display order of these messages is based on the date and time they were sent to you. In addition, using the icon
, you can see messages that are sent by the Bank. The display order of these messages is based on the date and time they were sent to you. In addition, using the icon ![]() , you can apply search filters based on the date, the availability status (all, read, unread) and the priority status (all, important, normal).
, you can apply search filters based on the date, the availability status (all, read, unread) and the priority status (all, important, normal).
Finally, by using the ![]() icon, you are given the option to delete any selected message(s). Click “Confirm”.
icon, you are given the option to delete any selected message(s). Click “Confirm”.
Online Activity
Online activity ![]() corresponds to the total of your activities/transactions while you are using Attica mobile and Attica e-banking. Under this section, you can view details of your activity history while you are logged in to one of the Attica web channels.
corresponds to the total of your activities/transactions while you are using Attica mobile and Attica e-banking. Under this section, you can view details of your activity history while you are logged in to one of the Attica web channels.
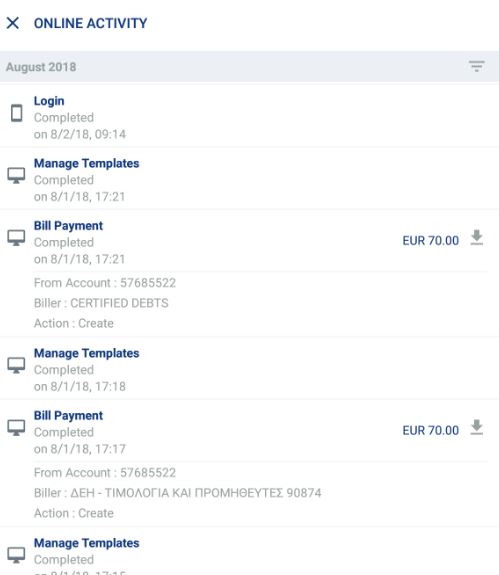
The table consists of 4 columns: the channel used in order a transaction to take place (Attica Mobile or Attica e-banking), the transaction date, the type and further details of the transaction, and its status (i.e. if the transactions were successfully completed or failed).
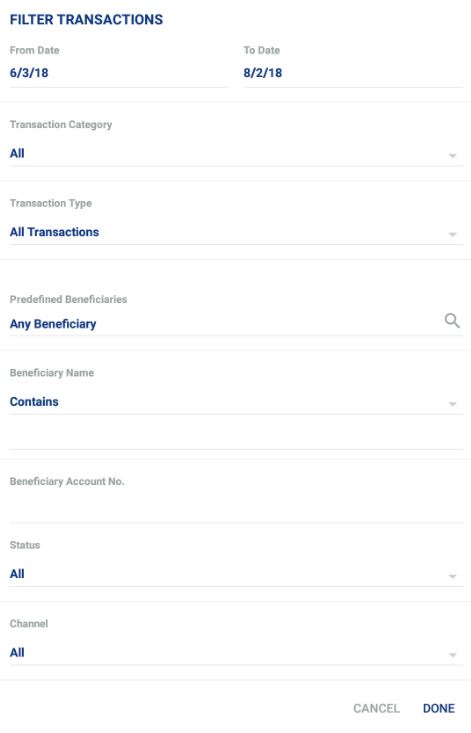
By choosing to open the filters, you can modify online activity so as to be displayed with the relevant criteria.
If next to a transaction, there is the icon ![]() , that means that for the specific transaction there is a cyber receipt which is available for viewing, saving or downloading.
, that means that for the specific transaction there is a cyber receipt which is available for viewing, saving or downloading.
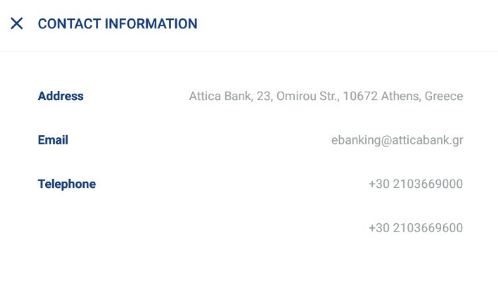
5.6.4 Contact Information
By clicking on this icon ![]() , information related to Attica Bank is available (Address, Email and Telephone number).
, information related to Attica Bank is available (Address, Email and Telephone number).
Attica Mobile shortcuts for Android
By selecting an icon through the application, the User performs specific banking transactions. The most often clicked icons are presented below:
Menu
“My Portfolio” Menu
Transfers Menu
User Menu – User Avatar

Services Menu – Logo Attica Bank
Transactions

Select Template
Transfer to own accounts

Intrabank transfers

Transfers DIAS
Bill Payments
RF Single Transaction Payment
Card payments

Block card
Information

Locator

Exchange Rates

Online Activity

Messages
Edit

Edit

Card Rotation

Download to device and Send by email

Account Selection (drag and drop)
Useful

Settings

Search Filters

Contact details

Contact